How to use Arduino with ZK-5KX dc-dc buck boost converter

SO I have this Zk -5KX dc dc buck boost convertor and I want to configure it via Arduino. I have a Arduino UNO. Now I also want to set parameter, Swtich off and ON the buck boost via arduino. Up until now I am successfull in connecting it and also reading from it But I am not able to set anything or configure anything. I am attaching the code here. Could anyone help me out in this? Thank you
include <SoftwareSerial.h>

// Define UART pins for ZK-5KX connection (adjust based on your Arduino)

// If using an Arduino Mega/Every/Leonardo, prefer using Serial1 hardware pins instead!

SoftwareSerial ZKSerial(10, 11, true); // RX, TX

// --- BATTERY CHARGING PROFILE VALUES (12V Exide Flooded Tabular) ---

const float ABS_VOLTAGE_TARGET = 14.40; // Absorption/Bulk max limit (Volts)

const float FLOAT_VOLTAGE_TARGET = 13.80; // Trickle/Float maintenance voltage (Volts)

const float MAX_SAFE_CURRENT = 4.500; // Constrained to 4.5A to protect the 80W module

const float FLOAT_TRIGGER_CURRENT = 0.500; // Drop to float when current falls below 500mA in CV mode

// --- SYSTEM STATE TIMERS ---

unsigned long lastQueryTime = 0;

const unsigned long queryInterval = 2000; // Query module every 2 seconds

enum ChargeState { BULK_ABSORPTION, FLOAT, FAULT };

ChargeState currentMode = BULK_ABSORPTION;

void setup() {

Serial.begin(9600); // Debug output to PC

ZKSerial.begin(9600); // Interface connection to ZK-5KX module

delay(1000);

Serial.println("--- Exide 6SBZ150 Smart Charger Initializing ---");

// 1. Establish structural safety limits on the module first

setChargingParameters(ABS_VOLTAGE_TARGET, MAX_SAFE_CURRENT);

// 2. Power up the charging rail

sendZKCommand("ON");

}

void loop() {

// Non-blocking telemetry evaluation loop

if (millis() - lastQueryTime >= queryInterval) {

lastQueryTime = millis();


// Request current stats from module

sendZKCommand("STATUS");


// Read and print telemetry feedback

handleTelemetry();

}

}

// Function to calculate and update parameters over UART runtime

void setChargingParameters(float voltage, float current) {

char vCmd[16];

char iCmd[16];

// Format variables cleanly to match ZK ASCII requirements (e.g. V14.40)

dtostrf(voltage, 4, 2, vCmd);

dtostrf(current, 5, 3, iCmd);

String finalVCmd = "V" + String(vCmd);

String finalICmd = "I" + String(iCmd);

sendZKCommand(finalVCmd);

delay(150); // Small delay to let the buffer process safely

sendZKCommand(finalICmd);

Serial.print("[CONFIG] Targets updated -> ");

Serial.print(finalVCmd); Serial.print(" | "); Serial.println(finalICmd);

}

// Low-level sender appending required standard terminations

void sendZKCommand(String command) {

ZKSerial.print(command + "\r\n");

}

// Process incoming feedback from the buck-boost unit

void handleTelemetry() {

String response = "";

while (ZKSerial.available()) {

char c = ZKSerial.read();

response += c;

delay(2); // Wait briefly for full string generation

}

if (response.length() > 0) {

response.trim();

Serial.print("\[TELEMETRY\]: ");

Serial.println(response);


// Simple state-machine parser for Bulk vs Float transition

// Standard status format: "XX.XXV X.XXXA XX.XXW"

if (response.indexOf('V') > 0 && response.indexOf('A') > 0) {

  float currentVoltage = response.substring(0, response.indexOf('V')).toFloat();


  // Isolate current chunk

  int spaceIdx = response.indexOf(' ') + 1;

  float currentAmps = response.substring(spaceIdx, response.indexOf('A')).toFloat();


  // Logical check for state switching

  if (currentMode == BULK_ABSORPTION && currentVoltage >= (ABS_VOLTAGE_TARGET - 0.1) && currentAmps <= FLOAT_TRIGGER_CURRENT) {

    Serial.println("\[STATE CHANGE\]: Battery Full. Dropping to Float Mode.");

    currentMode = FLOAT;

    setChargingParameters(FLOAT_VOLTAGE_TARGET, 1.000); // Reduce current ceiling for safety float

  }

} 

// Emergency hardware alert parsing

else if (response.indexOf("OVP") >= 0 || response.indexOf("OCP") >= 0 || response.indexOf("OTP") >= 0) {

  Serial.println("\[ALERT ERROR\]: Hardware fault flagged by ZK module!");

  currentMode = FAULT;

}

}

}
Hey So I am working the Zk-5kx and I want to read its values as well as configure its parameters through Arduino UNO. I am completely stuck is it possible for you to guide me a bit on this?,

Thank you

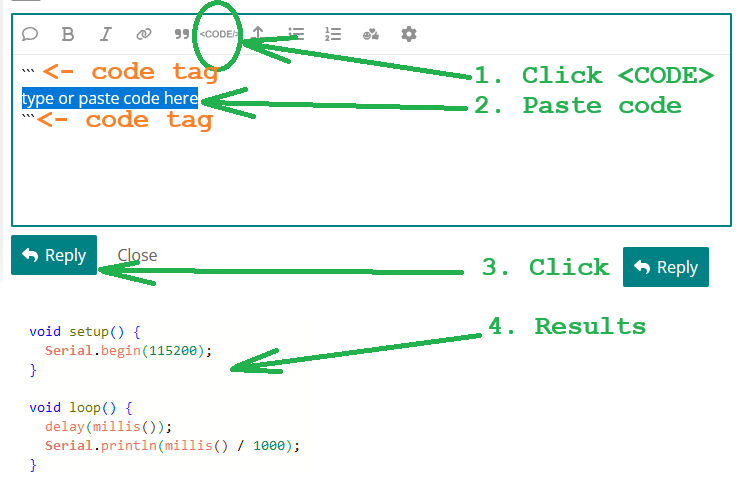
Please use code tags when posting code. It makes the code easier to read and copy and the forum software will display it correctly. Please read How to get the best out of this forum and specifically the section about posting code.

A link to the datasheet of the Zk -5KX will more than likely be useful; don't expect people here to start looking for it.


I can't answer your question.

Question merged with this topic. Please do not crosspost, it wastes people's time. And please do not hijack other people's topics.

Start with formatting your code and posting it in a <CODE> block:

Code is missing this:

#include <SoftwareSerial.h>

From where did you copy the code? I made the change (from above), and it compiles. Where's the UART?

// ZK-5KX DC-DC BUCK/BOOST

// Define UART pins for ZK-5KX connection (adjust based on your Arduino)
// If using an Arduino Mega/Every/Leonardo, prefer using Serial1 hardware pins instead!
#include <SoftwareSerial.h>
SoftwareSerial ZKSerial(10, 11, true); // RX, TX

// --- BATTERY CHARGING PROFILE VALUES (12V Exide Flooded Tabular) ---
const float ABS_VOLTAGE_TARGET = 14.40; // Absorption/Bulk max limit (Volts)
const float FLOAT_VOLTAGE_TARGET = 13.80; // Trickle/Float maintenance voltage (Volts)
const float MAX_SAFE_CURRENT = 4.500; // Constrained to 4.5A to protect the 80W module
const float FLOAT_TRIGGER_CURRENT = 0.500; // Drop to float when current falls below 500mA in CV mode

// --- SYSTEM STATE TIMERS ---
unsigned long lastQueryTime = 0;
const unsigned long queryInterval = 2000; // Query module every 2 seconds
enum ChargeState { BULK_ABSORPTION, FLOAT, FAULT };
ChargeState currentMode = BULK_ABSORPTION;

void setup() {
  Serial.begin(9600); // Debug output to PC
  ZKSerial.begin(9600); // Interface connection to ZK-5KX module
  delay(1000);

  Serial.println("--- Exide 6SBZ150 Smart Charger Initializing ---");
  // 1. Establish structural safety limits on the module first
  setChargingParameters(ABS_VOLTAGE_TARGET, MAX_SAFE_CURRENT);
  // 2. Power up the charging rail
  sendZKCommand("ON");
}

void loop() {
  // Non-blocking telemetry evaluation loop
  if (millis() - lastQueryTime >= queryInterval) {
    lastQueryTime = millis();
    // Request current stats from module
    sendZKCommand("STATUS");
    // Read and print telemetry feedback
    handleTelemetry();
  }
}

// Function to calculate and update parameters over UART runtime
void setChargingParameters(float voltage, float current) {
  char vCmd[16];
  char iCmd[16];
  // Format variables cleanly to match ZK ASCII requirements (e.g. V14.40)
  dtostrf(voltage, 4, 2, vCmd);
  dtostrf(current, 5, 3, iCmd);
  String finalVCmd = "V" + String(vCmd);
  String finalICmd = "I" + String(iCmd);
  sendZKCommand(finalVCmd);
  delay(150); // Small delay to let the buffer process safely
  sendZKCommand(finalICmd);
  Serial.print("[CONFIG] Targets updated -> ");
  Serial.print(finalVCmd); Serial.print(" | "); Serial.println(finalICmd);
}

// Low-level sender appending required standard terminations
void sendZKCommand(String command) {
  ZKSerial.print(command + "\r\n");
}

// Process incoming feedback from the buck-boost unit
void handleTelemetry() {
  String response = "";
  while (ZKSerial.available()) {
    char c = ZKSerial.read();
    response += c;
    delay(2); // Wait briefly for full string generation
  }
  if (response.length() > 0) {
    response.trim();
    Serial.print("\[TELEMETRY\]: ");
    Serial.println(response);

    // Simple state-machine parser for Bulk vs Float transition
    // Standard status format: "XX.XXV X.XXXA XX.XXW"
    if (response.indexOf('V') > 0 && response.indexOf('A') > 0) {
      float currentVoltage = response.substring(0, response.indexOf('V')).toFloat();
      // Isolate current chunk
      int spaceIdx = response.indexOf(' ') + 1;
      float currentAmps = response.substring(spaceIdx, response.indexOf('A')).toFloat();
      // Logical check for state switching
      if (currentMode == BULK_ABSORPTION && currentVoltage >= (ABS_VOLTAGE_TARGET - 0.1) && currentAmps <= FLOAT_TRIGGER_CURRENT) {
        Serial.println("\[STATE CHANGE\]: Battery Full. Dropping to Float Mode.");
        currentMode = FLOAT;
        setChargingParameters(FLOAT_VOLTAGE_TARGET, 1.000); // Reduce current ceiling for safety float
      }
    }
    // Emergency hardware alert parsing
    else if (response.indexOf("OVP") >= 0 || response.indexOf("OCP") >= 0 || response.indexOf("OTP") >= 0) {
      Serial.println("\[ALERT ERROR\]: Hardware fault flagged by ZK module!");
      currentMode = FAULT;
    }
  }
}

Can you show us the link to documentation you are using. So far I have not found any documentation.

User manuals only... nothing regarding programming...

Actually it seems very clear. All programming is done using the buttons and the rotary encoder knob. The OP needs to explain/show us what led them to think an Arduino could have any connection to the PSU.

A.I. is my wager.

Welcome!
In searching I found this as you did not post a link to the unit you have:

ZK-4KX ZK-5KX
Input 5-30 V 6-36 V
Output 0.5-30 V 0.6-36 V
Current 3 A continuous, 4 A max with added cooling 5 A max
Power 35 W natural / 50 W with added cooling 80 W
Switching frequency 180 kHz 120 kHz
Cooling heatsink heatsink + temperature-controlled fan

This link will take you to a project that should help you get it operating.

I did not see where the Arduino is involved. I use these with old laptop power supplies as the power source.
Let us know how yo do.

My "as much time as I was gonna waste on this" research also failed to turn up a digitally controlled power supply like the one the OP seems to be asking about.

But it sure made me want one. :expressionless:

a7

Either OP asked AI to write code for a charge controller using the ZK device on an Exide Flooded Tubular battery, or OP is a bot. The code never was capable. The ZK does not communicate. A charge controller for the Exide batteries exists, but is all hardware. OP vanished.

Even AI says the code is fake (not trustworthy), based on assumptions, and probably AI generated.

What is the difference between this user and a spam-dumping robot?

I have XY6020L.
It communicates via UART using modbus rtu (I had to dig the registers by trial).
I wouldn't be surprised if ZK uses same approach.

hey there so I posted that a bit frantically and this is the first time I am using any forums so made some clear mistakes and thank you for pointing that out and telling me how to do it right....and as for documentation there are only documents showing how to configure it. nothing about actually communicating with it via uart or modbus

there are uart ports available on the board. that's what led me to think that yes it might be possible to configure it through arduino. I was able to read the data from it but not write anything.

so the code is actually AI generated I am not gonna deny that I did not have the time required to sit and write manually. but this code was made for the ZK device itself.. and your assumption for using this with a charge controller is 100% right... that was the whole point and that is working fine as well when configured manually using the buttons on the ZK and charge controller but not so working fine when I try to configure it vi arduino. as I mentioned earlier.. it reads but doesn't write anything

I think I could def try this out. I did have this in plans but didn't have the time to sit and test on it.

How?

Find GND, TX and RX. Connect a terminal (app) and press <CR> a few times. UART are how boards are tested and programmed for shipment. Maybe, post a picture.