How To Install Using Arduino Library Manager
This library is a Light Weight Credentials / WiFi Manager for ESP8266 AT shields, specially designed to support AVR Mega, STM32, Teensy, SAM DUE, SAMD, etc. boards running ESP8266 AT-command shields, with smaller memory (64+K bytes)
You can also specify static AP and STA IP. Use much less memory compared to full-fledge WiFiManager. Credentials are saved in EEPROM, FlashStorage or DueFlashStorage.
You can use this library when your boards have more than 32K bytes of memory, for example Mega1280, Mega2560.
The web configuration portal, served from the ESP8266 AT-command shields is operating as an access point (AP) with configurable static IP address or use default IP Address of 192.168.4.1
Sample Code
/* Comment this out to disable prints and save space */
#define ESP_AT_DEBUG_OUTPUT Serial

#define ESP_AT_DEBUG    true

#if !( defined(ARDUINO_AVR_MEGA) || defined(ARDUINO_AVR_MEGA2560) )
#error This code is intended to run only on the Arduino Mega 1280/2560 boards ! Please check your Tools->Board setting.
#endif

// For Mega, use Serial1 or Serial3
#define EspSerial Serial3

#if defined(ARDUINO_AVR_MEGA2560)
#define BOARD_TYPE      "AVR Mega2560"
#else
#define BOARD_TYPE      "AVR Mega"
#endif

// Start location in EEPROM to store config data. Default 0
// Config data Size currently is 128 bytes)
#define EEPROM_START      (64)

#include <Esp8266_AT_WM_Lite.h>

// Your Mega <-> ESP8266 baud rate:
#define ESP8266_BAUD 115200

void heartBeatPrint(void)
{
  static int num = 1;

  if (WiFi.status() == WL_CONNECTED)
    Serial.print("H");        // H means connected to WiFi
  else
    Serial.print("F");        // F means not connected to WiFi

  if (num == 80)
  {
    Serial.println();
    num = 1;
  }
  else if (num++ % 10 == 0)
  {
    Serial.print(" ");
  }
}

void check_status()
{
  static unsigned long checkstatus_timeout = 0;

  //KH
  #define HEARTBEAT_INTERVAL    10000L
  // Print hearbeat every HEARTBEAT_INTERVAL (10) seconds.
  if ((millis() > checkstatus_timeout) || (checkstatus_timeout == 0))
  {
    heartBeatPrint();
    checkstatus_timeout = millis() + HEARTBEAT_INTERVAL;
  }
}

ESP_AT_WiFiManager_Lite* ESP_AT_WiFiManager;

void setup()
{
  // Debug console
  Serial.begin(115200);
  delay(1000);

  Serial.println("\nStart Mega_ESP8266Shield on " + String(BOARD_TYPE));

  // initialize serial for ESP module
  EspSerial.begin(115200);

  ESP_AT_WiFiManager = new ESP_AT_WiFiManager_Lite(&EspSerial, ESP8266_BAUD);

  // Optional to change default AP IP(192.168.4.1) and channel(10)
  //ESP_AT_WiFiManager->setConfigPortalIP(IPAddress(192, 168, 120, 1));
  //ESP_AT_WiFiManager->setConfigPortalChannel(1);

  ESP_AT_WiFiManager->begin();
}

void loop()
{
  ESP_AT_WiFiManager->run();
  check_status();
}
This is the terminal output when running Teensy_ESP8266Shield example on Teensy 4.0
- Open Config Portal
Start Teensy_ESP8266Shield on TEENSY 4.0
*AT: CCsum=5543,RCsum=1127042391
*AT: Init EEPROM sz=1080
*AT: Open Portal
*AT: SSID=ESP_AT_CCE61, PW=MyESP_AT_CCE61
*AT: IP=192.168.4.1, CH=10
FFF
- Got valid Credential from Config Portal, then connected to WiFi
Start Teensy_ESP8266Shield on TEENSY 4.0
*AT: CCsum=2271,RCsum=2271
*AT: Hdr=SHD_ESP8266, SSID=HueNet1, PW=****
*AT: con2WF:start
*AT: con2WF:spent millis=0
*AT: Con2 HueNet1
*AT: IP=192.168.2.82
*AT: WiFi OK
*AT: con2WF:OK
*AT: IP=192.168.2.82
*AT: WiFi OK
HHHHHHHHHH HHHHHHHHHH HHHHHHHHHH HHHHHHHHHH HHHHHHHHHH HHHHHHHHHH HHHHHHHHHH HHHHHHHHHH
HHHHHHHHHH HHHHHHHHHH HHHHHHHHHH HHHHHHHHHH HHHHHHHHHH HHHHHHHHHH HHHHHHHHHH HHHHHHHHHH
And the Config Portal screens:
1.Main Screen
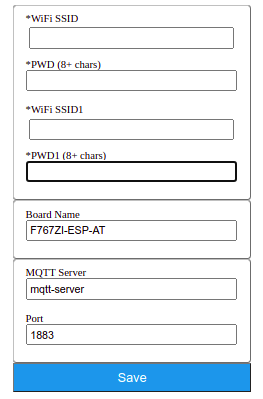
- Input Credentials:

- After pressing Save button
