BlynkManager for Mega/Teensy/SAM DUE/SAMD/STM32 boards & ESP8266 AT shields,

How To Install Using Arduino Library Manager

To help you to eliminate hardcoding your Wifi and Blynk credentials for Mega/Teensy boards running ESP8266 AT shields, and updating/reflashing every time when you need to change them. Configuration data are saved in configurable locatioon in EEPROM.

With version v1.0.0 or later, you now can configure:

  1. Config Portal Static IP address, Name and Password.
  2. Static IP address, Gateway, Subnet Mask and 2 DNS Servers IP addresses.

Sample Code

#define BLYNK_PRINT Serial

#if ( defined(ESP8266) || defined(ESP32) || defined(ARDUINO_AVR_MEGA) || defined(ARDUINO_AVR_MEGA2560) || !defined(CORE_TEENSY) )
#error This code is intended to run on Teensy platform! Please check your Tools->Board setting.
#endif

#ifdef CORE_TEENSY
  // For Teensy 4.0
  #define EspSerial Serial2   //Serial2, Pin RX2 : 7, TX2 : 8
  #if defined(__IMXRT1062__)
    #define BOARD_TYPE      "TEENSY 4.0"
  #else
    #define BOARD_TYPE      BLYNK_INFO_DEVICE
  #endif

#else
// For Mega
#define EspSerial Serial3
#define BOARD_TYPE      "AVR Mega"
#endif

#include <ESP8266_Lib.h>

// Start location in EEPROM to store config data. Default 0
// Config data Size currently is 128 bytes)
#define EEPROM_START     48

#define USE_BLYNK_WM      true
//#define USE_BLYNK_WM      false

#if USE_BLYNK_WM
  #include <BlynkSimpleShieldEsp8266_Teensy_WM.h>
#else
  #include <BlynkSimpleShieldEsp8266_Teensy.h>

  #define USE_LOCAL_SERVER      true

  #if USE_LOCAL_SERVER
    char auth[] = "****";
    String BlynkServer = "account.duckdns.org";
    //String BlynkServer = "192.168.2.112";
  #else
    char auth[] = "******";
    String BlynkServer = "blynk-cloud.com";
  #endif

  #define BLYNK_SERVER_HARDWARE_PORT    8080

  // Your WiFi credentials.
  char ssid[] = "****";
  char pass[] = "****";
  
#endif

// Your Teensy <-> ESP8266 baud rate:
#define ESP8266_BAUD 115200

ESP8266 wifi(&EspSerial);

void heartBeatPrint(void)
{
  static int num = 1;

  if (Blynk.connected())
  {
    Serial.print("B");
  }
  else
  {
    Serial.print("F");
  }
  
  if (num == 80) 
  {
    Serial.println();
    num = 1;
  }
  else if (num++ % 10 == 0) 
  {
    Serial.print(" ");
  }
} 

void check_status()
{
  static unsigned long checkstatus_timeout = 0;

#define STATUS_CHECK_INTERVAL     15000L

  // Send status report every STATUS_REPORT_INTERVAL (60) seconds: we don't need to send updates frequently if there is no status change.
  if ((millis() > checkstatus_timeout) || (checkstatus_timeout == 0))
  {
    // report status to Blynk
    heartBeatPrint();

    checkstatus_timeout = millis() + STATUS_CHECK_INTERVAL;
  }
}

void setup() 
{
  // Debug console
  Serial.begin(115200);
  delay(1000);
 
  // initialize serial for ESP module
  EspSerial.begin(ESP8266_BAUD);
  Serial.println("\nStart Blynk WiFiManager using ESP8266_AT_Shield on " + String(BOARD_TYPE));

  #if USE_BLYNK_WM
    Serial.println("Start Blynk_WM");
    // Set Config Portal AP IP Address
    Blynk.setConfigPortalIP(IPAddress(192, 168, 100, 1));
    // Set Config Portal SSID and Password
    //Blynk.setConfigPortal("Teensy4", "MyTeensy4");
    Blynk.begin(wifi);
  #else
    Serial.println("Start Blynk");
    Blynk.begin(auth, wifi, ssid, pass, BlynkServer.c_str(), BLYNK_SERVER_HARDWARE_PORT);
  #endif
}

void loop()
{
  Blynk.run();
  check_status();
}

This is the link to Blynk

Blynk IoT Platform

Blynk was designed for the Internet of Things. It can control hardware remotely, it can display sensor data, it can store data, visualize it and do many other cool things.

You can install and use Local Blynk Server (RPi Zero W, 3B+, 4, Laptop, PC, etc) to have full control.
The Server source code is in Public Domain and written in Java. You can download, compile and use to be sure having full control.

Use Local Blynk Server

Blynk Server

Blynk Server Source Code

New Version v1.0.2

  1. Add support to SAMD (DUE, ZERO, MKR, NANO_33_IOT, M0, M0 Pro, AdaFruit CIRCUITPLAYGROUND_EXPRESS, etc.) boards

Blynk_Esp8266AT_WM v1.0.2

Sample Code for SAMD

#define BLYNK_PRINT Serial

#if    ( defined(ARDUINO_SAM_DUE) || defined(ARDUINO_SAMD_ZERO) || defined(ARDUINO_SAMD_MKR1000) || defined(ARDUINO_SAMD_MKRWIFI1010) \
      || defined(ARDUINO_SAMD_NANO_33_IOT) || defined(ARDUINO_SAMD_MKRFox1200) || defined(ARDUINO_SAMD_MKRWAN1300) || defined(ARDUINO_SAMD_MKRWAN1310) \
      || defined(ARDUINO_SAMD_MKRGSM1400) || defined(ARDUINO_SAMD_MKRNB1500) || defined(ARDUINO_SAMD_MKRVIDOR4000) || defined(__SAMD21G18A__) \
      || defined(ARDUINO_SAMD_CIRCUITPLAYGROUND_EXPRESS) || defined(__SAM3X8E__) || defined(__CPU_ARC__) )      
  #if defined(ESP8266_AT_USE_SAMD)
    #undef ESP8266_AT_USE_SAMD
  #endif
  #define ESP8266_AT_USE_SAMD      true
#else
  #error This code is intended to run only on the SAMD boards ! Please check your Tools->Board setting.  
#endif

#if defined(ESP8266_AT_USE_SAMD) 
// For SAMD
  #define EspSerial Serial1
  
  #if defined(ARDUINO_SAMD_ZERO)
    #define BOARD_TYPE      "SAMD Zero"
  #elif defined(ARDUINO_SAMD_MKR1000)
    #define BOARD_TYPE      "SAMD MKR1000"    
  #elif defined(ARDUINO_SAMD_MKRWIFI1010)
    #define BOARD_TYPE      "SAMD MKRWIFI1010"
  #elif defined(ARDUINO_SAMD_NANO_33_IOT)
    #define BOARD_TYPE      "SAMD NANO_33_IOT"  
  #elif defined(ARDUINO_SAMD_MKRFox1200)
    #define BOARD_TYPE      "SAMD MKRFox1200"
  #elif ( defined(ARDUINO_SAMD_MKRWAN1300) || defined(ARDUINO_SAMD_MKRWAN1310) )
    #define BOARD_TYPE      "SAMD MKRWAN13X0"
  #elif defined(ARDUINO_SAMD_MKRGSM1400)
    #define BOARD_TYPE      "SAMD MKRGSM1400"
  #elif defined(ARDUINO_SAMD_MKRNB1500)
    #define BOARD_TYPE      "SAMD MKRNB1500"
  #elif defined(ARDUINO_SAMD_MKRVIDOR4000)
    #define BOARD_TYPE      "SAMD MKRVIDOR4000"
  #elif defined(ARDUINO_SAMD_CIRCUITPLAYGROUND_EXPRESS)
    #define BOARD_TYPE      "SAMD ARDUINO_SAMD_CIRCUITPLAYGROUND_EXPRESS"  
  #elif ( defined(__SAM3X8E__) || (__SAM3X8E__) || (__CPU_ARC__) )
    #define BOARD_TYPE      "SAMD Board"
  #else
    #define BOARD_TYPE      "SAMD Unknown"
  #endif
#endif

#include <ESP8266_Lib.h>

// Start location in EEPROM to store config data. Default 0
// Config data Size currently is 128 bytes)
#define EEPROM_START     256

#define USE_BLYNK_WM      true
//#define USE_BLYNK_WM      false

#if USE_BLYNK_WM
  #include <BlynkSimpleShieldEsp8266_SAMD_WM.h>
#else
  #include <BlynkSimpleShieldEsp8266_SAMD.h>

  #define USE_LOCAL_SERVER      true

  #if USE_LOCAL_SERVER
    char auth[] = "****";
    String BlynkServer = "account.duckdns.org";
    //String BlynkServer = "192.168.2.112";
  #else
    char auth[] = "****";
    String BlynkServer = "blynk-cloud.com";
  #endif

  #define BLYNK_SERVER_HARDWARE_PORT    8080

  // Your WiFi credentials.
  char ssid[] = "****";
  char pass[] = "****";
  
#endif

// Your Megay <-> ESP8266 baud rate:
#define ESP8266_BAUD 115200

ESP8266 wifi(&EspSerial);

void heartBeatPrint(void)
{
  static int num = 1;

  if (Blynk.connected())
  {
    Serial.print("B");
  }
  else
  {
    Serial.print("F");
  }
  
  if (num == 80) 
  {
    Serial.println();
    num = 1;
  }
  else if (num++ % 10 == 0) 
  {
    Serial.print(" ");
  }
} 

void check_status()
{
  static unsigned long checkstatus_timeout = 0;

#define STATUS_CHECK_INTERVAL     15000L

  // Send status report every STATUS_REPORT_INTERVAL (60) seconds: we don't need to send updates frequently if there is no status change.
  if ((millis() > checkstatus_timeout) || (checkstatus_timeout == 0))
  {
    // report status to Blynk
    heartBeatPrint();

    checkstatus_timeout = millis() + STATUS_CHECK_INTERVAL;
  }
}

void setup() 
{
  // Debug console
  Serial.begin(115200);
  delay(1000);
 
  // initialize serial for ESP module
  EspSerial.begin(ESP8266_BAUD);
  Serial.println("\nStart Blynk WiFiManager using ESP8266_AT_Shield on " + String(BOARD_TYPE));

  #if USE_BLYNK_WM
    Serial.println(F("Start Blynk_WM"));
    Blynk.setConfigPortalIP(IPAddress(192, 168, 120, 1));
    //Blynk.setConfigPortal("Mega", "MyMega");  
    Blynk.begin(wifi);
  #else
    Serial.println(F("Start Blynk"));
    Blynk.begin(auth, wifi, ssid, pass, BlynkServer.c_str(), BLYNK_SERVER_HARDWARE_PORT);
  #endif
}

void loop()
{
  Blynk.run();
  check_status();
}

New Version v1.0.3

  1. Add support to STM32 (STM32F1, F2, F3, F4, F7, etc) boards

Sample Code for STM32

/* Comment this out to disable prints and save space */
#define BLYNK_PRINT Serial

#if ( defined(STM32F0) || defined(STM32F1) || defined(STM32F2) || defined(STM32F3)  ||defined(STM32F4) || defined(STM32F7) )
  #if defined(ESP8266_AT_USE_STM32)
    #undef ESP8266_AT_USE_STM32
  #endif
  #define ESP8266_AT_USE_STM32      true
#endif

#if ( defined(ESP8266) || defined(ESP32) || defined(ARDUINO_AVR_MEGA) || defined(ARDUINO_AVR_MEGA2560) || defined(CORE_TEENSY) || !(ESP8266_AT_USE_STM32) )
//#error This code is intended to run on STM32 platform! Please check your Tools->Board setting.
#endif

#if ESP8266_AT_USE_STM32
  // For STM32, you have to declare and enable coreresponding Serial Port somewhere else before using it
  #define EspSerial Serial1
 
  #if defined(STM32F0)
    #define BOARD_TYPE  "STM32F0"
    #error Board STM32F0 not supported
  #elif defined(STM32F1)
    #define BOARD_TYPE  "STM32F1"
  #elif defined(STM32F2)
    #define BOARD_TYPE  "STM32F2"
  #elif defined(STM32F3)
    #define BOARD_TYPE  "STM32F3"
  #elif defined(STM32F4)
    #define BOARD_TYPE  "STM32F4"
  #elif defined(STM32F7)
    #define BOARD_TYPE  "STM32F7"  
  #else
    #warning STM32 unknown board selected
    #define BOARD_TYPE  "STM32 Unknown"  
  #endif
#else
// For Mega
#define EspSerial Serial3
#define BOARD_TYPE      "AVR Mega"
#endif

#include <ESP8266_Lib.h>

// Start location in EEPROM to store config data. Default 0
// Config data Size currently is 128 bytes)
#define EEPROM_START     0

#define USE_BLYNK_WM      true
//#define USE_BLYNK_WM      false

#if USE_BLYNK_WM
  #if ESP8266_AT_USE_STM32
    #include <BlynkSimpleShieldEsp8266_STM32_WM.h>
  #else
    #include <BlynkSimpleShieldEsp8266_WM.h>
  #endif
#else
  #include <BlynkSimpleShieldEsp8266_STM32.h>

  #define USE_LOCAL_SERVER      true

  #if USE_LOCAL_SERVER
    char auth[] = "****";
    String BlynkServer = "account.duckdns.org";
    //String BlynkServer = "192.168.2.112";
  #else
    char auth[] = "****";
    String BlynkServer = "blynk-cloud.com";
  #endif

  #define BLYNK_SERVER_HARDWARE_PORT    8080

  // Your WiFi credentials.
  char ssid[] = "****";
  char pass[] = "****";
  
#endif

// Your Teensy <-> ESP8266 baud rate:
#define ESP8266_BAUD 115200

ESP8266 wifi(&EspSerial);

void heartBeatPrint(void)
{
  static int num = 1;

  if (Blynk.connected())
  {
    Serial.print("B");
  }
  else
  {
    Serial.print("F");
  }
  
  if (num == 80) 
  {
    Serial.println();
    num = 1;
  }
  else if (num++ % 10 == 0) 
  {
    Serial.print(" ");
  }
} 

void check_status()
{
  static unsigned long checkstatus_timeout = 0;

#define STATUS_CHECK_INTERVAL     15000L

  // Send status report every STATUS_REPORT_INTERVAL (60) seconds: we don't need to send updates frequently if there is no status change.
  if ((millis() > checkstatus_timeout) || (checkstatus_timeout == 0))
  {
    // report status to Blynk
    heartBeatPrint();

    checkstatus_timeout = millis() + STATUS_CHECK_INTERVAL;
  }
}

void setup() 
{
  // Debug console
  Serial.begin(115200);
  delay(1000);
 
  // initialize serial for ESP module
  EspSerial.begin(ESP8266_BAUD);
  Serial.println("\nStart Blynk WiFiManager using ESP8266_AT_Shield on " + String(BOARD_TYPE));

  #if USE_BLYNK_WM
    Serial.println("Start Blynk_WM");
    Blynk.setConfigPortalIP(IPAddress(192, 168, 100, 1));
    //Blynk.setConfigPortal("Teensy4", "MyTeensy4");  
    Blynk.begin(wifi);
  #else
    Serial.println("Start Blynk");
    Blynk.begin(auth, wifi, ssid, pass, BlynkServer.c_str(), BLYNK_SERVER_HARDWARE_PORT);
  #endif
}

void loop()
{
  Blynk.run();
  check_status();
}

New Releases v1.0.4

  1. Add support to SAM DUE
  2. Reduce html and code size for faster Config Portal response.
  3. Enhance GUI.

So, how it works?
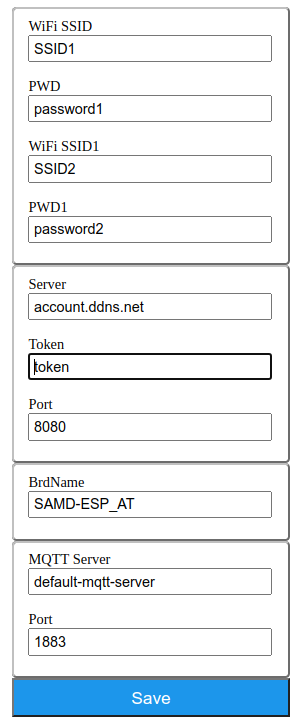
If it cannot connect to the Blynk server in 30 seconds, it will switch to Configuration Mode. You will see your built-in LED turned ON. In Configuration Mode, it starts a configurable access point, default called Teensy4_XXXXXX, SAMD_XXXXXX, DUE_XXXXXX,Mega_XXXXXX or STM32_XXXXXX. Connect to it using password MyTeensy4_XXXXXX, MySAMD_XXXXXX, MyDUE_XXXXXX, MyMega_XXXXXX or MySTM32_XXXXXX.

After you connected, please, go to http://192.168.4.1 or the AP IP you specified.

Enter your credentials : WiFi SSID/Password, Blynk Server, Port and Token, Board Name.

Then click Save. After you restarted, you will see your built-in LED turned OFF. That means, it connected to your Blynk server successfully.

New Releases v1.0.7

  1. Add support to all STM32F/L/H/G/WB/MP1 (Nucleo-144 NUCLEO_F767ZI, Nucleo-64 NUCLEO_L053R8, etc.)
  2. Add support to Seeeduino SAMD21/SAMD51 boards (SEEED_WIO_TERMINAL, SEEED_FEMTO_M0, SEEED_XIAO_M0, Wio_Lite_MG126, WIO_GPS_BOARD, SEEEDUINO_ZERO, SEEEDUINO_LORAWAN, SEEED_GROVE_UI_WIRELESS, etc.)
  3. Sync with latest ESP8266_AT_WebServer Library v1.0.12

New Releases v1.0.6

  1. Add support to ESP32-AT
  2. Use new ESP_AT_Lib to support ESP8266/ESP32-AT
  3. Enhance MultiWiFi connection logic.
  4. New logic for USE_DEFAULT_CONFIG_DATA to autoload Config / Dynamic Data in developing stage.

Major Releases v1.0.5

  1. Add support to nRF52 (AdaFruit Feather nRF52832, nRF52840 Express, BlueFruit Sense, Itsy-Bitsy nRF52840 Express, Metro nRF52840 Express, NINA_B302_ublox, NINA_B112_ublox, etc.). Dynamic custom parameters to be saved automatically in LittleFS.
  2. Add support to Adafruit SAMD21/SAM51 (Itsy-Bitsy M0/M4, Metro M0/M4, Grand Central M4, Feather M0/M4 Express, etc.). Dynamic custom parameters to be saved automatically in FlashStorage.
  3. Add MultiWiFi features for WiFi
  4. Add DoubleResetDetector (DRD) feature.
  5. Increase WPA2 SSID and PW to 63 chars. Permit special chars such as !,@,#,$,%,^,&,* into data fields.
  6. Restructure examples separate Credentials / Defines / Dynamic Params / Code.
  7. Drop support to Teensy boards.

The following is the sample terminal output when running example STM32_ESP8266Shield using STM32 Nucleo-144 NUCLEO_F767ZI with ESP8266-AT shield.

Start STM32_ESP8266Shield on NUCLEO_F767ZI
Start Blynk_ESP8266AT_WM
[6566] AT version:1.1.0.0(May 11 2016 18:09:56)
SDK version:1.5.4(baaeaebb)
Ai-Thinker Technology Co. Ltd.
Jun 13 2016 11:29:20
OK

EEPROM size = 16384, start = 0
Flag read = 0xffffffff
No doubleResetDetected
SetFlag write = 0xd0d01234
[11998] ======= Start Default Config Data =======
[12000] Hdr=STM32_ESP_AT,SSID=HueNet1,PW=password
[12004] SSID1=HueNet,PW1=password
[12007] Svr=account.duckdns.org,Prt=8080,Tok=new_token
[12014] BName=STM32_ESP_AT
[12017] i=0,id=mqtt,data=default-mqtt-server
[12021] i=1,id=mqpt,data=1883
[12023] SaveEEPROM,Sz=16384,DataSz=0,WCSum=0x2360
[12028] ======= Start Loaded Config Data =======
[12032] Hdr=SHD_ESP8266,SSID=HueNet1,PW=password
[12037] SSID1=HueNet,PW1=password
[12040] Svr=account.duckdns.org,Prt=8080,Tok=new_token
[12047] BName=STM32_ESP_AT
[12049] i=0,id=mqtt,data=default-mqtt-server
[12053] i=1,id=mqpt,data=1883
[12056] 
    ___  __          __
   / _ )/ /_ _____  / /__
  / _  / / // / _ \/  '_/
 /____/_/\_, /_//_/_/\_\
        /___/ v0.6.1 on STM32 NUCLEO_F767ZI

[12069] ConMultiWifi
[12071] con2WF:SSID=HueNet1,PW=password
[12075] Remaining retry_time=3
[12078] Con2:HueNet1
[18645] AT version:1.1.0.0(May 11 2016 18:09:56)
SDK version:1.5.4(baaeaebb)
Ai-Thinker Technology Co. Ltd.
Jun 13 2016 11:29:20
OK
[19189] Mac=68:c6:3a:a4:6a:97
[24253] IP=192.168.2.85


[24270] WOK
[24270] WOK, lastConnectedIndex=0
[24270] con2WF:OK
[24272] IP=192.168.2.85


[24290] b:WOK.TryB
[34457] Ready (ping: 12ms).
[34633] b:WBOK
Stop doubleResetDetecting
ClearFlag write = 0xd0d04321
B
Your stored Credentials :
MQTT Server = default-mqtt-server
Port = 1883
BBBBBBBBB BBBBBBBBBB BBBBBBBBBB BBBBBBBBBB BBBBBBBBBB BBBBBBBBBB BBBBBBBBBB BBBBBBBBBB

Releases v1.1.1

  1. Add support to Teensy 3.x boards, using only Teensy core v1.51 if Config Portal is needed.

Major Releases v1.1.0

  1. Restore support to Teensy 4.x boards, using only Teensy core v1.51 if Config Portal is needed.
  2. Add STM32 emulated-EEPROM feature so that saving to EEPROM is usable and much faster.
  3. Add functions to control Config Portal from software or Virtual Switches. Check How to trigger a Config Portal from code
  4. Renew all examples to demo the new Virtual ConfigPortal SW feature
  5. Optimize code and fix many bugs.

This topic was automatically closed 120 days after the last reply. New replies are no longer allowed.