I have given below a working sketch to accomplish this task:
Create sketch to count number of presses done on pushbutton1 (Fig-1) within 5-sec and then compute factorial for that count. LED1 will blink to reflect the number of press counts and L will reflect by blinking the factorial value.
Would appreciate to receive all possible better/alternate sketches/hints from the readers. This is to improve mine and my pupils' programming skills.
If you want to give your students a big head start have them use KiCad, it is a full blown schematic capture program that is very well supported. You can leave your wallet in your pocket, for each of your students to have an unlimited edition and your self, it is free for downloading. They will ask for a non required donation. This works very well on Linux and I here good things about it on the Mac and Windoze.
It looks like a really good enough code.
WhatYou could add is how to document code! One old method is Flow Charts. They work like road maps giving an overview of the execution flow.Dry reading code is a very time consuming way to understand what's done.
This is the first time I am seeing the iterative method of computing factorial. Simple and yet thought provoking like implementing artificial iret to execute single instruction in 8086. Thank you so much.
//
//================================================^================================================
// F a c t o r i a l
//================================================^================================================
//
// https://forum.arduino.cc/t/looking-for-better-alternate-approach-sketch/1393668/1
//
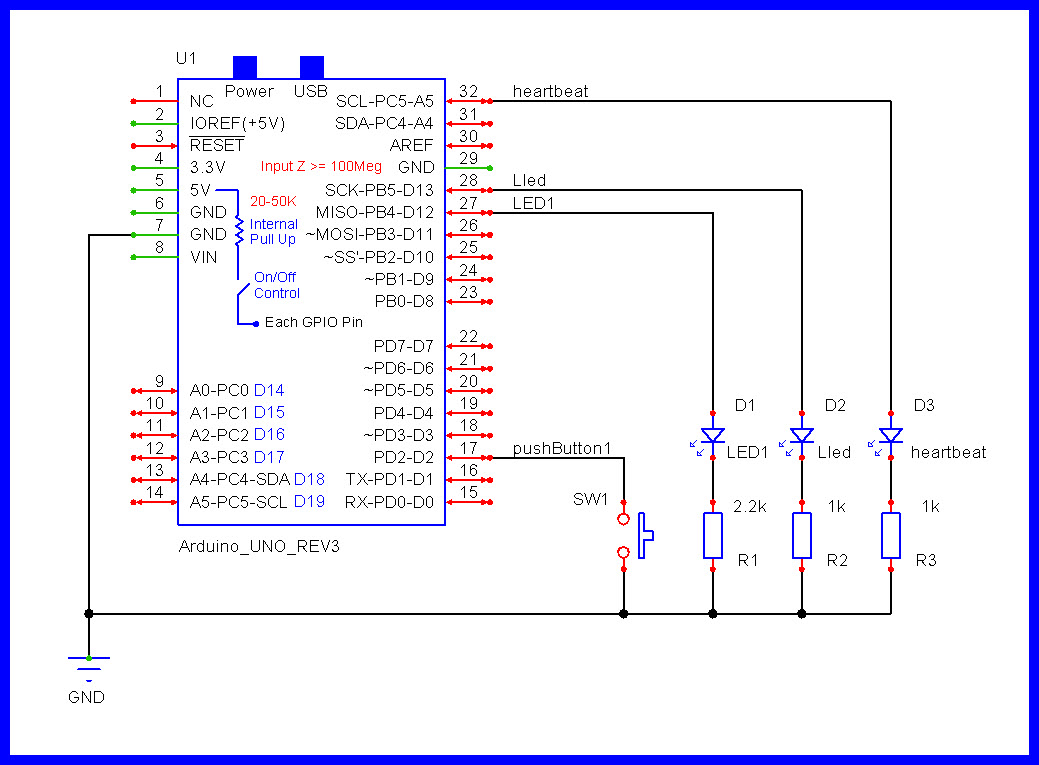
// See schematic:
//
// Version YY/MM/DD Comments
// ======= ======== ========================================================================
// 1.00 25/07/04 Running code
//
//
//
//
// Notes:
//
//
//
//
//================================================^================================================
#define LEDon HIGH
#define LEDoff LOW
#define ENABLED true
#define DISABLED false
#define CLOSED LOW
#define OPENED HIGH
// G P I O s A n d V a r i a b l e s
//================================================^================================================
//
//Analogs
//================================================
//
//INPUTS
//================================================
//
const byte pushButton1 = 2;
//OUTPUTS
//================================================
//
const byte LED1 = 12;
const byte Lled = 13;
const byte heartbeatLED = 19; //Same as A5. Gives us an indication if code is blocking.
//VARIABLES
//================================================
//
bool switchEnabledFlag = ENABLED;
bool testingFlag = DISABLED;
bool solutionFlag = DISABLED;
byte lastButton1 = OPENED;
const byte limit = 8; //Press count is limited to 8.
int pressCount = 0; //The number of times the switch was pressed.
unsigned int factorial = 0;
unsigned int ledToggles = 0; //The number of LED toggles (on/off) in the solution.
//========================
//Define TIMERs
//
unsigned long heartbeatTime;
const unsigned long heartbeatInterval = 500ul;
unsigned long checkSwitchTime;
const unsigned long switchInterval = 50ul;
unsigned long testingTime;
const unsigned long testingInterval = 5000;
unsigned long solutionTime;
const unsigned long solutionInterval = 300ul;
// s e t u p ( )
//================================================^================================================
//
void setup()
{
Serial.begin(9600);
pinMode(pushButton1, INPUT_PULLUP);
pinMode(LED1, OUTPUT);
pinMode(Lled, OUTPUT);
pinMode(heartbeatLED, OUTPUT);
Serial.println("Testing Ready . . . ");
} //END of setup()
// l o o p ( )
//================================================^================================================
//
void loop()
{
//======================================================================== T I M E R heartbeatLED
//Is it time to toggle the heartbeat LED ?
if (millis() - heartbeatTime >= heartbeatInterval)
{
//Restart this TIMER.
heartbeatTime = millis();
//Toggle the heartbeat LED.
digitalWrite(heartbeatLED, digitalRead(heartbeatLED) == HIGH ? LOW : HIGH);
}
//======================================================================== T I M E R check switches
//Is it time to scan our switches ?
if (millis() - checkSwitchTime >= switchInterval)
{
//Restart this TIMER.
checkSwitchTime = millis();
checkSwitches();
}
//======================================================================== T I M E R testing
//When enabled, has the testing TIMER expired ?
if (testingFlag == ENABLED && millis() - testingTime >= testingInterval)
{
//Disable switch press counting.
switchEnabledFlag = DISABLED;
//Switch counting is finished.
testingFlag = DISABLED;
Serial.println("\nFive seconds is over.\n");
Serial.print("Button Pressed = ");
Serial.print(pressCount);
Serial.print(" times. ");
Serial.print("Factorial = ");
Serial.println(factorial);
//Get ready to show the results; double facValue.
ledToggles = factorial * 2;
//Enable this TIMER
solutionFlag = ENABLED;
//Start the TIMER
solutionTime = millis();
}
//======================================================================== T I M E R solution
//When enabled, is it time to toggle the L LED ?
if (solutionFlag == ENABLED && millis() - solutionTime >= solutionInterval)
{
//Restart this TIMER.
solutionTime = millis();
//Are we finished with LED toggling ?
if (ledToggles > 0)
{
//Is ledToggles an even number
if (ledToggles % 2 == 0)
{
//LED goes ON
digitalWrite(Lled, HIGH);
ledToggles--;
}
//It's odd
else
{
//LED goes OFF
digitalWrite(Lled, LOW);
ledToggles--;
}
}
//We are finished.
else
{
//We are finished with the toggling LED results.
solutionFlag = DISABLED;
//Switch press counting is allowed.
switchEnabledFlag = ENABLED;
Serial.print("\nTesting can now continue.\n");
}
}
//================================================
// Other non blocking code goes here
//================================================
} //END of loop()
// c h e c k S w i t c h e s ( )
//================================================^================================================
//
void checkSwitches()
{
int pinState;
//======================================================================== p u s h B u t t o n 1
//
pinState = digitalRead(pushButton1);
//Was the a switch change in state ?
if (lastButton1 != pinState)
{
//Update to the new state.
lastButton1 = pinState;
//==================================
//Is this switch closed ?
if (pinState == CLOSED)
{
//=============
//Are we starting a new test ?
if (testingFlag == DISABLED && solutionFlag == DISABLED)
{
Serial.println("\nFive second testing TIMER started.\n");
//Get ready for the test.
pressCount = 0;
factorial = 1;
//enable our TIMER
testingFlag = ENABLED;
//Start the TIMER.
testingTime = millis();
}
//Are we allowed to count switch presses ?
if (switchEnabledFlag == ENABLED && pressCount < limit)
{
Serial.println("Switch Closed");
digitalWrite(LED1, LEDon);
pressCount++;
factorial = factorial * pressCount;
}
}
//==================
//The switch was opened.
else
{
digitalWrite(LED1, LEDoff);
}
}
} //END of checkSwitches()
//================================================^================================================
Every recursive function can be rewritten as an iterative one, however the recursive are more elegant and (often) easier to implement.
Going through (binary) trees in different ways, e.g. for adding, searching or deleting, are easier recursive.
A serious risk of recursive functions is stack usage which can crash your system.
A famous recursive algorithm is QuickSort(), it defines a pivot element and swaps all elements smaller and larger than the pivot, and then it calls itself recursively for both sub-array's.
Think that QuickSort() is one of the most researched recursive functions. There exist a variant that sorts the smallest subarray first as that uses the least stack space.
That does not matter. Global variables (#defines) should be longer than a few characters to prevent accidental reuse.
Also LED_BUILTIN is probably #defined itself...