tom321
June 3, 2023, 12:12pm
1
Hi
/*
    https://www.hackster.io/LithiumION/simple-lcd-menu-using-arduino-877004
    MADE BY Lithium Ion
*/

#include <LiquidCrystal.h>
// LiquidCrystal lcd(PC15, PC14, PB5, PB6, PB8, PB9);
LiquidCrystal lcd(12, 11, 5, 4, 3, 2);

int upButton = A3;
int downButton = A1;
int selectButton = A2;
int menu = 1;
int A;
int B;

void setup() {
  lcd.begin(16, 2);
  pinMode(upButton, INPUT_PULLUP);
  pinMode(downButton, INPUT_PULLUP);
  pinMode(selectButton, INPUT_PULLUP);
updateMenu();
}

void loop() {
  if (!digitalRead(downButton)) {
    menu++;
    updateMenu();
    delay(100);
    while (!digitalRead(downButton));
  }
  if (!digitalRead(upButton)) {
    menu--;
    updateMenu();
    delay(100);
    while (!digitalRead(upButton));
  }
  if (!digitalRead(selectButton)) {
    executeAction();
    updateMenu();
    delay(100);
    while (!digitalRead(selectButton));
  }
}

void updateMenu() {
  switch (menu) {
    case 0:
      menu = 1;
      break;
    case 1:
      lcd.clear();
      lcd.print(">LED1");
      lcd.setCursor(0, 1);
      lcd.print(" LED2");
      break;
    case 2:
      lcd.clear();
      lcd.print(" LED1");
      lcd.setCursor(0, 1);
      lcd.print(">LED2");
      break;
    case 3:
      lcd.clear();
      lcd.print(">LED3");
      lcd.setCursor(0, 1);
      lcd.print(" LED4");
      break;
    case 4:
      lcd.clear();
      lcd.print(" LED3");
      lcd.setCursor(0, 1);
      lcd.print(">LED4");
      break;
    case 5:
      menu = 4;
      break;
  }
}

void executeAction() {
  switch (menu) {
    case 1:
      action1();
      break;
    case 2:
      action2();
      break;
    case 3:
      action3();
      break;
    case 4:
      action4();
      break;
  }
}

void action1() {

  if (digitalRead(A3) == LOW)
  {
    A++;
    delay(100);
  }
  if (digitalRead(A1) == LOW)
  {
    A--;
    delay(100);
  }

  //lcd.clear();
  lcd.print("# A ");
  lcd.print(A );

 }
void action2() {

   if (digitalRead(A3) == LOW)
  {
    B++;
    delay(100);
  }
  if (digitalRead(A1) == LOW)
  {
    B--;
    delay(100);
  }

  lcd.clear();
  lcd.print("# B ");
  lcd.print(B );
  }
void action3() {

  lcd.clear();
  lcd.print(">Toggle Led #3");
 }
void action4() {

  lcd.clear();
  lcd.print(">Toggle Led #4");

}
horace
June 3, 2023, 12:16pm
2
what microcontroller are you using?
Hello tom321
I´ve made a small code review.
There is knot in the logic.
To modify the values for either A or B the sketch requieres addtional buttons or you have to interlock the action on the buttons used until the input is terminated.
Have a nice day and enjoy coding in C++.
horace
June 3, 2023, 12:36pm
5
you code defines
int upButton = A3;
int downButton = A1;
int selectButton = A2;
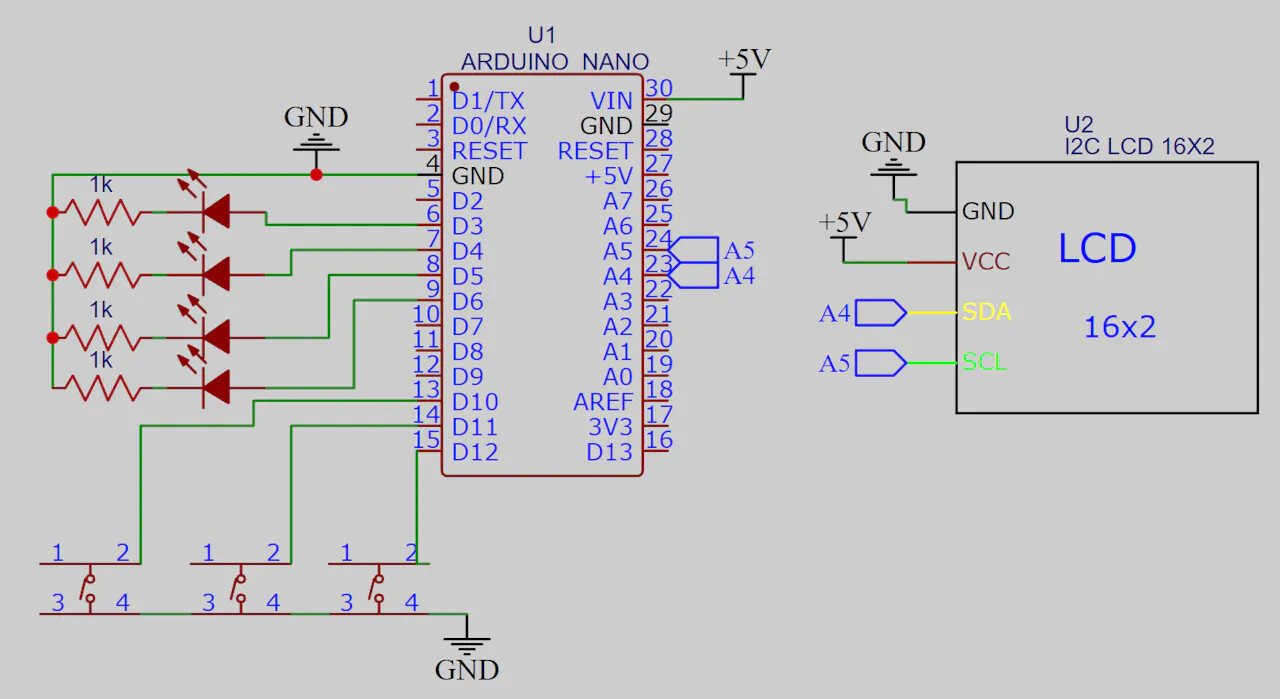
yet the diagram shows the buttons connected to D10, D11 and D12?
Here is your code with exactly the same logic .serial printing to make visible what your code is really doing.
Open the serial monitor
Upload this code-version and watch what is printed to the serial monitor
// MACRO-START * MACRO-START * MACRO-START * MACRO-START * MACRO-START * MACRO-START *
// a detailed explanation how these macros work is given in this tutorial
// https://forum.arduino.cc/t/comfortable-serial-debug-output-short-to-write-fixed-text-name-and-content-of-any-variable-code-example/888298
#define dbg(myFixedText, variableName) \
  Serial.print( F(#myFixedText " "  #variableName"=") ); \
  Serial.println(variableName);

#define dbgi(myFixedText, variableName,timeInterval) \
  { \
    static unsigned long intervalStartTime; \
    if ( millis() - intervalStartTime >= timeInterval ){ \
      intervalStartTime = millis(); \
      Serial.print( F(#myFixedText " "  #variableName"=") ); \
      Serial.println(variableName); \
    } \
  }

#define dbgc(myFixedText, variableName) \
  { \
    static long lastState; \
    if ( lastState != variableName ){ \
      Serial.print( F(#myFixedText " "  #variableName" changed from ") ); \
      Serial.print(lastState); \
      Serial.print( F(" to ") ); \
      Serial.println(variableName); \
      lastState = variableName; \
    } \
  }

#define dbgcf(myFixedText, variableName) \
  { \
    static float lastState; \
    if ( lastState != variableName ){ \
      Serial.print( F(#myFixedText " "  #variableName" changed from ") ); \
      Serial.print(lastState); \
      Serial.print( F(" to ") ); \
      Serial.println(variableName); \
      lastState = variableName; \
    } \
  }
// MACRO-END * MACRO-END * MACRO-END * MACRO-END * MACRO-END * MACRO-END * MACRO-END *


/*
    https://www.hackster.io/LithiumION/simple-lcd-menu-using-arduino-877004
    MADE BY Lithium Ion
*/

#include <LiquidCrystal.h>
// LiquidCrystal lcd(PC15, PC14, PB5, PB6, PB8, PB9);
LiquidCrystal lcd(12, 11, 5, 4, 3, 2);

int upButton = A3;
int downButton = A1;
int selectButton = A2;
int menu = 1;
int A;
int B;

void setup() {
  Serial.begin(115200);
  Serial.println("Setup-Start");

  lcd.begin(16, 2);
  pinMode(upButton, INPUT_PULLUP);
  pinMode(downButton, INPUT_PULLUP);
  pinMode(selectButton, INPUT_PULLUP);
  updateMenu();
}

void loop() {
  dbgc("01:", digitalRead(downButton) );
  dbgc("02:", digitalRead(upButton) );
  dbgc("03:", digitalRead(selectButton) );

  if (!digitalRead(downButton)) {
    menu++;
    updateMenu();
    delay(100);
    while (!digitalRead(downButton));
  }

  if (!digitalRead(upButton)) {
    menu--;
    updateMenu();
    delay(100);
    while (!digitalRead(upButton));
  }

  if (!digitalRead(selectButton)) {
    executeAction();
    updateMenu();
    delay(100);
    while (!digitalRead(selectButton));
  }
}

void updateMenu() {
  switch (menu) {
    case 0:
      menu = 1;
      break;
    case 1:
      lcd.clear();
      lcd.print(">LED1");
      lcd.setCursor(0, 1);
      lcd.print(" LED2");
      break;
    case 2:
      lcd.clear();
      lcd.print(" LED1");
      lcd.setCursor(0, 1);
      lcd.print(">LED2");
      break;
    case 3:
      lcd.clear();
      lcd.print(">LED3");
      lcd.setCursor(0, 1);
      lcd.print(" LED4");
      break;
    case 4:
      lcd.clear();
      lcd.print(" LED3");
      lcd.setCursor(0, 1);
      lcd.print(">LED4");
      break;
    case 5:
      menu = 4;
      break;
  }
}

void executeAction() {
  Serial.println("Entering executeAction");
  dbgc("exAct:", menu);

  switch (menu) {
    case 1:
      action1();
      break;
    case 2:
      action2();
      break;
    case 3:
      action3();
      break;
    case 4:
      action4();
      break;
  }
  Serial.println("leaving executeAction");
}


void action1() {
  Serial.println("entering action1");
  dbgc("a1:", digitalRead(A3) );
  dbgc("a1:", digitalRead(A1) );

  if (digitalRead(A3) == LOW)
  {
    A++;
    delay(100);
  }
  if (digitalRead(A1) == LOW)
  {
    A--;
    delay(100);
  }

  //lcd.clear();
  lcd.print("# A ");
  lcd.print(A );
  Serial.println("leaving action1");
}

void action2() {
  Serial.println("entering action2");

  if (digitalRead(A3) == LOW)
  {
    B++;
    delay(100);
  }
  if (digitalRead(A1) == LOW)
  {
    B--;
    delay(100);
  }

  lcd.clear();
  lcd.print("# B ");
  lcd.print(B );
  Serial.println("leaving action2");
}

void action3() {
  Serial.println("entering action3");

  lcd.clear();
  lcd.print(">Toggle Led #3");
  Serial.println("leaving action3");
}

void action4() {
  Serial.println("entering action4");

  lcd.clear();
  lcd.print(">Toggle Led #4");

  Serial.println("leaving action4");
}
here is a WOKWi simulation of your code with the added serial debugoutput
Run IoT and embedded projects in your browser: ESP32, STM32, Arduino, Pi Pico, and more. No installation required!
best regards Stefan
Thanks
I don't understand what you want to say with that
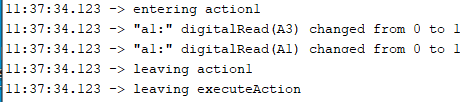
sure you are stuck here. What do you observe in the serial monitor if you have chosen menu item 1 and then press the button select?
pressing select button I should see on screen the letter A
StefanL38:
What do you observe
There is printedentering action1 leaving action1 where are the lines of code that print these two messages?
You are using the real hardware.
enable timestamps in the serial monitor and repeat the test
what can you conclude from these time-stamps?
How many milliseconds are inbetween
tom321
June 3, 2023, 4:23pm
15
I added delay 5000 , I can see for that time on LCD
# A 0
no respond to A1 or A3
void action1() {
  Serial.println("entering action1");
  dbgc("a1:", digitalRead(A3) );
  dbgc("a1:", digitalRead(A1) );

  if (digitalRead(A3) == LOW)
  {
    A++;
    delay(100);
  }
  if (digitalRead(A1) == LOW)
  {
    A--;
    delay(100);
  }

  //lcd.clear();
  lcd.print("   # A ");
  lcd.print(A);
  delay(5000);
  Serial.println("leaving action1");
}
tom321
June 3, 2023, 4:32pm
16
with this
  lcd.print(" #1, A = ");
  lcd.print(A
I have on LCD for 5 sec
#1, A = 0
because a digitalRead needs only 0,1 milliseconds
  // check if button connected to IO-pin A3 is pressed
  // this checking needs 0,1 milliseconds
  // this means you have to press the button very fast after pressing the select-button
  // so the button IS pressed down when this line of code gets executed
  // in real life NO chance to do it that fast
  // this means you have to modify the code to WAIT for the button-press
  if (digitalRead(A3) == LOW)
with the code that is executed for changing between the menu-iems
  if (!digitalRead(downButton)) {
    menu++;
    updateMenu();
    delay(100);
    while (!digitalRead(downButton));
  }
there is a while-loophttps://www.arduino.cc/reference/en/language/structure/control-structure/while/
best regards Stefan