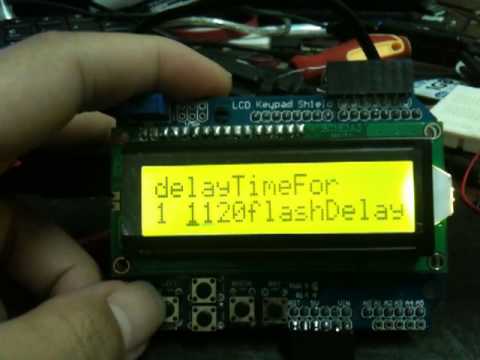
need guide on Arduino LCD&KeyPad Shield (SKU: DFR0009)

hi guys, i'm new with arduino and i need some help here...
i'm building a waterdrop sensor trigger and wanted to add in the LCD to adjust the waterdrop timer delay.
can anyone here show how should i write the script?
my current script as below...

int Sensor = 2;
int SensorStat = 0;
int led = 13;
int waterDropDelay = 1000;

void setup() {

pinMode(Sensor, INPUT);
pinMode(led, OUTPUT);
Serial.begin(9600);

}

void loop() {
SensorStat = digitalRead(Sensor);
if (SensorStat == HIGH){
delay(waterDropDelay);
digitalWrite(led, HIGH);
}

else {digitalWrite(led, LOW);
}

Serial.println(SensorStat, DEC);
}

What LCD & KeyPad shield are you using (as I think there are a few different variations on that theme).

Conceptually this is what you want to do though:

  1. Wire up the LCD and get that working. In the LCD library in the examples in the Arduino IDE there's a good test example. Also see Adafruit example on how to rig one up and test it ( Arduino Tutorial - connecting a parallel LCD )

  2. Once you have that set up and working then look at your keypad.

If you're using the one that seems like there are lots of clones of (http://www.arduino.cc/cgi-bin/yabb2/YaBB.pl?num=1206025987) then basically the buttons work by using a single input line on an analog pin. When you press one of the buttons, it varies the amount of resistance on the line, thus your input voltage and you then get your 6 different button "presses".

Pages 9 - 12 in the dfrobot shield manual has a good example of how to display and interact simply with the detection of the button presses: http://www.robotshop.com/content/PDF/dfrobot-arduino-shields-manual.pdf

That should get you started.

cheers
aj

mine is the one with keypad. i'm quite confuse with the manual's example. i just want to use the lcd & keypad to change the value of delay. the script in the manual was too long and confused me, i have no programming background...hope someone can help on this...

thanks...

ajfisher:
What LCD & KeyPad shield are you using (as I think there are a few different variations on that theme).

Conceptually this is what you want to do though:

  1. Wire up the LCD and get that working. In the LCD library in the examples in the Arduino IDE there's a good test example. Also see Adafruit example on how to rig one up and test it ( Arduino Tutorial - connecting a parallel LCD )

  2. Once you have that set up and working then look at your keypad.

If you're using the one that seems like there are lots of clones of (http://www.arduino.cc/cgi-bin/yabb2/YaBB.pl?num=1206025987) then basically the buttons work by using a single input line on an analog pin. When you press one of the buttons, it varies the amount of resistance on the line, thus your input voltage and you then get your 6 different button "presses".

Pages 9 - 12 in the dfrobot shield manual has a good example of how to display and interact simply with the detection of the button presses: http://www.robotshop.com/content/PDF/dfrobot-arduino-shields-manual.pdf

That should get you started.

cheers
aj

Could you provide a link to the place you bought the shield from? As ajfisher said there are a few variations and one needs to know the exact one to help you with programming. If I understand you correctly, you have a parameter, let's say, water_drop_delay, which has a default value when arduino starts. You then want to adjust this value up and down via a couple of keys.

If the above is accurate, you then need the following:

  1. code to detect button presses (the seller probably has some sample)
  2. code to interact with user, including what to do if up is pressed (increasing water_drop_delay value by how much per press till max value) and what to do if down is pressed.

liudr:
Could you provide a link to the place you bought the shield from? As ajfisher said there are a few variations and one needs to know the exact one to help you with programming. If I understand you correctly, you have a parameter, let's say, water_drop_delay, which has a default value when arduino starts. You then want to adjust this value up and down via a couple of keys.

If the above is accurate, you then need the following:

  1. code to detect button presses (the seller probably has some sample)
  2. code to interact with user, including what to do if up is pressed (increasing water_drop_delay value by how much per press till max value) and what to do if down is pressed.

this is the shield that i got... http://www.myduino.com/index.php?route=product/product&path=38&product_id=69

liudr, yup, u are right, that is what i want to do. but i have totally donno how to start the code for the shield. can u show me the sample of code edit for this? let say we put 1000milisecond as default value, then each time i press up it will +1000 and press down will -1000.

hope to see your reply soon. thanks...

I don't actually own that shield so my help is limited. I make and sell my own though :slight_smile:

I guess you want to do this on your shield:

This is my phi-2 shield:

If I had your shield, I would search who made some buttons library with that shield. I will then use that library to run some tests on buttons until I understand how to use the library to report button status. Interactions like in the video are supposed to build upon the buttons so once you get the buttons to report depress and release, you could use my phi_prompt library (used in the video) or write your own interactions.

By the way, don't use the lcd4bit library as suggested by the website. That library is obsolete for a long time and the website just didn't update anything.

that bout what i wanted to make. i'm still not understand what is the library for. is the LiquidCrystal default in the editor ok to use?

now i know how to print out the lcd but still on going to understand how the button works...

liudr:
I don't actually own that shield so my help is limited. I make and sell my own though :slight_smile:

I guess you want to do this on your shield:
http://www.youtube.com/watch?v=ZccLjz8cLno
This is my phi-2 shield:

If I had your shield, I would search who made some buttons library with that shield. I will then use that library to run some tests on buttons until I understand how to use the library to report button status. Interactions like in the video are supposed to build upon the buttons so once you get the buttons to report depress and release, you could use my phi_prompt library (used in the video) or write your own interactions.

By the way, don't use the lcd4bit library as suggested by the website. That library is obsolete for a long time and the website just didn't update anything.

The buttons are read through one analog pin - A0. The voltage at that pin defines which of the buttons is pressed. The shield manual on the page you linked to gives a fairly simple example of how to use it, or you can just analogread the pin and have a series of if statements to determine which one was pressed.

can show me some simple example for the code? let say,
the lcd by default will show value 1000. when up press it will +1 and down press will -1. when left or right press, it will go left or right...

wildbill:
The buttons are read through one analog pin - A0. The voltage at that pin defines which of the buttons is pressed. The shield manual on the page you linked to gives a fairly simple example of how to use it, or you can just analogread the pin and have a series of if statements to determine which one was pressed.

my lcd shield and codeare now as below. i still donno how to add in code to make the button funtion.
i wanted to use the left right button to move the cursor left right and up down button to change the value.

hope to see some example from anyone here...

#include <LiquidCrystal.h>
LiquidCrystal lcd(8, 9, 4, 5, 6, 7);

int Sensor = 2;
int SensorStat = 0;
int led = 13;
int waterDropDelay = 1000;

void setup() {

pinMode(Sensor, INPUT);
pinMode(led, OUTPUT);
lcd.begin(16,2);
Serial.begin(9600);

}

void loop() {
lcd.setCursor(0,0);
lcd.print("DelayTimer");
lcd.setCursor(0,1);
lcd.print(waterDropDelay);
SensorStat = digitalRead(Sensor);
if (SensorStat == HIGH){
delay(waterDropDelay);
digitalWrite(led, HIGH);
delay(100);
digitalWrite(led,LOW);
delay(1000);
}

else {digitalWrite(led, LOW);

}

Serial.println(SensorStat, DEC);
}

Here's the code from the manual page, hacked a bit for your purposes. Not at all elegant, may get the job done (don't have the hardware to test it):

void DealWithKeys() 
{ 
adc_key_in = analogRead(0); // read the value from the sensor
key = get_key(adc_key_in);  // convert into key press
if (key != oldkey)          // if keypress is detected
  { 
  delay(50);	              // wait for debounce time
  adc_key_in = analogRead(0); // read the value from the sensor 
  key = get_key(adc_key_in);  // convert into key press
  if (key != oldkey) 
    {
    oldkey = key; 
    switch(key)
      { 
      case 1: // up
        waterDropDelay++;
        break;
      case 2: // down
        waterDropDelay--;
        break;
      default:
        break;  
      }
    }
  }
} 

 
int get_key(unsigned int input) 
{ // Convert ADC value to key number	
int k;
for (k = 0; k < NUM_KEYS; k++)
  {
  if (input < adc_key_val[k])
    { 
    return k;
    }
  } 
if (k >= NUM_KEYS)
  k = -1;	// No valid key pressed 
return k;
}

Call DealWithKeys from loop. Because you're using delay, the response to the keys may be sluggish. Once you get it working, you'll probably want to replace the delay with use of millis. Which means (can I get a witness?) that you will need to look at the blink without delay example.

foosi,

The controller that I built is based on the same shield that you have in your possession.

My controller is used to control the time that a valve is open to create the drop. It has
the capability to provide 1, 2, or 3 drops....The size of the drops and the duration between
the drops.

I used the example provided by a couple of different vendors of this shield to build from.

I think what you are trying to accomplish is set a time delay from when a drop is detected that
will then fire a strobe. Am I correct in this assumption?

Have you been successful in getting the sample code from DFRobot working on your shield?

There is a zip file on the RobtShop web site. Here is a link to the page that has the file....

http://www.robotshop.com/dfrobot-lcd-keypad-shield-arduino.html

Click on the zip file and download it. When you unzip the file you will have
everything that you need to get the sample code up and running.

Once you have the sample code up and running you can then start to modify the
code to do what you want.

I suggest that you get a copy of the book "Beginning Arduino" by Michael McRoberts and do the
projects in the book. The hardware hookup and an explanation of the code that makes the project work
is provided by the author. The projects are fun and you will learn a lot about how Arduino works.

Here is another useful link on using Arduino to capture water drops written by Maurice Ribble. He
has a box that will do what you want for a very reasonable price.

http://www.glacialwanderer.com/hobbyrobotics/?p=11

RWW

RogerW,

thanks for your reply.

u are right, i'm now trying to use the lcd button shield to control the timer value.

i'm trying to start from simple step so that can understand more bout the arduino code. your controller are great but the code was too advance for me.

now i manage to make a code as below and the lcd+button shield can change the value by +1 or -1 if i press up key or down key.

thanks to wildbill and RogerW because this code i have made was idea i get from combination of code from Wildbill and RogerW.

#include <LiquidCrystal.h>
LiquidCrystal lcd(8, 9, 4, 5, 6, 7);


int Sensor = 2;
int SensorStat = 0;
int led = 13;
int waterDropDelay = 1000;
int adc_key_val[5] ={
  30, 150, 360, 535, 760 };
  
/*
 Right        Value = 0
 Up           Value = 1
 Down         Value = 2
 Left         Value = 3
 Select       Value = 4
 */
  
int NUM_KEYS = 5;
int adc_key_in;
int key=-1;
int oldkey=-1;
  
  
void setup() {
  
  pinMode(Sensor, INPUT);
  pinMode(led, OUTPUT);
  lcd.begin(16,2);
  Serial.begin(9600);

}

void loop() {
  
  adc_key_in = analogRead(0);    // read the value from the sensor  

  key = get_key(adc_key_in);    // convert into key press
  if (key != oldkey) // if keypress is detected
  {
    delay(0);      // wait for debounce time
    adc_key_in = analogRead(0);    // read the value from the sensor  
    key = get_key(adc_key_in);    // convert into key press
    if (key != oldkey)
    {
      oldkey = key;
      if (key == 1)         //up key
      {
        upkey();
      }
      else if (key == 2)   //down key
      {
        downkey();
      }
      {
        outloop();
        delay(100);
      }
    }
  }
}

// Convert ADC value to key number

int get_key(unsigned int input)
{   
  int k;
  for (k = 0; k < NUM_KEYS; k++)
  {
    if (input < adc_key_val[k])
    {  
      return k;  
    }
  }
  if (k >= NUM_KEYS)
    k = -1;     // No valid key pressed
  return k;
}
/*

*/
void upkey()
{
  waterDropDelay++;
}
/*

*/
void downkey()
{
  waterDropDelay--;
}


void outloop(){

  lcd.setCursor(0,0);
  lcd.print("foosi");
  lcd.setCursor(0,1);
  lcd.print(waterDropDelay);
  SensorStat = digitalRead(Sensor);
  if (SensorStat == HIGH){
    delay(waterDropDelay);
    digitalWrite(led, LOW);
    delay(100);
    digitalWrite(led,LOW);
    delay(500);
  }
  
  else {digitalWrite(led, LOW);
  
  
  }
  
  
  Serial.println(SensorStat, DEC);
}

now the code works to change the delay. now i set my default delay value was 1000 millisecond. i able to change the 1000 to 1001,1002, 1003,,, with up key. but if press down it change to 9990,9980,9970,,, can anyone here explain me on this? how can i modify the code so that i can use left, right to move the cursor left or right to change the single number from 0-9?

can anyone here explain me on this?

You are printing 999 over 1000, which doesn't erase the 0, so you see 9990.

foosi:
now the code works to change the delay. now i set my default delay value was 1000 millisecond. i able to change the 1000 to 1001,1002, 1003,,, with up key. but if press down it change to 9990,9980,9970,,, can anyone here explain me on this? how can i modify the code so that i can use left, right to move the cursor left or right to change the single number from 0-9?

In the following code, I want to print out a variable "number" on lcd. Instead of printing it directly, I printed appropriate amount of zeros to pad on the left side. You can replace '0' with ' ' (just a space) and do space padding or print the number first and do space padding on the right side too.

if (number<1000) lcd.write('0');
if (number<100) lcd.write('0');
if (number<10) lcd.write('0');
lcd.print(pos);

A better way (requires more C understanding) to control output is to use sprintf. I'm sure you'll use it in later stage of your project.

ok, now i get the flow step almost done. can change value up and down in 0001-9999.

#include <LiquidCrystal.h>
#include <EEPROM.h>
LiquidCrystal lcd(8, 9, 4, 5, 6, 7);

/*
 Right        Value = 0
 Up           Value = 1
 Down         Value = 2
 Left         Value = 3
 Select       Value = 4
 */
int  adc_key_val[5] ={
  30, 150, 360, 535, 760 };

int NUM_KEYS = 5;
int adc_key_in;
int key=-1;
int oldkey=-1;

int lcdTopRow = 0;
int lcdBottomRow = 1;

int flashSetting = 1;
int flashDelay = 0;

int reading = 0;

//initial for ON/OFF
int backLightON = HIGH;
int backLightOFF = LOW;
int ledpinON = HIGH;
int ledpinOFF = LOW;

//initial for pin I/O
int backLightControl = 10;   // Output to control back light on LCD
int ledpin = 13;         // Heartbeat indicator
int sensor = 2;              //sensor signal
int flash = 11;              //output to on flash
int camera = 12;
int valve = 3;

int sensorStat = 0;

int cursorValue = 0;

void setup()
{
  pinMode(backLightControl, OUTPUT);
  pinMode(ledpin, OUTPUT);
  pinMode(sensor, INPUT);
  pinMode(flash, OUTPUT);
  pinMode(camera, OUTPUT);
  pinMode(valve, OUTPUT);
  
  lcd.begin(16, 2);
  Serial.begin(9600);
 
  
  digitalWrite(backLightControl, backLightON);
  lcd.clear();
  {
  lcd.setCursor(0, lcdTopRow);
  lcd.print("flashSetting");
  lcd.setCursor(0, lcdBottomRow);
  lcd.print(flashSetting);
  lcd.print(" ");
  lcd.print(flashDelay);
  } 
  lcd.setCursor(0, lcdBottomRow);
  lcd.cursor();
  flashDelay = EEPROM.read(0);
}

void loop() 
{
  adc_key_in = analogRead(0);    // read the value from the sensor  

  key = get_key(adc_key_in);    // convert into key press
  if (key != oldkey) // if keypress is detected
  {
    delay(50);      // wait for debounce time
    adc_key_in = analogRead(0);    // read the value from the sensor  
    key = get_key(adc_key_in);    // convert into key press
    if (key != oldkey)             
    {           
      oldkey = key;
      if (key >=0)     
      {
        rightkey();     //right key
      }
      if (key == 1)     //up key
      {
        upkey();
      }
      else if (key == 2)   //down  key
      {
        downkey();
      }
      else if (key ==3)    //left key
      {
        leftkey();
      }
      else if (key == 4)     //select key
      { 
        saveRead();
        delay(500);
      }
    }
  }    
}
// Convert ADC value to key number

int get_key(unsigned int input)
{   
  int k;
  for (k = 0; k < NUM_KEYS; k++)
  {
    if (input < adc_key_val[k])
    {  
      return k;  
    }
  }
  if (k >= NUM_KEYS)
    k = -1;     // No valid key pressed
  return k;
}

/*
*/
void rightkey()
{
  if (key == 0)    //right key
  {
    cursorValue++;
    if (cursorValue >= 15)
    {
      cursorValue = 15;
    }

    lcd.setCursor (cursorValue,1);
    //lcd.print (cursorValue);
    if (cursorValue == 2)
    {
      lcd.setCursor(0,lcdTopRow);
      lcd.print("                ");
      lcd.setCursor(0,lcdTopRow);
      lcd.print("flashDelay");
      lcd.setCursor(cursorValue,1);
    }
  }
}
  
/*
*/
void leftkey()
{
  cursorValue--;
  if (cursorValue <= 0)
  {
    cursorValue = 0;
  }  
  lcd.setCursor (cursorValue,1);

  if (cursorValue == 0)
  {
    lcd.setCursor(0,lcdTopRow);
    lcd.print("                ");
    lcd.setCursor(0,lcdTopRow);
    lcd.print ("flashSetting");
    lcd.setCursor(cursorValue,1);
  }
  else if (cursorValue == 2)
  {
    lcd.setCursor(0,lcdTopRow);
    lcd.print("                ");
    lcd.setCursor(0,lcdTopRow);
    lcd.print("flashDelay");
    lcd.setCursor(cursorValue,1);
  }
}

/*
*/
void upkey()
{       
    if (cursorValue == 2) 
  {
    flashDelay = flashDelay + 1000;

    if (flashDelay >= 10000)
    {
      flashDelay = 0;
    }

    lcd.print(flashDelay);
    lcd.setCursor(cursorValue,1);
  }
  if (cursorValue == 3)  
  {
    flashDelay = flashDelay + 100;

    if (flashDelay >= 1000)
    {
      flashDelay = 0;
    }

    lcd.print(flashDelay);
    lcd.setCursor(cursorValue,1);
  }
  if (cursorValue == 4)  
  {
    flashDelay = flashDelay + 10;

    if (flashDelay >= 100)
    {
      flashDelay = 0;
    }

    lcd.print(flashDelay);
    lcd.setCursor(cursorValue,1);
  }
  if (cursorValue == 5)  
  {
    flashDelay = flashDelay + 1;

    if (flashDelay >= 10)
    {
      flashDelay = 0;
    }

    lcd.print(flashDelay);
    lcd.setCursor(cursorValue,1);
  }
         
    return;
}

/*
*/
void downkey()
{
  if (cursorValue == 2)  //decrement tens of drop size 1
  {
    flashDelay = flashDelay - 1000;

    if (flashDelay <= 999)
    {
      flashDelay = 0000;
    }
    lcd.print(flashDelay);
    lcd.setCursor(cursorValue,1);
  }
  if (cursorValue == 3)  //decrement tens of drop size 1
  {
    flashDelay = flashDelay - 100;

    if (flashDelay <= 99)
    {
      flashDelay = 000;
    }
    lcd.print(flashDelay);
    lcd.setCursor(cursorValue,1);
  }
  if (cursorValue == 4)  //decrement tens of drop size 1
  {
    flashDelay = flashDelay - 10;

    if (flashDelay <= 9)
    {
      flashDelay = 00;
    }
    lcd.print(flashDelay);
    lcd.setCursor(cursorValue,1);
  }
  if (cursorValue == 5)  //decrement tens of drop size 1
  {
    flashDelay = flashDelay - 1;

    if (flashDelay <= 0)
    {
      flashDelay = 0;
    }
    lcd.print(flashDelay);
    lcd.setCursor(cursorValue,1);
  }
  
  return;
}

void saveRead()
{
  digitalWrite(backLightControl, backLightOFF);
  digitalWrite(camera, HIGH);
  delay(50);
  digitalWrite(valve, HIGH);
  delay(100);
  digitalWrite(valve, LOW);
  sensorStat = digitalRead(sensor);
    if (sensorStat == HIGH)
    {
      delay(flashDelay);               //delay to fire flash if sensor detect waterdrop
      digitalWrite(flash, HIGH);
      delay(100);                      //delay to show LED as flash indicator
      digitalWrite(flash, LOW);
      delay(1000);
    }      
      digitalWrite(camera, LOW);
      
  
  EEPROM.write(0, flashDelay);
  digitalWrite(backLightControl, backLightON);
  loop;
}

That was pretty quick. Now you owe the forum a video. :wink:

yup, spending few days time keep trying on those code that everyone share here and thanks for everyone's helps here...

liudr:
That was pretty quick. Now you owe the forum a video. :wink:

now i have add in more code for timer 1 and timer 2.

#include <LiquidCrystal.h>
#include <EEPROM.h>
LiquidCrystal lcd(8, 9, 4, 5, 6, 7);

/*
 Right        Value = 0
 Up           Value = 1
 Down         Value = 2
 Left         Value = 3
 Select       Value = 4
 */
int  adc_key_val[5] ={
  30, 150, 360, 535, 760 };

int NUM_KEYS = 5;
int adc_key_in;
int key=-1;
int oldkey=-1;

int lcdTopRow = 0;
int lcdBottomRow = 1;

int timerSetting = 0;
int flashDelay = 0;
int valveDelay = 0;

int reading = 0;

//initial for ON/OFF
int backLightON = HIGH;
int backLightOFF = LOW;
int ledpinON = HIGH;
int ledpinOFF = LOW;

//initial for pin I/O
int backLightControl = 10;   // Output to control back light on LCD
int ledpin = 13;         // Heartbeat indicator
int sensor = 2;              //sensor signal
int flash = 11;              //output to on flash
int camera = 12;
int valve = 3;

int varloop = 0;       //check sensor var

int sensorStat = 0;

int cursorValue = 0;

void setup()
{
  pinMode(backLightControl, OUTPUT);
  pinMode(ledpin, OUTPUT);
  pinMode(sensor, INPUT);
  pinMode(flash, OUTPUT);
  pinMode(camera, OUTPUT);
  pinMode(valve, OUTPUT);
  
  lcd.begin(16, 2);
  Serial.begin(9600);
  
  timerSetting = EEPROM.read(0);
  flashDelay = EEPROM.read(1);
  valveDelay = EEPROM.read(2);
   
  digitalWrite(backLightControl, backLightON);
  lcd.clear();
  
    if (timerSetting == 0)
    {
      lcd.setCursor(0, lcdTopRow);
      lcd.print("settingSelection");
      lcd.setCursor(0, lcdBottomRow);
      lcd.print(timerSetting);
      lcd.print(" ");
      lcd.print("1flash 2valve");
    }

      
  lcd.setCursor(0, lcdBottomRow);
  lcd.cursor();

}
void loop() 
{
  
  adc_key_in = analogRead(0);    // read the value from the sensor  

  key = get_key(adc_key_in);    // convert into key press
  if (key != oldkey) // if keypress is detected
  {
    delay(50);      // wait for debounce time
    adc_key_in = analogRead(0);    // read the value from the sensor  
    key = get_key(adc_key_in);    // convert into key press
    if (key != oldkey)             
    {           
      oldkey = key;
      if (key >=0)     
      {
        rightkey();     //right key
      }
      if (key == 1)     //up key
      {
        upkey();
      }
      else if (key == 2)   //down  key
      {
        downkey();
      }
      else if (key ==3)    //left key
      {
        leftkey();
      }
      else if (key == 4)     //select key
      { 
        saveRead();
        delay(500);
      }
    }
  }    
}
// Convert ADC value to key number

int get_key(unsigned int input)
{   
  int k;
  for (k = 0; k < NUM_KEYS; k++)
  {
    if (input < adc_key_val[k])
    {  
      return k;  
    }
  }
  if (k >= NUM_KEYS)
    k = -1;     // No valid key pressed
  return k;
}

/*
*/
void rightkey()
{
  if (timerSetting == 0)    //right key
  {
    cursorValue++;
    if (cursorValue <= 1)
    {
      cursorValue = 0;
    }
      lcd.setCursor(0,lcdTopRow);
      lcd.print("                ");
      lcd.setCursor(0,lcdTopRow);
      lcd.print("UpDownToSelect");
      lcd.setCursor (cursorValue,1);
  }
  else if (key == 0)    //right key
  {
    cursorValue++;
    if (cursorValue >= 6)
    {
      cursorValue = 0;
    }
    lcd.setCursor (cursorValue,1);
    //lcd.print (cursorValue);
    if (timerSetting == 1 && cursorValue == 2)
    {
      lcd.setCursor(0,lcdTopRow);
      lcd.print("                ");
      lcd.setCursor(0,lcdTopRow);
      lcd.print("delayTimeFor");
      lcd.setCursor(6,lcdBottomRow);
      lcd.print("flashDelay");
      lcd.setCursor(cursorValue,1);
    }
    if (timerSetting == 2 && cursorValue == 2)
    {
      lcd.setCursor(0,lcdTopRow);
      lcd.print("                ");
      lcd.setCursor(0,lcdTopRow);
      lcd.print("delayTimeFor");
      lcd.setCursor(6,lcdBottomRow);
      lcd.print("valveDelay");
      lcd.setCursor(cursorValue,1);
    }
  }
}
  
/*
*/
void leftkey()
{
  if (timerSetting == 0)
  {
    cursorValue--;
  }
    if (cursorValue <= -1)
    {
      cursorValue = 0;
    }
    else if (timerSetting == 1 || timerSetting == 2)
    {
      cursorValue--;
      if (cursorValue <= -1)
      {
        cursorValue = 5;
       }
    }  
      lcd.setCursor (cursorValue,1);

  if (cursorValue == 0 && timerSetting ==1)
  {
    lcd.setCursor(0,lcdTopRow);
    lcd.print("                ");
    lcd.setCursor(0,lcdTopRow);
    lcd.print ("settingSelection");
    lcd.setCursor(cursorValue,1);
  }
  else if (cursorValue == 0 && timerSetting ==2)
  {
    lcd.setCursor(0,lcdTopRow);
    lcd.print("                ");
    lcd.setCursor(0,lcdTopRow);
    lcd.print ("settingSelection");
    lcd.setCursor(cursorValue,1);
  }
}