Problem with long run program - Arduino UNO

Hello there,

I'm new here at this forum and really beginner with Arduino coding.
My friend ask me for a favor and code custom-made driver for enabling/disabling external device on 230V AC.

The main idea of the driver is:

  1. Program in Standby mode, waiting for operators move,
  2. Program go into "heat" mode and count the time to finish or looking for operator move to interupt the mode,
  3. Program go to "cooldown" mode after first or second scenario in point 2. Counting down the time, then go back to standby mode.

Additional features:

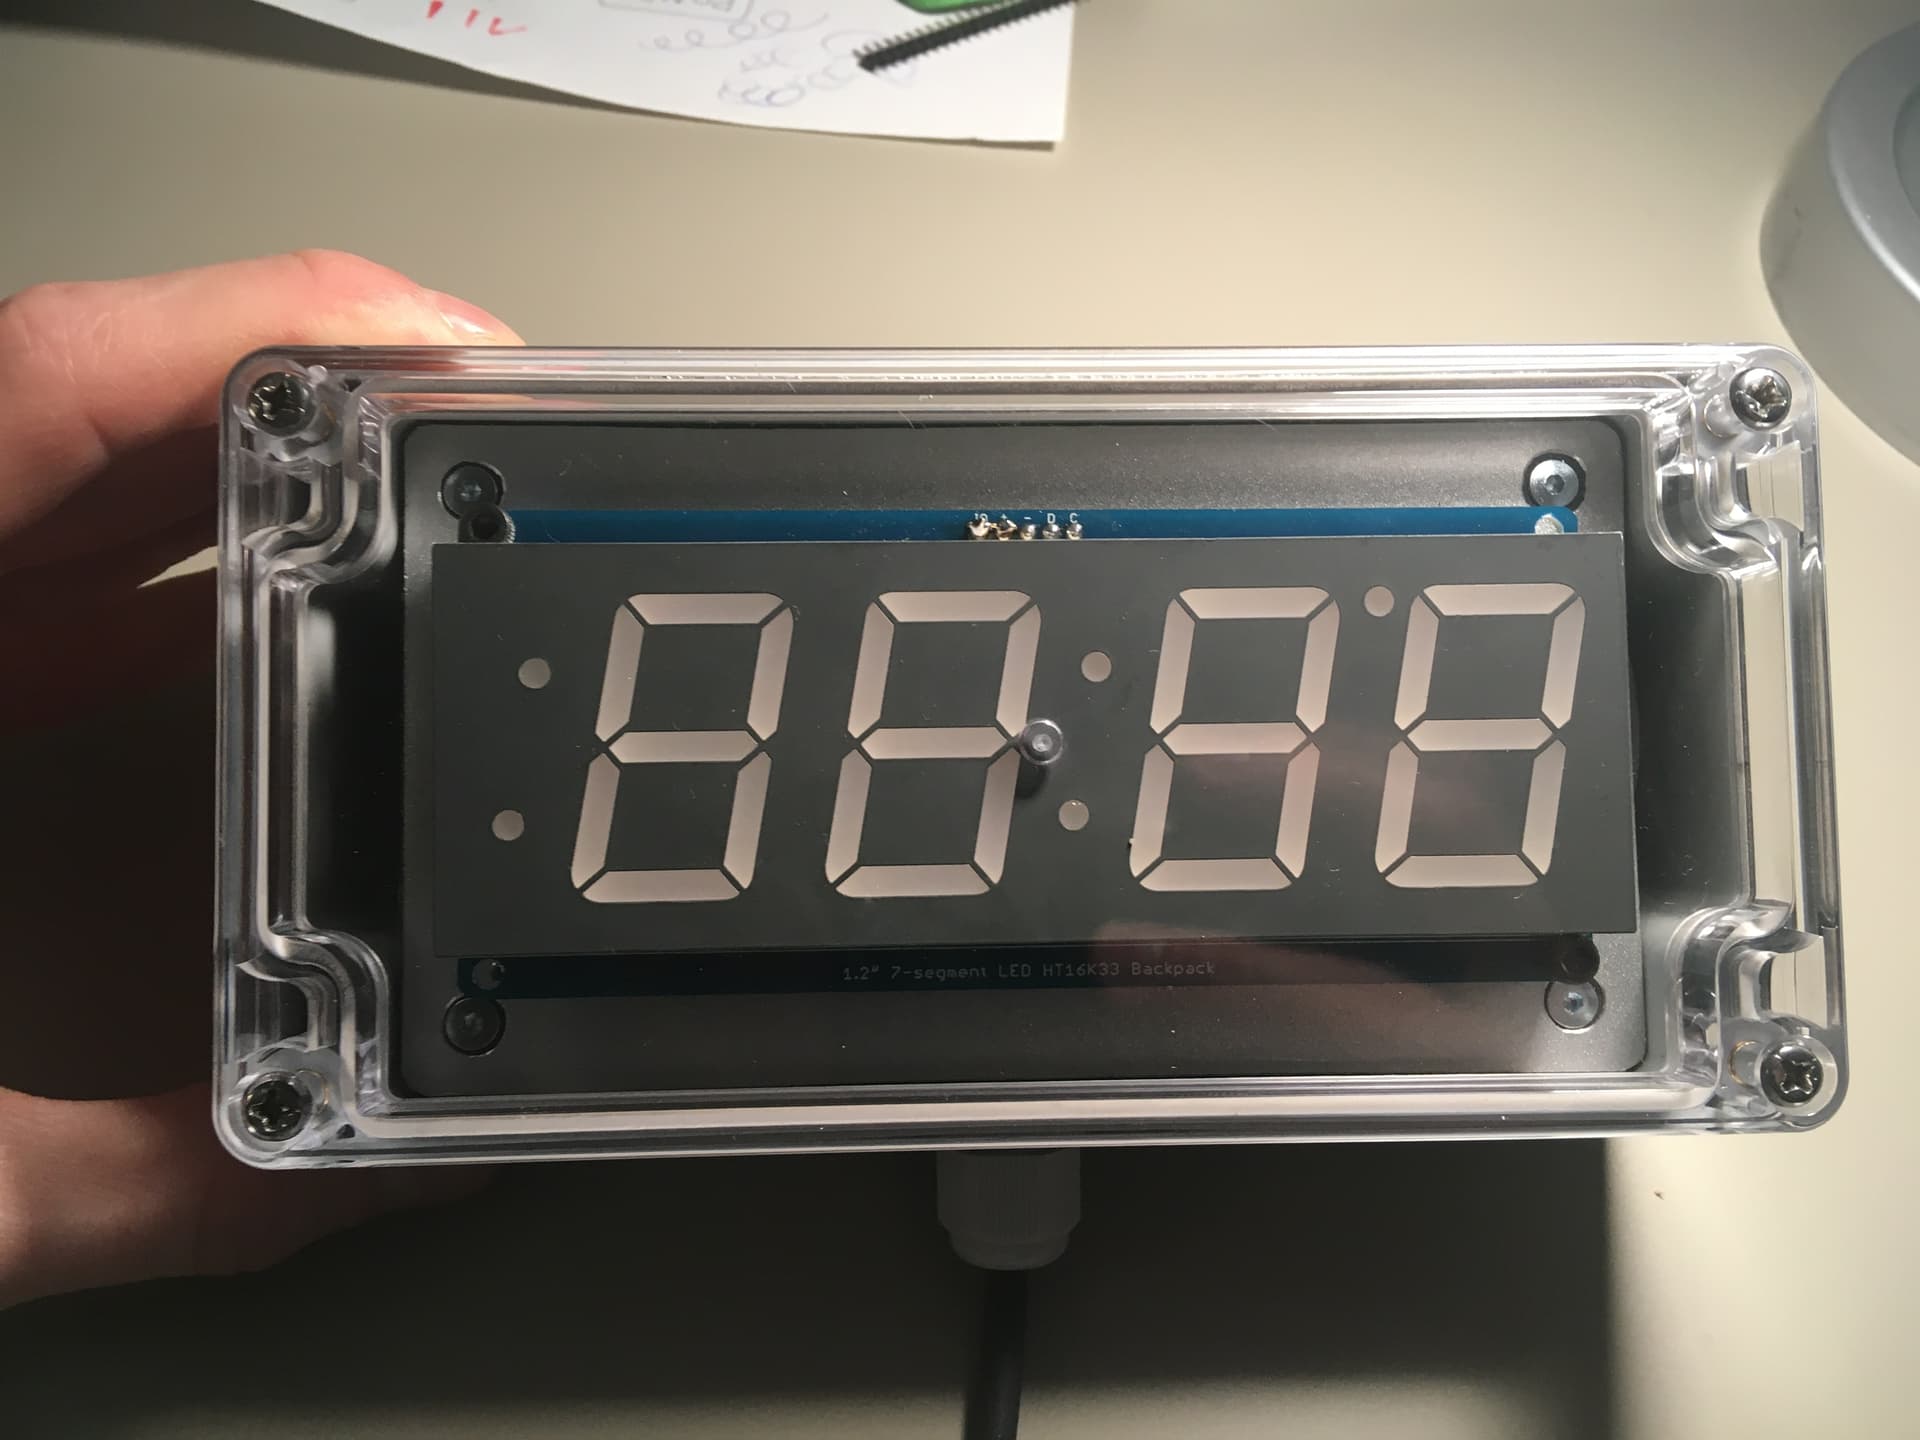
  1. Driver have external LCD display basing on 7-segment display with colon to display counting time. Display is based on Adafruit driver and connection is on I2C way.
  2. Standby - only colon is displayed, display brightness setting is able to change only in this mode,
  3. Cooldown counting cannot be interrupted by operator. Only the hardware reset can reset the all driver.

Where is the problem?
For some reason sometimes program freeze and not responding for any input. Only hardware reset helps.
Knowing that I add extra feature to reset the all board with connecting A3 as output to RESET pin. Then code a method to execute it with digitalWrite LOW level of signal.
To prevent some bad scenarios the program count 30s in Standby with no action and go with reset. Second way to reset the diver is after counting down the cooldown time.

Idk why the program freeze if all driver is reseting for every 30s of idle in Standby?
Also I with to make my code (this and future) much more better quality and wish to ask you for any advice with code review.

To make all case more clear I put my code below. I can also share a GIT folder with all history of this driver.
PS many parts of the program are in Polish but it could be easy to understand for any of You :wink: If not, let me know to explain the code more precisely.

// 13.02.2023 Update:
// 1. Extra condition added to heat and cooldown mode, the "if" checks also the current mode
// 2. Extra program to reset the arduino software, method is called after cooldown time end
// 3. Error program implemented. Basing on current behaviour of driver, the method is called after calling the reset.
//    That provide extra info if driver is stucked and need to be reset manually by pressing the button.
// 4. Some of the lines are moved to correct (better) positions to be executed when it is necessary.
// 5. All commented and not used anymore lines - are deleted.

// 18.02.2023 Update:
// 1. Software reset is disabled
// 2. Hardware + software reset is setup, A0 Pin as output to reset the driver
// 3. Reset works on Standby for each 30sec without enabling the program
// 4. Reset function is enabled after the cooldown time is gone.

#include <Arduino.h>
#include <Wire.h>
#include "Adafruit_LEDBackpack.h"

#define LEDzielony 8
#define LEDczerwony 9
#define LEDniebieski 10
#define przekaznik 11
#define buttonPIN 12


Adafruit_7segment matrix = Adafruit_7segment();
int mode = 0;                         //mode(tryb) przyjmuje wartości: 0-dla standby, 1-dla heat, 2-dla cooldown
int time_to_calc;
int odczytADC;
int brightness = 0;
bool standbyON = false;
bool heatON = false;
bool cooldownON = false;
bool colon_status = true;
unsigned long defaultStandbyTime = 30000UL;     //domyślny czas dla standby, po jego zakończneiu następuje reset sterownika, 30.000ms (30sek)
unsigned long defaultHeatTime = 600000UL;        //domyślny czas dla grzania, finalnie wpisać 600.000ms
unsigned long defaultCooldownTime = 1800000UL;   //domyślny czas dla studzenia, finalnie wpisać 1.800.000ms
unsigned long previous_time = 0;
unsigned long start_standby = 0;
unsigned long start_heat = 0;
unsigned long start_cooldown = 0;


void setup()
{
  digitalWrite(A0, HIGH);             //ustawienie wyjścia na A0 w stan wysoki
  pinMode(A0, OUTPUT);                //ustawienie portu A0 jako wyjście
  pinMode(LEDzielony, OUTPUT);
  pinMode(LEDczerwony, OUTPUT);
  pinMode(LEDniebieski, OUTPUT);
  pinMode(przekaznik, OUTPUT);
  pinMode(buttonPIN, INPUT_PULLUP);
  pinMode(A3, INPUT_PULLUP);

  digitalWrite(LEDzielony, HIGH);
  digitalWrite(LEDczerwony, HIGH);    //dla RGB ze wspolną anodą (+), dla stanu HIGH diody nie świecą
  digitalWrite(LEDniebieski, HIGH);
  digitalWrite(przekaznik, HIGH);     //dla przekaźnika z załączaniem do GND, dla stanu HIGH przekaźnik jest wyłączony

  matrix.begin(0x70);                 // ustawienie adresu wyświetlacza, wartość domyślna 0x70
  matrix.blinkRate(0);                // ustawienie migania wyświetlacza, domyślnie 0 - brak migania
  
  mode = 0;
  digitalWrite(LEDczerwony, LOW);
  delay(500);
  digitalWrite(LEDczerwony, HIGH);
}

//metoda sygnalizująca błąd (brak) resetu programu. Konieczny reset ręczny
void error_mess ()
{
  bool LED_stat = LOW;
  for (;;)            // wywołanie pęlti nieskończoej. Wszystkie diody migają razem.
  {
    digitalWrite(LEDzielony, LED_stat);
    digitalWrite(LEDczerwony, LED_stat);
    digitalWrite(LEDniebieski, LED_stat);
    delay(500);
    LED_stat = !LED_stat;
  }
}

//metoda resetująca sterownik hardware'owo, podanie stanu LOW na pin RESET powoduje reset sterownika
void resetFunc()
{
  digitalWrite(LEDzielony, LOW);
  digitalWrite(LEDczerwony, LOW);
  digitalWrite(LEDniebieski, LOW);
  delay(2000);
  digitalWrite(A0, LOW);
  delay(50);
  error_mess();
}


bool butt()
{
  // bool buttonResult;
  while (digitalRead(buttonPIN) == LOW)
  { }
  delay(100);
  return true;
}

int display_time (int t1) {
  return int (t1 / 60 * 100 + t1 % 60);   // przeliczenie sekund na wartość do wyświetlenia na ekranie, minuty i sekundy
}

// wyświetlająca wartość na wyświetlaczu + zmiana stanu dwukropka
void count_the_time (int t3) {
  matrix.print(display_time(t3), DEC);
  colon_status = !colon_status;
  matrix.drawColon(colon_status);
  matrix.writeDisplay();
}

void standby()
{
  if ((standbyON == false) & (mode == 0))
  {
    digitalWrite(przekaznik, HIGH);     //profilaktyczne wyłączenie przekaźnika
    digitalWrite(LEDczerwony, HIGH);    //
    digitalWrite(LEDniebieski, HIGH);   //wyłączenie diodek czerwonej i niebieskiej
    digitalWrite(LEDzielony, LOW);      //załączenie diody zielonej
    colon_status = true;
    matrix.drawColon(colon_status);     // uruchomienie dwukropka
    matrix.writeDisplay();
    time_to_calc = defaultStandbyTime / 1000;  //przeliczenie czasu standby na sekundy
    start_standby = millis();
    previous_time = start_standby;
    standbyON = true;
    heatON = false;
    cooldownON = false;
    delay(2000);
  }
  odczytADC = analogRead(A3);         //odczyt wartości z portu A3 (analog) z potencjometru
  brightness = map(odczytADC, 5, 1020, 0, 15);
  matrix.setBrightness(brightness);
  matrix.drawColon(true);             // uruchomienie dwukropka
  matrix.writeDisplay();              // załączneie zmian w wyświetlaczu
  if ((millis() - start_standby) > defaultStandbyTime)
  {
    resetFunc();
  }
  if (digitalRead(buttonPIN) == LOW)
  {
    if (butt() == true)
    {
      standbyON = false;
      cooldownON = false;
      mode = 1;
    }
  }
}

void heat()
{
  if ((heatON == false) & (mode == 1))
  {
    digitalWrite(przekaznik, LOW);          //załączenie przekaźnika
    digitalWrite(LEDczerwony, LOW);         //załączenie diody czerwonej
    digitalWrite(LEDniebieski, HIGH);       //
    digitalWrite(LEDzielony, HIGH);         //wyłączenie diodek niebieskiej i zielonej
    time_to_calc = defaultHeatTime / 1000;  //przeliczenie czasu grzania na sekundy
    start_heat = millis();
    previous_time = start_heat;
    heatON = true;
    colon_status = false;
    delay(1000);
  }
  if ((heatON == true) & (mode == 1))
  {
    if ((start_heat + defaultHeatTime) > millis())   //sprawdzenie, czy upłynął już domyślny czas grzania
    {
      if (millis() - previous_time >= 1000UL)
      {
        previous_time = millis();
        time_to_calc -= 1;
        count_the_time(time_to_calc);
      }
      if (digitalRead(buttonPIN) == LOW)                  //jeżeli nie, możemy wywołać zakończenie programu oraz przejście
      {                                                   //do podprogramu studzenia
        if (butt() == true)                               //taki zabieg można zrobić tylko raz przed upływem domyślnego czasu grzania
        {
          heatON = false;
          mode = 2;
          matrix.print(0, DEC);
          matrix.writeDisplay();
        }
      }
    }
    else if ((start_heat + defaultHeatTime) <= millis())   //sprawdzenie, czy upłynął już domyślny czas grzania
    {
      heatON = false;
      mode = 2;                                           //jeżeli tak, przejdź od razu do podprogramu studzenia
      matrix.print(0, DEC);
      matrix.writeDisplay();
    }
  }
}

void cooldown()
{
  if ((cooldownON == false) & (mode == 2))              //sprawdzenie stanu dla podprogramu studzenia, domyślnie jest false
  {
    digitalWrite(przekaznik, HIGH);     //wyłączenie przekaźnika
    digitalWrite(LEDczerwony, HIGH);    //wyłączenie diody czerwonej
    digitalWrite(LEDniebieski, LOW);    //załączenie diody niebieskiej
    digitalWrite(LEDzielony, HIGH);     //wyłączenie diody zielonej
    start_cooldown = millis();
    previous_time = start_cooldown;
    cooldownON = true;                  //załączenie stanu studzenia na true
    colon_status = false;
    time_to_calc = defaultCooldownTime / 1000;  //przeliczenie czasu studzenia na sekundy
    matrix.print(display_time(time_to_calc), DEC);
    matrix.drawColon(colon_status);
    matrix.writeDisplay();
  }
  if ((cooldownON == true) & (mode == 2))
  {
    if ((start_cooldown + defaultCooldownTime) > millis())   //sprawdzenie, czy upłynął już domyślny czas studzenia
    {
      if (millis() - previous_time >= 1000UL)
      {
        previous_time = millis();
        time_to_calc -= 1;
        count_the_time(time_to_calc);
      }
      mode = 2;                                              //jeżeli nie minął, pozostań w trybie 2-cooldown
    }
    else if ((start_cooldown + defaultCooldownTime) <= millis())  //sprawdzenie, czy upłynął już domyślny czas studzenia
    {
      matrix.clear();
      matrix.writeDisplay();
      cooldownON = false;
      resetFunc();                                          // wywołaj funkcję resetu
      delay(2000);                                          // odczekaj 2s. Kod wykonywany, jeżeli reset nie przebiegnie pomyślnie
      error_mess();                                         // wywołanie podprogramu error_mess, gdy nie nastąpi reset. Pętla nieskończona
    }
  }
}

void loop() {
  if (mode == 0)
  {
    standby();
  }
  if (mode == 1)
  {
    heat();
  }
  if (mode == 2)
  {
    cooldown();
  }
}

Reading buttons an using delay is a bad combination. Rewrite the code to use millis() instead.
When You think the code is stuck, keep any pressed key down and hold it there for long time, 5 - 10 seconds and see if anything moves.

The first line in setup() puts A0 in a strange state, explained by arduino.reference.cc

If you do not set the pinMode() to OUTPUT, and connect an LED to a pin, when calling digitalWrite(HIGH), the LED may appear dim. Without explicitly setting pinMode(), digitalWrite() will have enabled the internal pull-up resistor, which acts like a large current-limiting resistor.

However, which order you do the "pinMode()" and "digitalWrite()" shouldn't matter, and both ARE there...

I am sorry, I do not understand the cite provided by xfpd:
This Arduino statement as (the original source):

If you do not set the pinMode() to OUTPUT , and connect an LED to a pin, when calling digitalWrite(HIGH) , the LED may appear dim. Without explicitly setting pinMode() , digitalWrite() will have enabled the internal pull-up resistor, which acts like a large current-limiting resistor.

is so strange (and nonsense for me):

What happens if you use a GPIO output when it was not configured as output?

  • nothing should happen, even a "dim LED" should not be there - it is an input (does not drive anything, does not take anything)
  • you just set the (internal) Output Register which is not yet connected to the real pin output:
    I do this all the time: I configure the Out already before I set the GPIO to out mode: this makes sure that right after "configure for output" it drives the correct value.

YES: you can set an output anytime - but it comes out just after the pin was configured as an output. The order does not matter, just to make sure: when enabling as output and not clear what it will drive and than you set the value for Out - it "floats" (or toggles). So, I set Out before I configure Out.

And why the internal (weak) pull-up resistor should have any effect on the external LED?
If the signal driven out is high - the current comes from the output stage (not the pull-up).
And if the signal driven out is low - it takes the current (e.g. the LED can be connected via resistor to 3V3 and a low switches the LED on). It would "ground" the internal pull-up (and no voltage out).

The internal pull-up is only reasonable (and effective) when the GPIO pin is configured as an input. For an Output - this pull-up does not do anything. And it is so weak (at least 10K, even higher, up to 100K) any external LED would not "act" on this pull-up, and for sure not when GPIO pin really configured as an output.

Just: if GPIO pin remains an input and pull-up is enabled - yes, there is a very tiny current into the LED. But I would guess: the current is so small, that you do not see even any tiny dim on LED (just in darkness), and even if I would see - I would be careful not to burn my MCU with this "strange" state (taking current for external LED through the chip is not a "good idea").

So:
configure pull-up ONLY when it is an INPUT (and when really needed). For an Output - no need for an internal pull-up.
BTW:
I would guess, when configured as Output - the pull-up is disconnected anyway.

It can be desirable to do a digitalWrite(pin, HIGH) (enabling the pullup) before the pinMode(pin, OUTPUT) to prevent a temporary low-impedance LOW state (since the PORT values default to 0.)

Things like below are very suspect :wink:

if ((cooldownON == true) & (mode == 2))

Single & is a binary AND, double & is a logical AND

It was the first thing that I saw after loading your code in the IDE; I stopped right there.

1 Like

Hi, @majsterkowicz
Welcome to the forum.

Can you post a schematic of your project?
Can you please post some images of your project so we can see your component layout?

What are you using to switch the heater ON?
What are the specs of the Heater?

Thanks.. Tom.. :smiley: :+1: :coffee: :australia:

1 Like

Hey all!
@Railroader that means if I would like to simply put a delay e.g. 100ms in button method - it's worthy to put millis() and other counters?
If I wish to do the long-press-test I can do it not early than next weekend. The device is now assembled in the cabinet (about 100km from me) so I do it immediately when I come again.

About pin "A0" i use it to hardware reset the Adruino board. For some reason if the line

digitalWrite(A0, HIGH)

not at the top, the system can see state at this pin more like "LOW" level, that makes board imediately reset. So I put it at the high top.
Maybe it would work also when I will switch "pinMode" and "digitalWrite" - to make a declaration and setting the pin as output first. Then set the "HIGH" output.

@sterretje That's good point to think about. I've read few articles about these two operators and makes more clear now. The conclusion is that I have to change for the "doubled" operators.

@TomGeorge For sure I can share some data about project layout and photos. I got some videos of prototype works too. I didn't do schematic in any app because of simplicity of the project but I can describe it by hand on piece of paper:

About Heater - to be honest, this is a device like a blower. Make some bubbles in jacuzzi. Finally it is supplied by 230V AC, so using the relay is necessary.

I don't understand what You want to say.

Don't use delay. The execution often stays in delays here and there and is not checking any button while being stuck in delays.

Hello there,
For some reason the program works better if I put a 100ms delay (function) after receiving signal from button. This simply help me with debouncing, because my friend use different type of buttons, so that’s the reason.
So you suggest to not using delays at all or replace the “delay()” as function for “millis()” instead?

Greetings

You can most likely decrease that to 50 or even lower.

Find the topic "Blink without delay" and play with it! Delay ruins many projects. Delay is causing more bad then it solves issues.

This code may work but when You want to add Bluetooth, GPS, ...., it will definetly not work.

1 Like

So I read an article with "blink without delay" I put it on my code to avoid "delay()" option.

I'm just thinking about more fixing. Is there any rules to code, e.g. is it better to setup the variables at the beggining or put them where i wish to use? For local variables only?
Maybe there is a problem with memory and other corresponding cases what causes the software freeze?

My friend gives me an update with driver behaviour. There is still the same case - so when software freeze the manual reset helps. But there is also a another artifact from time to time with the freeze the one block on he display lights on. To clarify that, the freeze appear only in standby mode and then only colon is displayed on the screen.
This is the block which light on when program freezes.

I got an idea. Is there a possibility to code something like sleep mode? I could wake it up with TRG button and then push it one more time to start the "heating".

Hello there, here is the last updated soft basing on yours suggestions. All delay() feunctions are gone. Where the delay of time is needed the millis() function is used. Some of variables are gone, few are added, Constans variables are setup as "const".

You can see the code on my github also:
GitHub Link

// 13.02.2023 Update:
// V1.1
// 1. Extra condition added to heat and cooldown mode, the "if" checks also the current mode
// 2. Extra program to reset the arduino software, method is called after cooldown time end
// 3. Error program implemented. Basing on current behaviour of driver, the method is called after calling the reset.
//    That provide extra info if driver is stucked and need to be reset manually by pressing the button.
// 4. Some of the lines are moved to correct (better) positions to be executed when it is necessary.
// 5. All commented and not used anymore lines - are deleted.

// 18.02.2023 Update:
// V1.2
// 1. Software reset is disabled
// 2. Hardware + software reset is setup, A0 Pin as output to reset the driver
// 3. Reset works on Standby for each 30sec without enabling the program
// 4. Reset function is enabled after the cooldown time is gone.

// 24.02.2023 Update:
// V2.0
// 1. Function resetFunc is out
// 2. All polish names and comments are switched to english
// 3. Method for lighting the LEDs is add
// 4. A0 pin is out (previous used for hard reset)
// 5. Default times for counters are declared as const variables
// 6. One more mode is add, new set is: 0 - settings mode, 1 - Standby mode, 2 - Heating mode, 3 - Cooldown mode
// 7. Settings mode is use to setup the brightness of display. buttonPin close the setting when pressed -> switch mode to 1 (Standby)
// 8. A library for debouncing the button (ezButton) is add
// 9. Previous buttonPin is replaced with object "buttonPin" of ezButton class, pin attached (12) is not changed
// 10. If-s in main program loop are replaced by switch-case method
// 11. ADCread variable is out AnalogRead(A3) is directly put into the next line with mapping
// 12. The button method is out because of ezButton library use
// 13. Variable start_standby is gone.
// 14. defaultStandbyTime is gone.
// 15. New method for counting the delay is add (simple_delay())
// 16. All methods (standby, heat, cooldown) are changed basing on previous changes
// 17. When cooldown is finished, program switched to mode 1. The settings mode is avaliable only once when power on the device or hard reset


#include <Arduino.h>
#include <Wire.h>
#include "Adafruit_LEDBackpack.h"
#include "ezButton.h"

#define LED_GREEN 8
#define LED_RED 9
#define LED_BLUE 10
#define RelayOut 11


Adafruit_7segment matrix = Adafruit_7segment();
ezButton buttonPIN(12);
//mode of the driver: 0 - settings, 1 - standby, 2 - heat, 3 - cooldown
int mode;
int timeToCalc;
int brightness = 0;
bool standbyON = false;
bool heatON = false;
bool cooldownON = false;
bool colonStatus = true;
bool delayFinished = false;
const unsigned long defaultHeatTime = 600000UL;        //default time for Heating, 10m x 60s x 1000
const unsigned long defaultCooldownTime = 1800000UL;   //default time for Coolingdown, 30m x 60s x 1000
const unsigned long defaultWaitTime = 1000UL;          //default time for simple delay after entereing to new mode
const unsigned long blinkTime = 500UL;                 //default time for blinking
unsigned long start_heat = 0UL;
unsigned long start_cooldown = 0UL;
unsigned long previous_time = 0UL;


void setup()
{
  // setting the serial port, 9600 baud
  Serial.begin(9600);
  // setting the debounce time (in ms) for buttonPin
  buttonPIN.setDebounceTime(50);
  // default mode is Settings (0)
  mode = 0;
  // setting the Inputs and Outputs
  pinMode(LED_GREEN, OUTPUT);
  pinMode(LED_RED, OUTPUT);
  pinMode(LED_BLUE, OUTPUT);
  pinMode(RelayOut, OUTPUT);
  pinMode(A3, INPUT_PULLUP);
  // setting display adress, default is 0x70
  matrix.begin(0x70);
  // disabling the Relay for safety
  digitalWrite(RelayOut, HIGH);
  standbyON = false;
  heatON = false;
  cooldownON = false;
}


// method to light the LEDs
// output values for common anode (+), LOW in the LED ON, HIGH - OFF
void LED_lighting (int m)
{
  switch (m)
  {
  case 1:
    digitalWrite(LED_GREEN, LOW);
    digitalWrite(LED_RED, HIGH);
    digitalWrite(LED_BLUE, HIGH);
    break;
  
  case 2:
    digitalWrite(LED_GREEN, HIGH);
    digitalWrite(LED_RED, LOW);
    digitalWrite(LED_BLUE, HIGH);
    break;
  
  case 3:
    digitalWrite(LED_GREEN, HIGH);
    digitalWrite(LED_RED, HIGH);
    digitalWrite(LED_BLUE, LOW);
    break;
  
  default:
    digitalWrite(LED_GREEN, HIGH);
    digitalWrite(LED_RED, HIGH);
    digitalWrite(LED_BLUE, HIGH);
    break;
  }
}


// calculate seconds into value to display on 4 digit display mm:ss
int display_time (int t1)
{
  return int (t1 / 60 * 100 + t1 % 60);
}


// method for displaying values on LCD + colon blinking
void count_the_time (int t3)
{
  matrix.print(display_time(t3), DEC);
  colonStatus = !colonStatus;
  // IMPORTANT to make sure that colon is displayed, put the matrix.print line first, then matrix.drawColon, last: matrix.writeDisplay
  matrix.drawColon(colonStatus);
  matrix.writeDisplay();
}


bool simple_delay ()
{
  if (millis() - previous_time >= defaultWaitTime)
  {
    return true;
  }
  else
  {
    return false;
  }
}

// a place where brightness of LCD display can be setup
void settings ()
{
  bool LED_stat = LOW;
  if (millis() - previous_time >= blinkTime)
  {
    previous_time = millis();
    LED_stat = !LED_stat;
    digitalWrite(LED_GREEN, LED_stat);
    digitalWrite(LED_RED, LED_stat);
    digitalWrite(LED_BLUE, LED_stat);
  }
  brightness = map((analogRead(A3)), 5, 1020, 0, 15);
  matrix.blinkRate(2);
  matrix.print(8888, DEC);
  matrix.setBrightness(brightness);
  matrix.drawColon(true);
  matrix.writeDisplay();
  if (buttonPIN.isPressed())
  {
    mode = 1;
    matrix.blinkRate(0);
    matrix.clear();
    matrix.writeDisplay();
  }
}


void standby()
{
  if (standbyON == false)
  {
    previous_time = millis();
    LED_lighting(mode);
    matrix.drawColon(true);
    matrix.writeDisplay();
    standbyON = true;
  }
  if (delayFinished == false)
  {
    delayFinished = simple_delay();
  }
  if (buttonPIN.isPressed() && delayFinished == true)
  {
    mode = 2;
    standbyON = false;
    delayFinished = false;
  }
}


void heat()
{
  if (heatON == false)
  {
    previous_time = millis();
    start_heat = millis();
    digitalWrite(RelayOut, LOW);            //turning the relay out ON
    LED_lighting (mode);
    timeToCalc = defaultHeatTime / 1000UL;  //calculating the default time to seconds
    heatON = true;
  }
  if (delayFinished == false)
  {
    delayFinished = simple_delay();
  }
  if (delayFinished == true)
  {
    if (millis() - start_heat <= defaultHeatTime)        //checking the main time counter for heating, if false
    {
      if (millis() - previous_time >= 1000UL)             //checking the time for change the display
      {
        previous_time = millis();
        timeToCalc -= 1;
        count_the_time(timeToCalc);
      }
      if (buttonPIN.isPressed())                  //checking the Trigger button state
      {                                           //if button is pressed go to cooldown (mode3)
        heatON = false;
        delayFinished = false;
        mode = 3;
        matrix.print(0, DEC);
        matrix.writeDisplay();
      }
    }
    else if (millis() - start_heat > defaultHeatTime)   //checking the main time counter for heating, if true
    {                                                   //if time is gone go to cooldown (mode3)
      heatON = false;
      delayFinished = false;
      mode = 3;
      matrix.print(0, DEC);
      matrix.writeDisplay();
    }
  }
}

void cooldown()
{
  if (cooldownON == false)
  {
    previous_time = millis();
    start_cooldown = millis();
    digitalWrite(RelayOut, HIGH);             //turning the relay out OFF
    LED_lighting (mode);
    timeToCalc = defaultCooldownTime / 1000UL;  //calculating the default time to seconds
    cooldownON = true;
  }
  if (delayFinished == false)
  {
    delayFinished = simple_delay();
  }
  if (delayFinished == true)
  {
    if (millis() - start_cooldown <= defaultCooldownTime)       //checking the main time counter for cooldown, if false
    {
      if (millis() - previous_time >= 1000UL)
      {
        previous_time = millis();
        timeToCalc -= 1;
        count_the_time(timeToCalc);
      }
    }
    else if (millis() - start_cooldown > defaultCooldownTime)  //checking the main time counter for cooldown, if true
    {
      cooldownON = false;
      delayFinished = false;
      mode = 1;
      matrix.clear();
      matrix.writeDisplay();
    }
  }
}

void loop() {
  buttonPIN.loop();
  switch (mode)
  {
  case 0:
    settings();
    break;
  case 1:
    standby();
    break;
  case 2:
    heat();
    break;
  case 3:
    cooldown();
    break;
  
  default:
    settings();
    break;
  }
}

I will be really appreciated for the code review and any suggestions how to make the code better.

This topic was automatically closed 180 days after the last reply. New replies are no longer allowed.