Serial Communication issues encountered when using the Arduino Nano 33 BLE Sense Rev2 board in the Zephyr environment

Hi,

I am encountering some serial issues with the Arduino Nano 33 BLE Sense Rev2 board while working in the Zephyr environment. We are attempting to run a Zephyr application on this board for our Thread application, as it features the nRF52840 microcontroller. However, when we try to execute the "Hello World" application in the Zephyr environment, we are unable to see any serial output. The serial is only appears when I double-click the reset button to enter boot mode the serial com is visible (ex. dev/ttyACM0) after uploading the application its gone. Meanwhile, I can see the serial output when uploading sketches using the Arduino IDE.

I would like to know if it is possible to run and view applications in the Zephyr environment on this board. Additionally, can we run a Thread application on the Arduino Nano 33 BLE Sense Rev2? or is there any other way to run my zephyr application on it, to see the serial ? Kindly help me with the resource that i can refer.

I would greatly appreciate your assistance with this matter.

Regards,
Ebineser

Hello @ebi777,

When you say Zephyr environment, Are you using just Zephyr or are you
trying the ArduinoCore-zephyr setup?

A few us are currently experimenting with the later version. I have not tried
direct to just the zephyr project.

More details about stuff on the thread:
MBED->Zephyr status? Beta by end of year? - Community / General Discussion - Arduino Forum

Up until yesterday, @Merlin513 and I had mostly only played with the GIGA on
Arduino zephyr and it is what I would call it in alpha state.

The best luck is to not use the released version, but to build the release as
described in the readme. You should also look through the current issues
up on this project:
Issues · arduino/ArduinoCore-zephyr
As well as the Pull requests.

LIke:
Nano 33 BLE sense v2: WIRE1 not defined · Issue #48 · arduino/ArduinoCore-zephyr

Nano 33 Sense v2: I2c Scanner running for Wire only acting strangely · Issue #49 · arduino/ArduinoCore-zephyr

Zephyr User Threads (define/start) don't seem to be working. (Multithreading) · Issue #37 · arduino/ArduinoCore-zephyr
Note there is a PR on this one:
update to get threads working by mjs513 · Pull Request #43 · arduino/ArduinoCore-zephyr

As for Hello world, I do believe works, although I am not sure I tried that
directly.

Also would suggest, when you run into a direct issue, you might get more feedback
up on the issue.

Hope that helps
Kurt

1 Like

Hi @KurtE ,

Thanks for the response. I tried this hello world project in the nrf connect sdk extension in vs code, created new project and built it by choosing arduino_nano_ble_33 board and uploaded using boassac:

so this thing is done in the zephyr environment. I don't know what is that arduino core - zephyr , i will look into it..!

So if we want to run any application in zephyr environment without getting disconnecting from serial , how to do it?

And after installing arduino zephyr boards how to upload programm?

Best Regards,
Ebineser

I Should again mention that I am just a normal user here and just playing with this for the fun of it.

There are two sort of worlds here:

Zephyr - which is setup to use cmake and all the like, which I have not done (yet).

Lots more details up at: Getting Started Guide — Zephyr Project Documentation
This uses the device trees overlay and project config file, that choose which
components of zephyr are to be included...

And then there is the Arduino on top of zephyr and llext... Which is probably what I would call alpha level, some may say beta.

Which is described some in their blog last month:
Introducing Arduino cores with ZephyrOS (beta): take your embedded development to the next level | Arduino Blog

Which I am currently playing with and trying to contribute to.
I played some with the boards version mentioned in the blog. Which I found is/was missing a lot of stuff.

There is some good information up on the ReadMe file on the main ArduinoCore-zephyr github project:
arduino/ArduinoCore-zephyr: Arduino Core based on Zephyr+llext

There is also a lot that you can learn, from the open and closed issues that is part of this github project. Some of them have a lot of questions/answers that @Merlin513 and I asked and @facchinm responded to. Lots of this is in the readme mentioned.

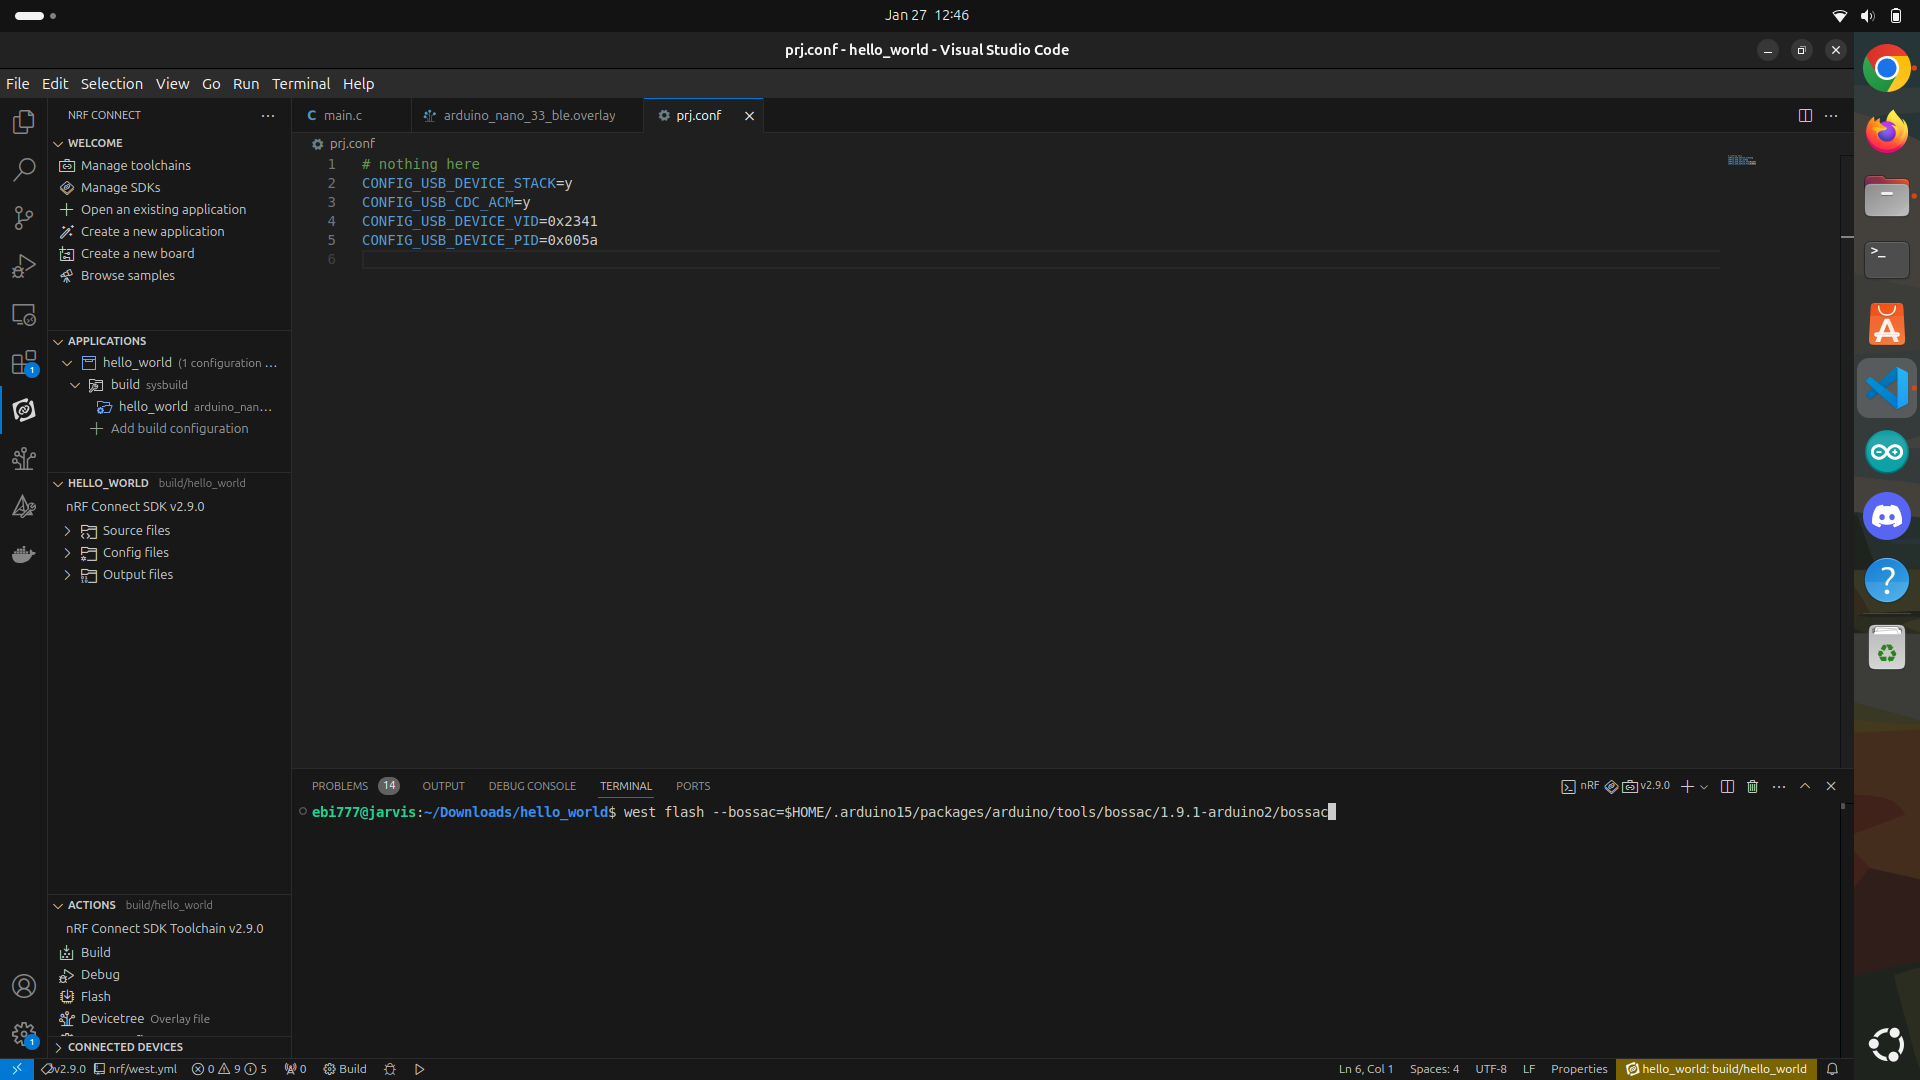
But the current state of usage: For each of the boards, there is a definition of the device tree and config of which components are included and the like:
These are prebuilt into an image for each of these boards,

You need program the board with this image. You do so by selecting the board, double click to put it into bootloader mode, and then use the tools->Burn bootloader command, which will program the board with this. This image then is setup to be able to upload your compiled sketch and run it (that is the llext part of this). The first time you wish to program a sketch after downloading the new bootloader, you again probably need to double click the reset button...

If you are lucky and your program runs, then you should see it doing something.
But my first many attempts' things did not load, as there was not enough space
allocated in the system to load my sketch. So could not use the boards installed version. So had to build my own. Which again is described in the readme.
In the Setup the environment section:

Note: They don't have a real setup for this for Windows! However we are able to do so. That is I use WSL with Ubuntu 24.04 on my windows machine. (Sometimes I do it directly on Ubuntu as well). Two approaches for doing this, as I need to build the bootloader under WSL, but run it under WIndows.

a) Download it into the Windows filesystem space: in my case:
\mnt\d\github\ArduinoCore-zephyr
Then go through all of the steps:
.\extras\bootstrap.sh
.\extras\build.sh default to giga.
...
When this completes, I can simply run Arduino build as I setup links to this
within /hardware/arduino-git
I created a link to my build: mklink /J ArduinoCore-zephyr d:\github\ArduinoCore-zephyr
Note: in ArduinoCore-zephyr/cores/arduino is a directory api.
Actually, the github version is a link file that is setup for some ones relative link
location. I normally than have to delete it and create my own link. in this case
mklink /J api d:/github/ArduinoCore-api/api

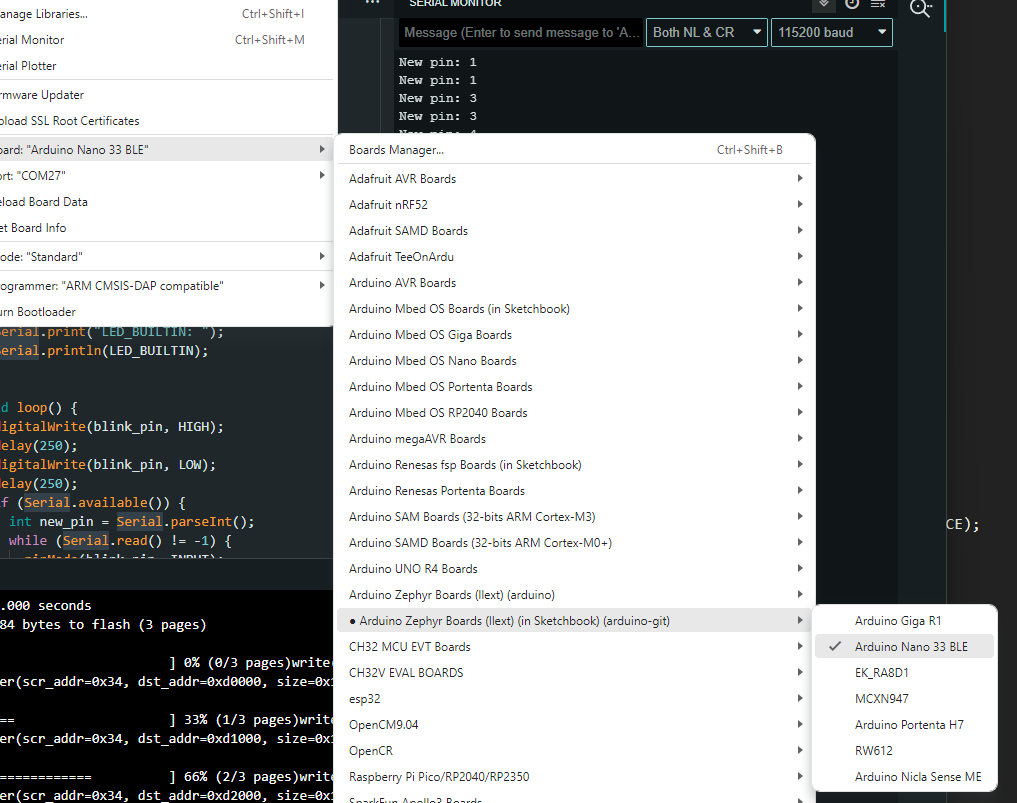
And then choose the board within tools, like:

And then go through the steps of burn bootloader. ...
Note if you change any settings or system code or ..., you need to go through the
steps again of under WSL to rebuild the bootloader.

b) Build with all of the zephyr build stuff contained within your WSL file system.
Each time you complete the build: ./extras/build.sh you then need to copy
the appropriate parts of this directory structure to somewhere within your
windows normal file system locations.

Builds go a lot faster this way, BUT: not sure what all you need to copy, so I typically copy everything....

Most of the time I do A) or do builds on my old machine running Ubuntu, but probably will transition to B), I believe @Merlin513 does B)

State of Nano 33 BLE builds: still needs lots of TLC. The two of us mentioned, only started playing with the nano boards several days ago.
And if you look up at the github project issues you will see what we have found
so far:
Issues · arduino/ArduinoCore-zephyr

And we have only scratched the surface, dealing with things like some of the pins were not defined correctly, Serial interface had issues, Wire1 was not defined, ...

Just now starting to see how to talk to some of the sensors. I am not sure which direction Arduino will take on some of this. That is they could

a) define all of them in the device tree, and have then all running in all of the sketches you upload to it. (Or some subset of sensors)
b) Like MBED version where you load libraries for each sensor you wish to use...
Just starting to play with these.

So far my attempts to load a library to talk to the Temperature sensor with SPI1 crashes the board...

Sorry for the long-convoluted answer to your question. Hope some of it makes
sense

Hey @KurtE,Thank you for the brief explanation; I really appreciate your time.

Current Situation:

I understand a few things after burning the bootloader by selecting the programmer as shown in the screenshot below:


Bootloader ProgrammerFollowing your instructions and referring to the Arduino Core Zephyr GitHub page, I put my Nano board into bootloader mode. However, when I attempted to upload a basic application from the Arduino IDE, I encountered the following error:Upload Error

Request for Guidance

It seems I might be uploading the Zephyr application incorrectly. Could you guide me on where I should build my application and how to upload it?

System Information:

  • OS: Linux Ubuntu 24
  • Arduino IDE Version: 2.3.4
  • Zephyr SDK: Installed as instructed

If you suggest trying a different platform, I'm open to that as well. My goal is to run the "Hello World" Zephyr application on the Arduino Nano BLE 33 Sense Rev2 board and view the serial output using the command or any other way:

sudo screen /dev/ttyACM0 115200

Currently, I can't see the serial output because of disconnection issues after uploading the Zephyr application as i mentioned before.

Additional Query

Additionally, when referring to the GitHub page regarding the loader, I found configuration and overlay files for nano 33 ble board. Do you have any insights on how to use these? In my experience with the nRF Connect SDK, I could upload with an overlay file, but I'm unsure how to incorporate it into the Arduino application. Is it mandatory to include these files in the Arduino application?

Thank you again for your assistance!

Think the readme for the installation of zephyr is pretty straight forward:

Installation

Install the core and its toolchains via Board Manager:

  • Download and install the latest Arduino IDE (only versions 2.x.x are supported).
  • Open the 'Settings / Preferences' window.
  • Open the 'Boards Manager' from the side menu and search for 'Zephyr'.
    • If it doesn’t appear, add the following URL to the 'Additional Boards Manager URLs' field: https://downloads.arduino.cc/packages/package_zephyr_index.json (if you have multiple URLs, separate them with a comma).
  • Install the Arduino Zephyr Boards platform.

Alternatively, to install the core using the command line, run the following command with the Arduino CLI:

arduino-cli core install arduino:zephyr --additional-urls https://downloads.arduino.cc/packages/package_zephyr_index.json

:building_construction: First Use

To get started with your board:

  • Put the board in bootloader mode by double-clicking the RESET button.
  • Run the Burn Bootloader option from the IDE/CLI.
    • Note that due to limitations in the Arduino IDE, you may need to select any programmer from the Programmers menu.
  • Once the bootloader is installed, you can load your first sketch by placing the board into bootloader mode again.

Note

After the initial setup, future sketches will be loaded automatically without needing to reset the board.

1 Like

Sorry I did not respond again until today as have been busy trying to get some additional things to be working.

Yesterday and today, several more things were merged into the builds, which fixes a lot of things, although probably a few regressions as well.

As @Merlin513 mentioned, the instructions in the Readme file pretty well
describes the steps for installing the zephyr code two different ways. The board manager way, Which maybe will start working for you.
It looks like a new tag 0.2.0 was create today, like two hours ago. So probably soon you can update to the current stuff that way.

the Work In progress code base, is what I prefer, as there are things that are not implemented and/or working, that several of us are trying to improve.

And as I have mentioned you can learn a lot of what is going on, by looking at the
issues, both open and closed. And potentially add yourself to the github watch of the project and then you can see what things are happening.

Hi @Merlin513 @KurtE ,

Thank you for your insights, after your guidance i am able to see some progress in my task but still facing some issues as below, it would be great if you help me with that i am almost there.

  1. Have you ever tried any of the serial print in zephyr environment in Arduino nano 33 BLE sense REV2 board , if you have any kindly send me the file for my reference.

  2. I did whatever they told like burning the bootloader in the boot mode and uploading the sketch (from arduino ide ex. blink led from arduino ide- correct me if i did it wrong) . after uploading i seen the led blinking on my board, so is that mean i am running a zephyr application in my board?

So i couldnt upload the loader as they mentioned in the steps:

i am using the below command:
ebi777@jarvis:~/my_new_zephyr_folder/ArduinoCore-zephyr$ ./extra/build.sh $arduino_nano_33_ble_sense

in this image untill build the loader its happening,

but when i try to flash it stuck in here:

but after that i tried with the bossac also, again some error:

then i tried to add the overlay and config file that they gave it inside the loader file in vs code zephyr environment, then also same error i am getting.

  1. And i love to admyself on the open issues, kindly add me or tell me how to add my self in that.

So if you have any working zephyr built application working with arduino nao 33 ble sense rev2 board it would be great.

Thanks and regards
Ebineser M

This topic was automatically closed 180 days after the last reply. New replies are no longer allowed.