I've tried following the manual and various example wirings from other discussions online without success (I've spent days...). At best, I've temporarily achieved one-way communication, both getting the motor to move and receiving responses from the TMC2209, but never simultaneously, and as soon as I add additional features, it stops working.
I'm confused about exactly which pin on the TMC2209 should be used for UART communication. The manual refers to "UART" as a specific pin, but it doesn't seem clearly defined from what I can see.
My questions:
Which specific pin on the TMC2209 should be used for UART communication?
What's required to activate UART and are there other important aspects to consider?
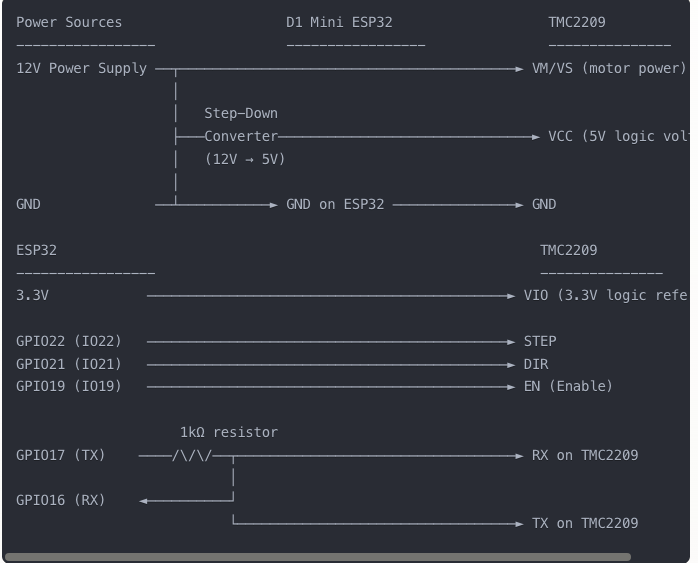
Does anyone have a working wiring diagram for TMC2209 and ESP32 (preferably D1 Mini) for UART control? I would really appreciate a diagram showing all connections, but any help is more than welcome!
Thanks for posting, I understand why you are having problems, that is a great sales ad but it is missing the details needed to operate it. I would suggest you get your money back and get a different unit that provides the needed documentation. First try your existing vendor and see if they can offer help, if not return it.
Thanks. I thought the TMC2209 from BTT was a fairly established product in the community. But I'll definitely consider other alternatives - are there any recommendations for a well-documented and proven motor driver with stallguard/sensorless homing, that works well with ESP32?
I've checked several wirings including the ones in your linked pages. Unfortunately I don't remember my semi working wiring since I've only managed to get the motor running on rare occasions, but haven't been able to consistently reproduce it after adding more functionality to the code.
Thanks for sharing your setup. I've followed your approach and I'm getting a response of "2" from the test_connection() function, which seems to mean some communication with the driver. However, my motor isn't moving at all.
Could you show in more detail exactly how you connected the 1K resistor between the TX and RX lines and what pin you are using for UART in TMC2209?
Ok so the MS1 and MS2 pins if you want to microstep you can use a 10k resistor from 5v on MS1. But if you dont want that then you can just use my code as is. The code sets the adress. Your EN pin on the TMC2209 needs to go to a pin on the ESP32 you dont GND the EN pin as you can see in my code as well as DIR and STEP. You can bridge a 1k resistor over TX and RX pin GPIO 16 & 17 on ESP32 and from RX TX tMC2209 UART pin. You only need one TMC2209 connect to UART pin. You dont need to connect anything on MS1 & MS2 on either TMC2209. Use the same pins im using and you wont have any issues. Connect your RX TX from Esp32 to your PDN pin on the TMC2209 just under the CLK pin
I've got the motor moving through STEP/DIR signals, just like in your code. The motor runs quietly and smoothly in StealthChop mode, so the basic functions are working well.
The problem is that the UART communication doesn't work despite multiple attempts. I've tested:
Wiring exactly as shown in the manual with a 1kΩ resistor between TX (GPIO16) and RX (GPIO17) on the ESP32, and both connected to the PDN_UART pin (below CLK) on the TMC2209
Different baud rates (115200, 19200, 9600)
Other pin combinations for UART
Left MS1 and MS2 unconnected as you suggested
I get no responses from the TMC2209 when sending UART-commands.
Do you have any other suggestions on what might be wrong? Could you share your actual wiring, especially how you've connected the resistor and the PDN_UART pin?
I have the exact same driver and am having the exact same issues. With some different code* I get numbers but they don´t really seem to match load or stalling, so I think it's not really working. I´d be interested in getting at least StallGuard to work.
*here's the code I get some numbers with. Note that I get 0 from the test_connection() call instead of 2
#include <HardwareSerial.h>
#include <TMCStepper.h>


#define DIAG_PIN_2         19          // STALL motor 2
#define EN_PIN_2           4          // Enable
#define DIR_PIN_2          18          // Direction
#define STEP_PIN_2         5          // Step
#define SERIAL_PORT_2      Serial2    // TMC2208/TMC2224 HardwareSerial port
#define DRIVER_ADDRESS_2   0b00       // TMC2209 Driver address according to MS1 and MS2
#define R_SENSE_2          0.11f      // E_SENSE for current calc.
#define STALL_VALUE_2      200          // [0..255]

hw_timer_t * timer1 = NULL;
TMC2209Stepper driver2(&SERIAL_PORT_2, R_SENSE_2 , DRIVER_ADDRESS_2 );


void IRAM_ATTR onTimer() {

  digitalWrite(STEP_PIN_2, !digitalRead(STEP_PIN_2));
}

void activate_interrupt(){
    {
      cli();//stop interrupts
      timer1 = timerBegin(3, 8,true); // Initialize timer 4. Se configura el timer,  ESP(0,1,2,3)
                                   // prescaler of 8, y true es una bandera que indica si la interrupcion se realiza en borde o en nivel
      timerAttachInterrupt(timer1, &onTimer, true); //link interrupt with function onTimer
      timerAlarmWrite(timer1, 8000, true); //En esta funcion se define el valor del contador en el cual se genera la interrupción del timer
      timerAlarmEnable(timer1);    //Enable timer
      sei();//allow interrupts
    }
  }

void setup() {
//   Serial.begin(250000);         // Init serial port and set baudrate
  Serial.begin(9600);         // Init serial port and set baudrate
  while(!Serial);               // Wait for serial port to connect
  Serial.println("\nStart...");
  SERIAL_PORT_2.begin(115200);

  pinMode(DIAG_PIN_2 ,INPUT);
  pinMode(EN_PIN_2 ,OUTPUT);
  pinMode(STEP_PIN_2 ,OUTPUT);
  pinMode(DIR_PIN_2 ,OUTPUT);

  digitalWrite(EN_PIN_2 ,LOW);
  digitalWrite(DIR_PIN_2 ,LOW);

  driver2.begin();
  driver2.toff(4);
  driver2.blank_time(24);
  driver2.rms_current(1500);
  driver2.microsteps(8);
  driver2.TCOOLTHRS(0xFFFFF); // 20bit max
  driver2.semin(0);
  driver2.semax(2);
  driver2.shaft(false);
  driver2.sedn(0b01);
  driver2.SGTHRS(STALL_VALUE_2);

  activate_interrupt();
}

void loop() {
 static uint32_t last_time=0;
 uint32_t ms = millis();


 if((ms-last_time) > 100) { //run every 0.1s
    last_time = ms;

    Serial.print("0 ");
    Serial.print(driver2.SG_RESULT(), DEC);
    Serial.print(" ");
    Serial.print(driver2.test_connection());
    Serial.print(" ");
    Serial.print(driver2.cs2rms(driver2.cs_actual()), DEC);

    Serial.println();
 }
}