Uploading error

Hello,
I should point out that I'm a complete beginner in Arduino programming.
I want to make a custom button box, so I bought all the components, including the "iHaospace Set of 2 Pro Micro USB C ATMEGA32U4 5V 16MHz ATMEGA 32U4 controller boards compatible with Arduino Pro Micro" on Amazon. They don't seem to be exactly the same as the ones in the product sheet photo. I proceeded as instructed, selecting different Arduino types on the IDE (Leonardo, Micro, Nano), and I still have the same problem when uploading.

avrdude: butterfly_recv(): programmer is not responding
Found programmer: Id = "�"; type = �
    Software Version = i.
avrdude: error: buffered memory access not supported. Maybe it isn't
a butterfly/AVR109 but a AVR910 device?
avrdude: initialization failed, rc=-1
         Double check connections and try again, or use -F to override
         this check.
avrdude: butterfly_recv(): programmer is not responding
avrdude: error: programmer did not respond to command: leave prog mode
avrdude: error: programmer did not respond to command: exit bootloader
Failed uploading: uploading error: exit status 1

I've tried a whole bunch of solutions, but I'm still stuck on this, always at the point where I want to include the "joystick.h" library. I clearly need help, which is why I'm posting here. Thanks in advance (and sorry for the English from Google Translate)

okay, you say you want a button box, what exactly do you mean by that?

Button box for sim racing and flight/Space sims

fun! can you please tell me what you are using in this project and I would be glad to assist you further.

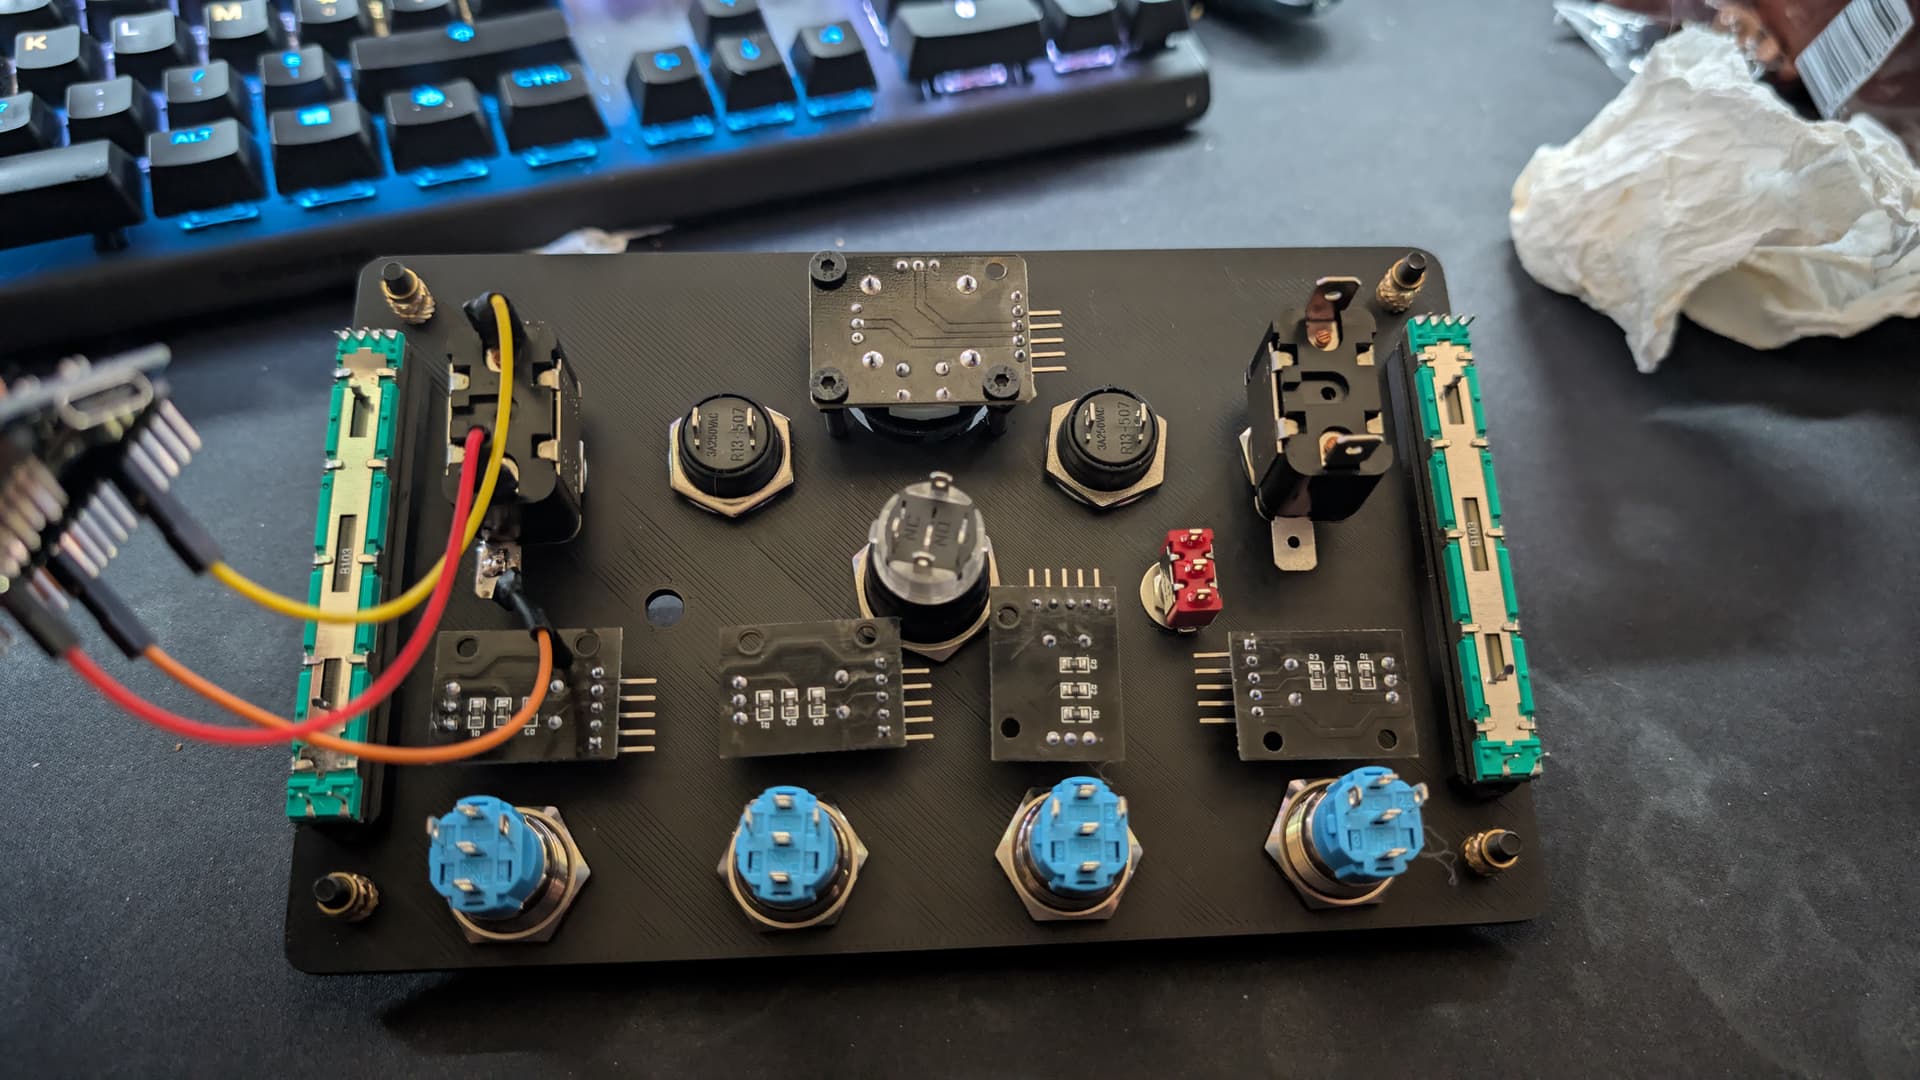
Thanks, you want to know waht button I am using ? or just the controller ? I can upload a picture if you want. But, I'm stuck with the arduino upload. And I'm not sur what Arduino ctronller I am using (not the same than the link on my first post)

send a picture please and I will be able to write a code for you!

Really ? Nice, thanks :slight_smile:


okay! correct me if I'm wrong but I am seeing some push buttons, a joystick, a rocker push button, and some switches.

the five buttons on the bottom are momentary buttons, just above, incrementiale with a push, juste after 2 momentary ON OFF ON , and Start Engine Momentary, above 2 momentary (black) 2 "On OFF" (Red) and a stick with push button

very cool I will write your code if you could give me about 5 minutes!

can you actually send the picture of the Arduino board you are using?

yep, uploading is on the way. I forgot the 2 potentiometer vertical on the two sides

its fine I saw them!

from the first picture I sent, it looks like you are using a nano but I would need another pic to be sure

yep thats a nano I will be right back!

Ok, but, when I try to do a verification, I have an error. So anoying

Hi @grumpindaface.

Is this a picture of your board?

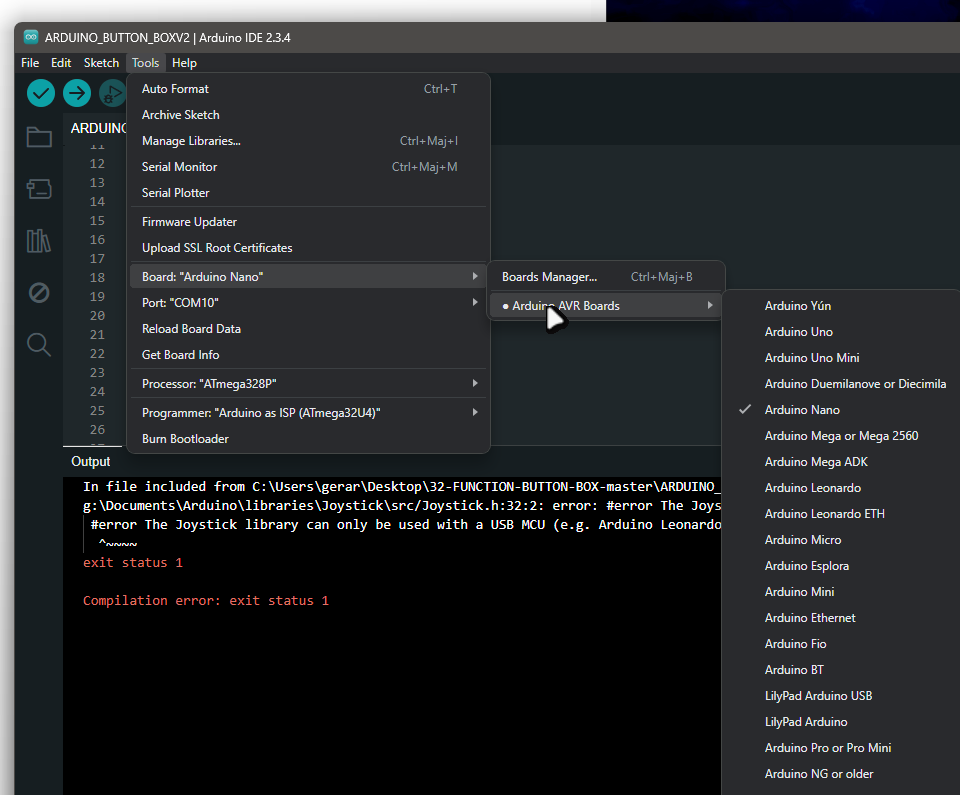
I am asking because this picture is of a clone/derivative of the classic Nano board, but the product listing title you referenced is for a clone of the Pro Micro board.

It is important for us to understand which of these boards you have because they have significant technical differences. If your board is a Nano, then the error message you encountered while attempting to upload to it with Arduino IDE configured for use with the Pro Micro is expected.

Yes, this is a picture of my board. And this is not the same than my amazon picture purshased.. thx amazon . .

here is your code, tell me if it works!

#include <Keyboard.h> // For sending key presses
//#include <Joystick.h> // For sending joystick data (you might need this later)

// --- Pin Definitions ---
// These are the pins where your components are connected.  YOU NEED TO FILL THESE IN!
const int button1Pin = -1;     // Replace -1 with the actual pin number, e.g., 2
const int button2Pin = -1;     // Replace -1
const int button3Pin = -1;     // Replace -1
const int button4Pin = -1;     // Replace -1
const int potentiometer1Pin = -1; // Replace -1, e.g., A0
const int potentiometer2Pin = -1; // Replace -1, e.g., A1
const int potentiometer3Pin = -1; // Replace -1, e.g., A2
const int potentiometer4Pin = -1; // Replace -1, e.g., A3
const int switch1Pin = -1;       // Replace -1
const int switch2Pin = -1;       // Replace -1
const int switch3Pin = -1;       // Replace -1
const int switch4Pin = -1;       // Replace -1
const int switch5Pin = -1;       // Replace -1

// Rotary encoder pins (if you have them)
//const int encoder1PinA = -1;   // Replace -1
//const int encoder1PinB = -1;   // Replace -1
//const int encoder2PinA = -1;   // Replace -1
//const int encoder2PinB = -1;   // Replace -1

// Joystick pins (if you have one)
//const int joystickXPin = -1;    // Replace -1
//const int joystickYPin = -1;    // Replace -1
//const int joystickButtonPin = -1; // Replace -1

// --- Variable Declarations ---
// Variables to store the state of buttons, potentiometers, etc.
int button1State = 0;
int button2State = 0;
int button3State = 0;
int button4State = 0;
int potentiometer1Value = 0;
int potentiometer2Value = 0;
int potentiometer3Value = 0;
int potentiometer4Value = 0;
int switch1State = 0;
int switch2State = 0;
int switch3State = 0;
int switch4State = 0;
int switch5State = 0;

// Rotary encoder variables (if you have them)
//int encoder1Position = 0;
//int encoder2Position = 0;
//int lastEncoder1State = 0;
//int lastEncoder2State = 0;

// Joystick variables (if you have one)
//int joystickXValue = 0;
//int joystickYValue = 0;
//int joystickButtonState = 0;

// --- Setup Function ---
void setup() {
  // Initialize serial communication (for debugging)
  Serial.begin(9600);

  // Set pin modes for buttons and switches (INPUT_PULLUP is often useful)
  pinMode(button1Pin, INPUT_PULLUP);
  pinMode(button2Pin, INPUT_PULLUP);
  pinMode(button3Pin, INPUT_PULLUP);
  pinMode(button4Pin, INPUT_PULLUP);
  pinMode(switch1Pin, INPUT_PULLUP);
  pinMode(switch2Pin, INPUT_PULLUP);
  pinMode(switch3Pin, INPUT_PULLUP);
  pinMode(switch4Pin, INPUT_PULLUP);
  pinMode(switch5Pin, INPUT_PULLUP);
  // Potentiometer pins don't need pinMode, they are always inputs.

  // Set pin modes for encoder pins (if you have them)
  //pinMode(encoder1PinA, INPUT_PULLUP);
  //pinMode(encoder1PinB, INPUT_PULLUP);
  //pinMode(encoder2PinA, INPUT_PULLUP);
  //pinMode(encoder2PinB, INPUT_PULLUP);

  // Set pin modes for joystick pins (if you have them)
  //pinMode(joystickButtonPin, INPUT_PULLUP);

  // Initialize keyboard (or joystick) library
  Keyboard.begin();
  //Joystick.begin(); // If you're using the Joystick library
}

// --- Loop Function ---
void loop() {
  // --- Read Input Values ---
  // Read button states
  button1State = digitalRead(button1Pin);
  button2State = digitalRead(button2Pin);
  button3State = digitalRead(button3Pin);
  button4State = digitalRead(button4Pin);

  // Read potentiometer values
  potentiometer1Value = analogRead(potentiometer1Pin);
  potentiometer2Value = analogRead(potentiometer2Pin);
  potentiometer3Value = analogRead(potentiometer3Pin);
  potentiometer4Value = analogRead(potentiometer4Pin);

    // Read switch states
  switch1State = digitalRead(switch1Pin);
  switch2State = digitalRead(switch2Pin);
  switch3State = digitalRead(switch3Pin);
  switch4State = digitalRead(switch4Pin);
  switch5State = digitalRead(switch5Pin);

  // Read encoder values (if you have them)
  //int encoder1StateA = digitalRead(encoder1PinA);
  //int encoder1StateB = digitalRead(encoder1PinB);
  //int encoder2StateA = digitalRead(encoder2PinA);
  //int encoder2StateB = digitalRead(encoder2PinB);

  // Read joystick values (if you have one)
  //joystickXValue = analogRead(joystickXPin);
  //joystickYValue = analogRead(joystickYPin);
  //joystickButtonState = digitalRead(joystickButtonPin);

  // --- Process Inputs and Send to Computer ---

  // --- Button Actions ---
  // Example:  Button 1 shifts up
  if (button1State == LOW) { // Assuming you're using INPUT_PULLUP
    Keyboard.press('a');      // Replace 'a' with the key you want to send
    Serial.println("Button 1 Pressed - Shift Up"); // For debugging
  } else {
    Keyboard.release('a');
  }

  // Add code here for the other buttons (button2, button3, button4)
  //  For example:
  //  if (button2State == LOW) { ... }

  // --- Potentiometer Actions ---
  // Example: Potentiometer 1 controls throttle
  //  You'll need to map the potentiometer value (0-1023) to a suitable range
  //  for your game (e.g., 0-255 for a joystick axis).
  int throttleValue = map(potentiometer1Value, 0, 1023, 0, 255);
  //  Serial.print("Throttle: ");  //For debugging
  //  Serial.println(throttleValue);
  //  Joystick.setThrottle(throttleValue); // If using Joystick library
  //  You might send a key press with varying pressure.

  // Add code here for the other potentiometers (potentiometer2, 3, 4)

    // --- Switch Actions ---
  // Example: Switch 1 toggles headlights
  if (switch1State == LOW) { // Assuming switch is active low
    Keyboard.press('l');  // 'l' for lights
    Serial.println("Switch 1 ON - Lights");
    delay(200); // Debounce
    Keyboard.release('l');
  }
    // Add code for other switches

  // --- Rotary Encoder Actions (if you have them) ---
  //  (This is more complex and requires debouncing and state management)
  //  Add code here

  // --- Joystick Actions (if you have one) ---
  //  (Map joystick values to appropriate ranges for your game)
  //  Add code here

  delay(10); // Small delay
}