I want to make a digital voltmeter and display the DC battery voltage on an LCD using the Arduino UNO R3.
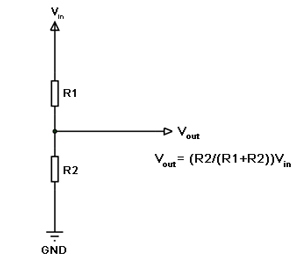
I have done some research and i found some conflicting information. Here is the schematic that i am planning to build:
Source: Simple Arduino Voltmeter Project with Circuit & Code
That page also says that: "In this resistive network we have two resistors. As shown in figure, R1 and R2 which are of 10k and 100k ohm. The midpoint of branch is taken to measurement as a anolog input to the Arduino. The voltage drop across R2 is called Vout , that’s the divided voltage of our circuit."
My questions:
Shouldn't the resistor values be in reverse, that is, R1 higher than R2, so that it protects the Arduino's analog pin from high current coming from the DC battery??
I am using 2 x 18650 batteries as the power source, so that's a total of 8.4 V when fully charged and from my calculations, i should be using a resistance ratio, R2/(R1+R2) of 0.6. Should i use 600 ohms for R2 and 400 ohms for R1 or 6000 and 4000 ohms, respectively? And why? I'm thinking higher resistance values are better so that it limits the current flowing to the Arduino pin and also protects the ground pin in the Arduino, otherwise the battery would be kinda shorted to the Arduino by connecting the positive battery terminal to the Arduino ground pin without a high enough series resistor in between. Am i correct?
I am also thinking that this voltmeter circuit is not very energy efficient since i am using DC batteries and maybe the resistors will just take all the juice out of the battery quickly as heat dissipation? What are the other better options for making a voltmeter using Arduino, with better battery longevity?
I did more research and i found this: "Enhancing the Voltmeter: using switches to allow the user to choose from multiple potential dividers or a front-end in Processing or building the meter using a minimal AVR circuit instead of a full Arduino board." How can i use switches that can be activated through code to switch between voltmeters? And what does it mean by "a front-end in Processing"?
larryd:
The values R1 and R2 set the level for the analog input.
This voltage can be what you need as long as it doesn’t go over Vcc.
It’s recommend you use 10k for R2; adjust R1 to get the desired value for A0 input.
The input to divider can go through a N.O. contact of a relay; this can then disconnect the battery when testing is not needed.
Thank you for your reply. I am also wondering, why not just use one single resistor in series between the battery and the analogRead pin instead of a voltage divider which requires 3 resistors? This would also essentially reduce the voltage? I could use a value of resistance that would take most of the voltage and let only a final voltage of no more than 5 V reach the Arduino analog pin.
larryd:
A voltage divider needs two resistors. As in your schematic, R1 and R2.
To illustrate my question better, let's consider this case:
If Vin is 10 V and i want a voltage of 5 V at Vout, then i can just put the correct resistor, R1.
I apologise for my ignorance... But i'm a bit confused since i'm thinking about applying the same reasoning as in this guide: https://lastminuteengineers.com/nokia-5110-lcd-arduino-tutorial/
The LCD works on 3.3V and if i were to connect 5V from the Arduino to it directly, then the voltage would need to go through a logic level shifter, otherwise it would damage the LCD.
Quote from that page: "One of the cheap and easiest way to shift levels is to add resistors inline with each data transmission pin. Just add 10kΩ resistors between the CLK, DIN, D/C, and RST pins and a 1kΩ resistor between CE."
So, my thinking is that i could use the same simple resistor setup in series to shift the voltage levels from, let's say, 10V down to 5V for the analogRead pin.
So, my thinking is that i could do use the same simple resistor setup to shift the voltage levels from, let's say, 10V down to 5V for the analogRead pin.
No, you can't. The resistors in the "last minute engineers" example have a completely different function: to protect a DIGITAL input from overcurrent, if the maximum allowed input voltage level is exceeded.
This description is completely wrong, so avoid any web pages by those people.
Quote from that page: "One of the cheap and easiest way to shift levels is to add resistors inline with each data transmission pin. Just add 10kΩ resistors between the CLK, DIN, D/C, and RST pins and a 1kΩ resistor between CE."
For analog inputs, you must use two resistors, or the equivalent.
With R1 = 100K, then Vout = Vin + (1,000,000/(1,100,000)) = 0.91 of Vin.
With a 5V powered '328P, the inputs must not exceed 5.5V to avoid blowing the input protection diodes,
thus Vout = 5.5VMax = 0.91Vin, so Vin must be <=5.5/.91 = 6V.
Input leakage current is spec'ed at 1uA max, implying 1 Megohm resistance.
The only other value shown is 50nA for the analog comparator.
Digital inputs are not isolated from the analog read section, they are connected in parallel.
DryRun:
To illustrate my question better, let's consider this case:
If Vin is 10 V and i want a voltage of 5 V at Vout, then i can just put the correct resistor, R1.
But the effective resistance of the pin is extremely high. So there is incredibly little current flowing through your solitary resistor and therefore there is almost no voltage dropped across it. So the pin still sees 10V near as damn it.
I suppose it might sort of work if you used a resistor of several Mohms but that would create other problems.
Semiconductor leakage (clamping diodes, etc.) can't be put into a fixed resistor value, and that leakage is temp dependent.
Not sure at what temp that 1uA max is specified, but at normal room temps that value is a shipload lower.
And an analogue pin 'floats' at about 1/3*VCC, which makes it even more complicated.
Easier to just stick your head in the sand, and ignore input resistance leakage.
Leo..
If you don't use a voltage divider, and the voltage on the 'other side' of a single resistor exceeds 'VCC+0.65volt', then current starts to flow through the pin protection 'diode' to Arduino's VCC.
It is considered a bad thing to rely on that, because it's not properly specified.
Therefore you should try to keep pin voltage under 'VCC+0.5volt'.
Not using a voltage divider (single current limiting resistor) also means that any voltage at or over VCC on an analogue pin will read 1023, so useless for 9volt battery measurements.
You should not use default Aref for voltage measurements, because Arduino's default ratiometric A/D makes voltage results dependent on battery voltage as well as Arduino's VCC (supply) voltage.
Better to calculate the divider for 1volt, and switch to 1.1volt Aref in setup.
That could be a 10k resistor from pin to ground, and a 82k (or 100k) resistor from 9volt battery to pin.
(shouldn't power an Arduino from a 9volt smoke alarm battery).
For the display. "cheap and easiest way".
Indeed.
They rely on the internal clamping of the LCD chip pins.
Not recommended for production, but ok for hobby use (where you have several spare LCDs).
Leo...
So heat up the chip to 105C, and put 5.5volt on it, and you might see that leakage.
Test:
Use a 10Megohm:10Megohm voltage divider (or higher values) on an analogue pin,
and a 10-100n ceramic cap across each resistor (to eliminate muxer cross-talk).
Read the analogue pin, and see how far it's off from '512'.
Or use a 100Meg resistor between a digital pin and +5volt.
You most likely read a HIGH from the pin.
Leo..