Hello, I have been using the Uno and Mega for many years. Recently I am interested in small size applications and consider the Nano series. Although they look small, all those youtube videos I have seen involve putting them in a breadboard which ended up similar in size as the Uno or Mega. So what is the point of choosing the Nano series?
Because you don’t have to do that. You can direct wire, if really necessary, or put pin headers or 0.1” screw terminals in only the pins you need to connect to. In extremis, I’ve direct-wired a board, then run hot glue down the edge of the board to serve as a strain relief. I don’t recommend it, because servicing it is then very difficult, but it can be done.
But, there are other much smaller form factors - it depends on your project’s needs.
Breadboards are for temporary experiments and proof of concept.
For a final project with other components, you can have a a PCB made with space for the Nano and place the other bits around it, or even use it with stackable headers, like the Adafruit Feather series, which features stackable add-ons like small TFT displays, buttons, IMUs, etc.
The Nano footprint is a lot easier to use with a multi panel breadboard than the Uno footprint. Put male machine pin headers on it and it's just another 0.6" DIP30 part.
The ability to plug a Nano into a breadboard is one of the major advantages, although as @jremington points out, that is not for a finished project. Even if you mount header pins to an UNO or Mega, it is not possible to plug directly into a breadboard because the pin spacing will not fit (and it would need to straddle two breadboards because of the width). I am also not a fan of wires with dupont connectors, I'm still using breadboards and 22-gauge solid wire jumpers I made back in the 1980's that continue to work reliably.
The Nano is way smaller and have sane footprint.
I use more components, so the breadboard is involved anyway to keep them in fixed places. It would need a lot of dupond wires to connect the UNO to the breadboard, while Nano can be simply inserted there. And I can remove the MCU anytime and then simply put back without need to rewire everything. And with Nano it is one solid breadboard, while the same with UNO is one solid breadboard and UNO and lot of dangling wires.
I can use the breadboard to test the circuit and then convert it to any universal PCB (perfboard?) and solder that with Nano, while UNO would not fit. (Or put pin sockets there, so the MCU can be swaped to other projects.)
When I want to make something like shield, for Nano I can use arbitrary sized cheap universal PCB, while for UNO I have to get special PCB with the failed footprint. (Yes, the authors of Arduino say it was mistake, they fixed it, then by mistake unfixed it and then they were in hurry, so they leave it in the unfixed state and never fixed it again.)
Whats the point of using UNO instead?
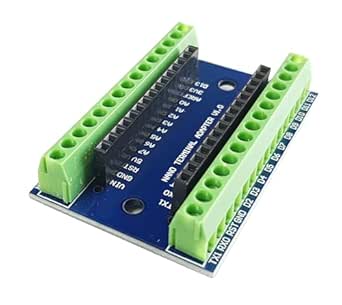
Example of the screw terminals mention by @camsysca in post #2: Screw Terminal Block Shield for Arduino Nano – Secure Connection Module for Arduino Nano Wiring: Amazon.com: Industrial & Scientific
And if you use these protoboards:
https://www.ebay.com/itm/294059612638
you may be able to use a Nano without having to design and order a board from China. As with a breadboard, a Nano leaves two empty holes on one side, and three empty holes on the other side, to solder leads in.
However, I have to say that these protoboards are becomming more and more difficult to find. Part of the migration to SMD I guess.
Not quite what I meant. here’s an Amazon link, the OP may have to search for an equivalent in their country. This was chosen as an example, not something I’ve bought, as mine came from Ali:
These can be mounted on a Nano, though depending on which pins you want to access, you may find yourself mounting some or all on the bottom of the Nano, not the top.
YMMV, it’s just an option.
OK, thanks for that idea. I did never think about that option.
I know you said YMMV. So a bit of a guess is that you will probably have some problems if you want to populate all pins with those screw terminals (either 328P in the way or voltage regulator in the way).
Yeah, if I wanted all pins with a screw terminal, I’d either buy a term board like you pointed out, or if I needed it as small as possible, make my own with a piece out of one of these:
The idea is, solder the screw terminals to one side, but then, since the holes are PTH, you can put the Nano on the other side. Again, an extreme option, and only worth it if there’s no better option, and one has an aversion to changing away from the Nano for example. Other options would likely be better, but…
Nano is a nice package at lower price than an Uno but end products can use an ATmega328P or other AVR stand-alone or as part of a bigger system.
Yes, but not every hobbyist is ready for that leap, if designing and building a circuit board is your suggestion(it’s not clear to me). There’s at least one intermediate stage between using an Uno and build-your-own Arduino.
Well it depends on which Uno. Just a couple years ago most Unos had the DIP version of ATmega328P installed and it was in a socket. About 2020 everybody got really “smart” and now the majority of Unos produced have surface mount ATmega328P soldered on, and the hobby took a huge leap backwards in friendliness to beginners taking that leap. As it turns out the surface mount MCUs are a few cents cheaper, and when the manufacturer is producting thousands of boards for sale they have an opportunity to make several dozen dollars per year more. I don’t buy Unos having the surface mount MCU.
Anyway after that rant, what I really have to say is if you have an Uno with the DIP version MCU that is socketed, all you have to do to leap to your own design is carefully pry the MCU out of the socket and put it on a breadboard with a very small number of support components, and wire it up like you would an Arduino using a pinout diagram. The minimum support components are 2 each 100nf capacitors and an FTDI adapter to power it and communicate with it. That’s it. Optional support components include a stronger pullup resistor for the reset pin, although the built-in pullup is enough for most applications. And if you want precision clock you can add a crystal instead of using the internal oscillator. If you want power regulation built into your board, add a very inexpensive and small buck converter and adjust it to 5V. Buy some bare ATmega328P-PU MCUs to replace the one you pried out of the Uno and to make projects with.
The next very small leap is to get an account on https://pro.easyeda.com/editor, watch some tutorial videos about putting together your schematic based on what you built on your breadboard, and put together the PCB design and risk $5 to $10 on some prototype PCBs that you can have JLCPCP beautifully manufacture in your choice of color and mail to you.
The move to stand-alone AVR chips Used To Be a part of the main site, a goal of the learning program. But somewhere along the way it seems that marketers moved in.
The original Uno has the socket on purpose.
It’s a DEVELOPMENT board, not meant for end products.
Ditto with the Nano though it is breadboard-friendly.
I think: A wide variety of "clone" Nano products showed up from third parties at really attractive prices (relative to official Unos, anyway.)
And AFTER that, people noticed the advantages of small size, breadboard compatibility, and so on.
Probably the state of PCB manufacturing had something to do with it as well. There used to be a 50x50mm size limit for "cheap" PCBs, and an Uno didn't fit.
(I put "clone" in quotes above, because the design advancement in the Nano compatible space has been pretty dramatic. The original Nano was more expensive than an Uno, and used a PCB with components on both sides of the PCB (which is more expensive to manufacture.) The derivatives appeared with a different and cheaper USB/Serial converter, and eventually a board with components on only a single side - impressive "cost reduction engineering.")
I understand your point of looking for backwards compatibility. But at certain point it doesn't make much sense anymore. New boards might not be compatible with old libraries, but old boards are not compatible with new ones and for sure don't have all new features. For me the line is usually wireless connections, if needed, I go with Esp32. Probably soon also with nRF.
The Arduino boards would never be made one at a time. They would be in a panel of 10 to 20 per panel. Perhaps more if the company could afford bigger equipment.
Nanos are ideal for incorporating in custom PCBs. I've made many projects this way, from radio controlled ride-on railway signal systems to a burglar alarm bell box.