Advice on Finite state machine code to move two motors with two buttons and 3 endstops

Hi folks,

I'm trying to motorise a wardrobe setup and have prepared the hardware part, but now I'm somewhat stuck on the programming task. I'm an architect, so programming is something new to me, but I'm trying to understand it as much as possible and trying to learn and watch tons of videos.

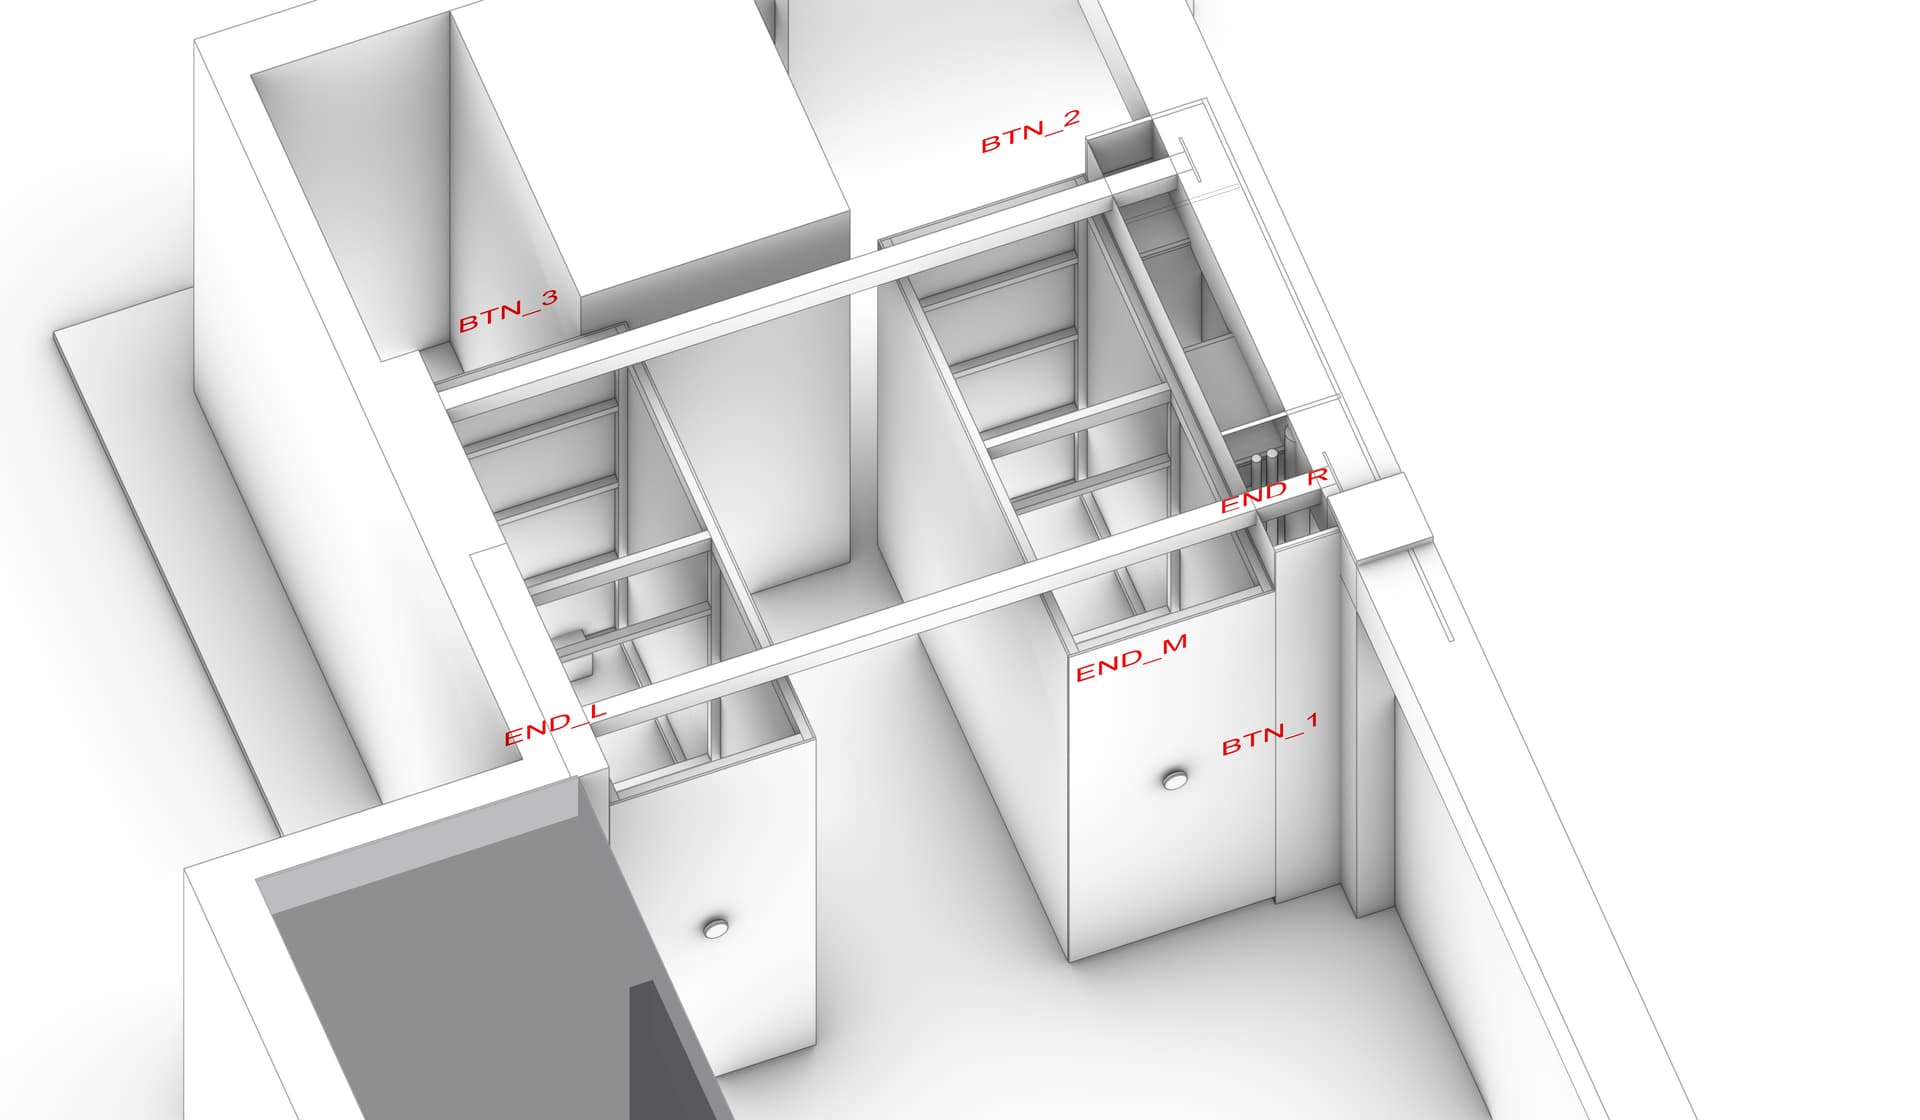
I have this schematic of how I have everything connected. Right now I'm doing the test part and I'm working my way through simpler code to more complex one.
I managed to write code, that moves both motors while holding any of the buttons. If I release the button and hold it again, the direction is reversed. If the endstop is being touched, it stops both motors and starts moving in the opposite direction with a small delay (so I would be able to release the button and the "home" position). This was pretty ok and fun, but now I'm at the trickier part.

I'm adding the third moving endstop (it is moving with wardrobe 2) and I have to come up with some logic on how to move the wardrobes. My first intention was to move one wardrobe at a time (to not put that much load on the power supply). When I press the button it should start moving W1 or W2 based on the last direction (the direction changes with each button press). Then it hits one of the end stops (L or R) and then it should start moving the other wardrobe to the Middle endstop. If Middle and L/R are pressed it has to move to the non-activated endstop and after hitting it it stops or if I still hold the button it has to start moving the other wardrobe. If just L/R is activated, it should move the other wardrobe to the M stop.
There are a lot of other problems I guess, but I don't have any idea, how to handle this kind of logic/variable-based code.

Do you have some inspiration, that I could read/watch to find some solution for this?

Here is the code, that I managed to test with the motors and end stops.

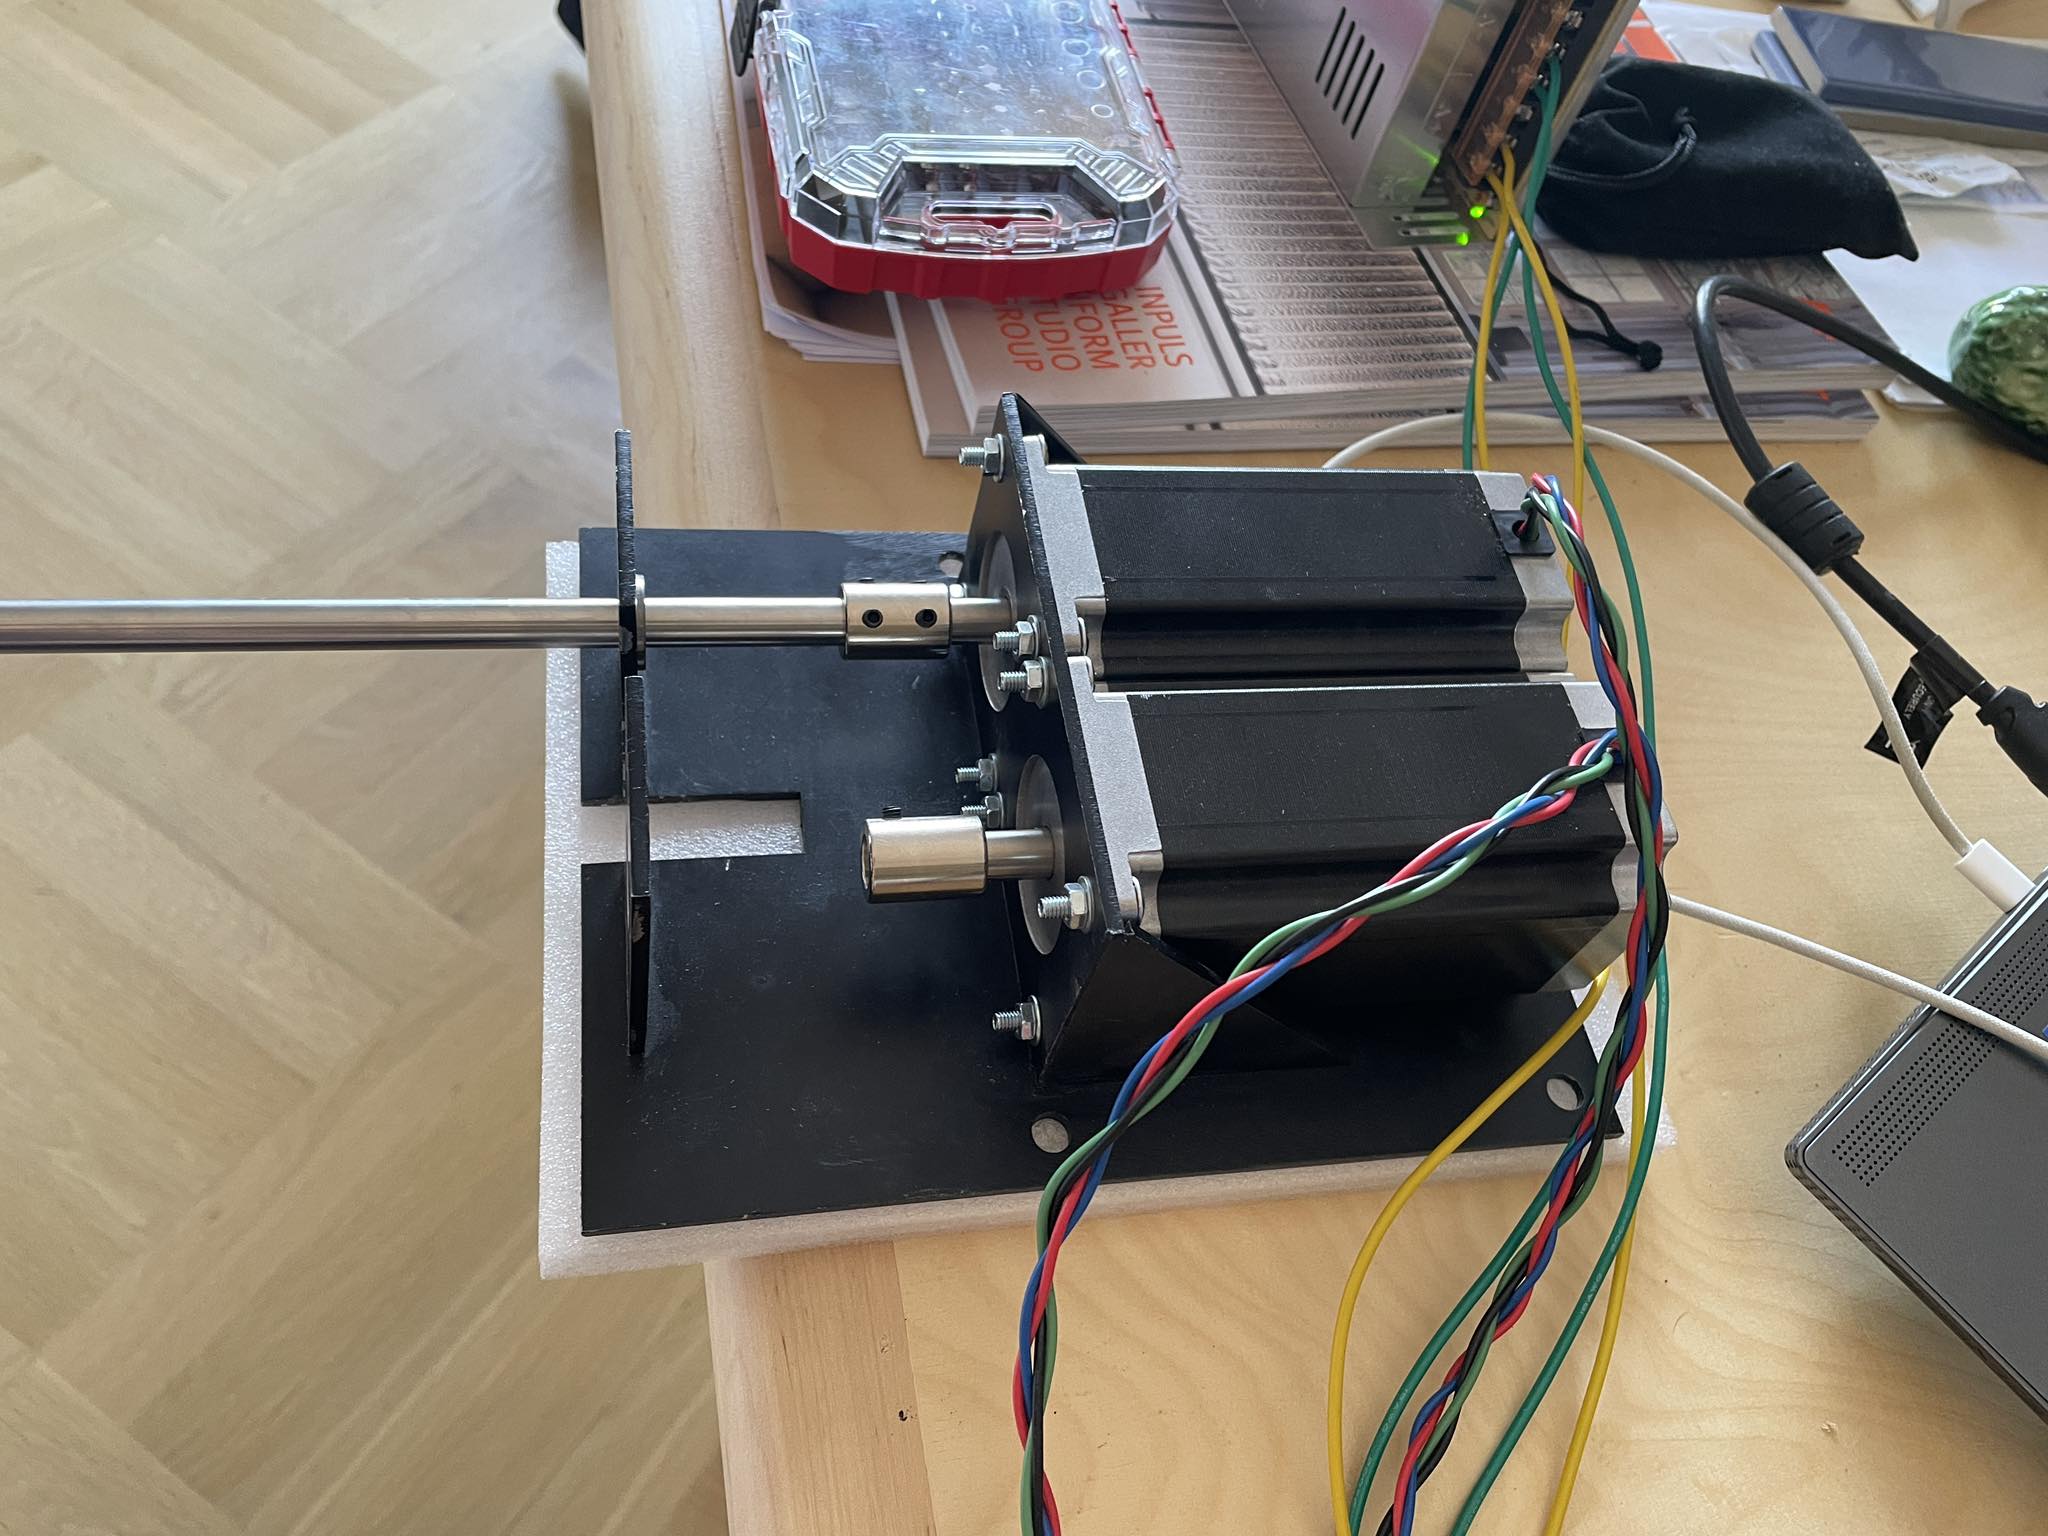
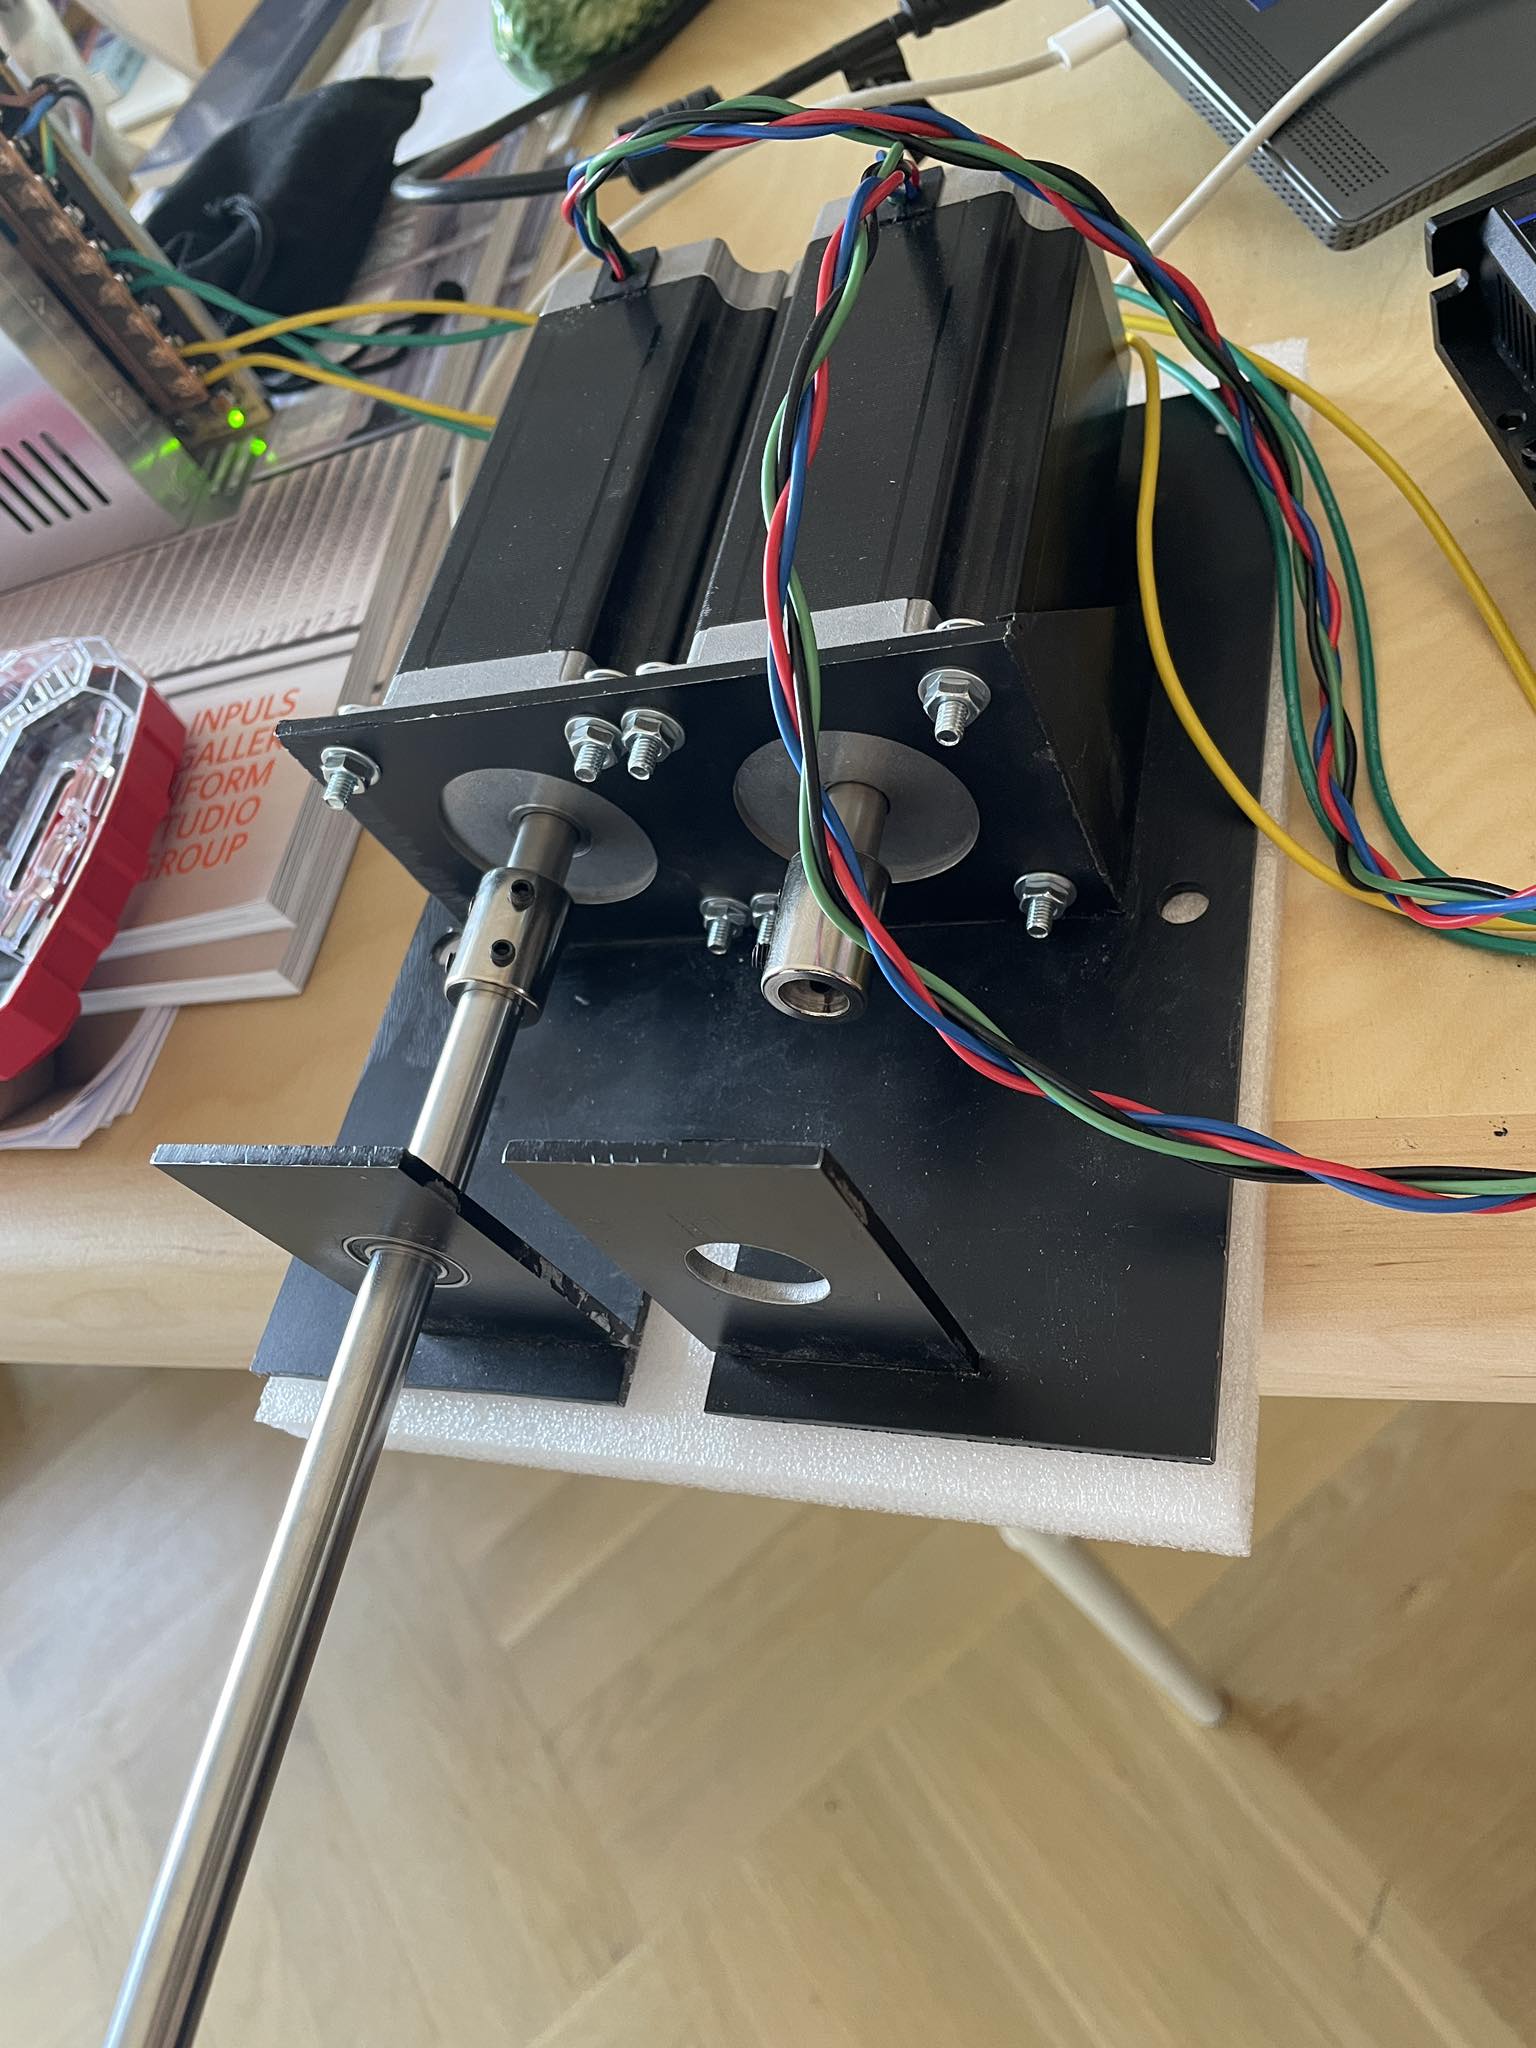
And pictures of the setup of the motor, some parts are missing, but I will add those once I install it in place.

Thank you for any advice or good word, I appreciate it. :pray:


```cpp
#include <AccelStepper.h>

// Buttons
#define BTN_1 4 // Button - entrance (to bedroom)
#define BTN_2 5 // Button - exit (from bedroom)
#define BTN_3 6 // Button - hideout

// Endstops
#define END_L A0 // Endstop - left
#define END_R A2 // Endstop - right

// Stepper motor pins for the left stepper
#define STEP_L 7  // Define step pin (pulse pin) for the left stepper motor
#define DIR_L 8   // Define direction pin for the left stepper motor
#define ENA_L 9   // Define enable pin for the left stepper motor

// Stepper motor pins for the right stepper
#define STEP_R 10 // Define step pin (pulse pin) for the right stepper motor
#define DIR_R 11  // Define direction pin for the right stepper motor
#define ENA_R 12  // Define enable pin for the right stepper motor

// Alarm pin connected from both stepper drivers - NOT USING THOSE YET
#define ALM 13

// SSR for reseting power to the power supply of stepper drivers - NOT USING THOSE YET
#define SSR A3

AccelStepper stepperL(AccelStepper::DRIVER, STEP_L, DIR_L);
AccelStepper stepperR(AccelStepper::DRIVER, STEP_R, DIR_R);

// Variables - button states and endstop states
bool btn1_state = false; // actual button state
bool btn2_state = false; // actual button state
bool btn3_state = false; // actual button state
bool lastBtn1_state = false; // previous button state
bool lastBtn2_state = false; // previous button state
bool lastBtn3_state = false; // previous button state

bool END_L_STATE = false; // actual endstop state
bool END_R_STATE = false; // actual endstop state
bool lastEND_L_STATE = false; // previous endstop state
bool lastEND_R_STATE = false; // previous endstop state

bool direction = true; // true = right, false = left
bool waitingForDelay = false; // flag to check if waiting for delay
unsigned long endstopHitTime = 0;
const unsigned long endstopDelay = 700; // Delay in milliseconds

void setup() {
 
  // Initialize the buttons
  pinMode(BTN_1, INPUT_PULLUP);
  pinMode(BTN_2, INPUT_PULLUP);
  pinMode(BTN_3, INPUT_PULLUP);
  
  // Initialize the endstops
  pinMode(END_L, INPUT_PULLUP);
  pinMode(END_R, INPUT_PULLUP);
  
  // Initialize the left stepper motor
  stepperL.setMaxSpeed(400);      // Set maximum speed
  stepperL.setAcceleration(100);  // Set acceleration
  stepperL.setEnablePin(ENA_L);
  stepperL.setPinsInverted(false, false, true);
  stepperL.disableOutputs();

  // Initialize the right stepper motor
  stepperR.setMaxSpeed(400);
  stepperR.setAcceleration(100);
  stepperR.setEnablePin(ENA_R);
  stepperR.setPinsInverted(false, false, true);
  stepperR.disableOutputs();
}

void loop() {

  // Update button and endstop states
  updateButtonStates();
  updateEndstopStates();

  unsigned long currentMillis = millis(); // Save current millis to be able to add delay after hitting endstop and reversing movement

  if (waitingForDelay) {
    // Check if the delay period has passed
    if (currentMillis - endstopHitTime >= endstopDelay) {
      waitingForDelay = false;
    } else {
      return; // Exit the loop until delay period has passed
    }
  }

  // Check if any button is pressed
  if (btn1_state || btn2_state || btn3_state) {
    // Enable the stepper motors
    stepperL.enableOutputs();
    stepperR.enableOutputs();

    // Move the motors in the current direction
    if (direction) {
      if (!END_R_STATE) { // Allow movement if right endstop is not triggered
        stepperL.moveTo(stepperL.currentPosition() + 10000); // Greater movement then current position and physicall limitations (
        stepperR.moveTo(stepperR.currentPosition() + 10000); // will be adjusted to be sligtly more then real physicall limitations)
      }
    } else {
      if (!END_L_STATE) { // Allow movement if left endstop is not triggered
        stepperL.moveTo(stepperL.currentPosition() - 10000);
        stepperR.moveTo(stepperR.currentPosition() - 10000);
    }

    // Run the motors while any button is pressed
    while ((btn1_state || btn2_state || btn3_state)) {
      stepperL.run();
      stepperR.run();
      
      // Update button and endstop states
      updateButtonStates();
      updateEndstopStates();
      
      // Check if an endstop is hit
      if (END_L_STATE && !direction) {
        // Left endstop reached and moving left
        direction = true; // Change direction to right
        stepperL.setCurrentPosition(0); // Reset position
        stepperR.setCurrentPosition(0); // Reset position
        endstopHitTime = millis();
        waitingForDelay = true;
        break;
      }
      if (END_R_STATE && direction) {
        // Right endstop reached and moving right
        direction = false; // Change direction to left
        stepperL.setCurrentPosition(0); // Reset position
        stepperR.setCurrentPosition(0); // Reset position
        endstopHitTime = millis();
        waitingForDelay = true;
        break;
      }
    }
    
    // Disable the stepper motors to save power
    stepperL.disableOutputs();
    stepperR.disableOutputs();
  } else {
    // Reset positions to 0 when no button is pressed
    direction = !direction; // Switch the direction for the next press
    stepperL.setCurrentPosition(0);
    stepperR.setCurrentPosition(0);
  }
}

void updateButtonStates() {
  lastBtn1_state = btn1_state;
  lastBtn2_state = btn2_state;
  lastBtn3_state = btn3_state;
  
  btn1_state = (digitalRead(BTN_1) == LOW);
  btn2_state = (digitalRead(BTN_2) == LOW);
  btn3_state = (digitalRead(BTN_3) == LOW);
}

void updateEndstopStates() {
  lastEND_L_STATE = END_L_STATE;
  lastEND_R_STATE = END_R_STATE;
  
  END_L_STATE = (digitalRead(END_L) == LOW);
  END_R_STATE = (digitalRead(END_R) == LOW);
}


Draw a picture of the finished product, include button locations, limit-switch locations and try to convey how it physically moves. To me "wardrobe" is a free-standing box with doors, so I am not picturing three-dimension movement.

could you recognize that the button was pressed for < 1 sec and use that short presses to switch wardrobes

start the wardrobe moving or reversing (?) when pressed for > 1 sec

#include <AccelStepper.h>

// Buttons
#define BTN_1 4 // Button - entrance (to bedroom)
#define BTN_2 5 // Button - exit (from bedroom)
#define BTN_3 6 // Button - hideout

// Endstops
#define END_L A0 // Endstop - left
#define END_R A2 // Endstop - right

// Stepper motor pins for the left stepper
#define STEP_L 7  // Define step pin (pulse pin) for the left stepper motor
#define DIR_L 8   // Define direction pin for the left stepper motor
#define ENA_L 9   // Define enable pin for the left stepper motor

// Stepper motor pins for the right stepper
#define STEP_R 10 // Define step pin (pulse pin) for the right stepper motor
#define DIR_R 11  // Define direction pin for the right stepper motor
#define ENA_R 12  // Define enable pin for the right stepper motor

// Alarm pin connected from both stepper drivers - NOT USING THOSE YET
#define ALM 13

// SSR for reseting power to the power supply of stepper drivers - NOT USING THOSE YET
#define SSR A3

AccelStepper stepperL(AccelStepper::DRIVER, STEP_L, DIR_L);
AccelStepper stepperR(AccelStepper::DRIVER, STEP_R, DIR_R);

// Variables - button states and endstop states
bool btn1_state = false; // actual button state
bool btn2_state = false; // actual button state
bool btn3_state = false; // actual button state
bool lastBtn1_state = false; // previous button state
bool lastBtn2_state = false; // previous button state
bool lastBtn3_state = false; // previous button state

bool END_L_STATE = false; // actual endstop state
bool END_R_STATE = false; // actual endstop state
bool lastEND_L_STATE = false; // previous endstop state
bool lastEND_R_STATE = false; // previous endstop state

bool direction = true; // true = right, false = left
bool waitingForDelay = false; // flag to check if waiting for delay
unsigned long endstopHitTime = 0;
const unsigned long endstopDelay = 700; // Delay in milliseconds

void setup() {

  // Initialize the buttons
  pinMode(BTN_1, INPUT_PULLUP);
  pinMode(BTN_2, INPUT_PULLUP);
  pinMode(BTN_3, INPUT_PULLUP);

  // Initialize the endstops
  pinMode(END_L, INPUT_PULLUP);
  pinMode(END_R, INPUT_PULLUP);

  // Initialize the left stepper motor
  stepperL.setMaxSpeed(400);      // Set maximum speed
  stepperL.setAcceleration(100);  // Set acceleration
  stepperL.setEnablePin(ENA_L);
  stepperL.setPinsInverted(false, false, true);
  stepperL.disableOutputs();

  // Initialize the right stepper motor
  stepperR.setMaxSpeed(400);
  stepperR.setAcceleration(100);
  stepperR.setEnablePin(ENA_R);
  stepperR.setPinsInverted(false, false, true);
  stepperR.disableOutputs();
}

void loop() {

  // Update button and endstop states
  updateStates();

  unsigned long currentMillis = millis(); // Save current millis to be able to add delay after hitting endstop and reversing movement

  if (waitingForDelay) {
    // Check if the delay period has passed
    if (currentMillis - endstopHitTime >= endstopDelay) {
      waitingForDelay = false;
    } else {
      return; // Exit the loop until delay period has passed
    }
  }

  // Check if any button is pressed
  if (btn1_state || btn2_state || btn3_state) {
    // Enable the stepper motors
    stepperL.enableOutputs();
    stepperR.enableOutputs();

    // Move the motors in the current direction
    if (direction) {
      if (!END_R_STATE) { // Allow movement if right endstop is not triggered
        stepperL.moveTo(stepperL.currentPosition() + 10000); // Greater movement then current position and physicall limitations (
        stepperR.moveTo(stepperR.currentPosition() + 10000); // will be adjusted to be sligtly more then real physicall limitations)
      }
    } else {
      if (!END_L_STATE) { // Allow movement if left endstop is not triggered
        stepperL.moveTo(stepperL.currentPosition() - 10000);
        stepperR.moveTo(stepperR.currentPosition() - 10000);
      }

      // Run the motors while any button is pressed
      while ((btn1_state || btn2_state || btn3_state)) {
        stepperL.run();
        stepperR.run();

        // Update button and endstop states
        updateStates();

        // Check if an endstop is hit
        if (END_L_STATE && !direction) {
          // Left endstop reached and moving left
          direction = true; // Change direction to right
          stepperL.setCurrentPosition(0); // Reset position
          stepperR.setCurrentPosition(0); // Reset position
          endstopHitTime = millis();
          waitingForDelay = true;
          break;
        }
        if (END_R_STATE && direction) {
          // Right endstop reached and moving right
          direction = false; // Change direction to left
          stepperL.setCurrentPosition(0); // Reset position
          stepperR.setCurrentPosition(0); // Reset position
          endstopHitTime = millis();
          waitingForDelay = true;
          break;
        }
      }
    }
    // Disable the stepper motors to save power
    stepperL.disableOutputs();
    stepperR.disableOutputs();
  } else {
    // Reset positions to 0 when no button is pressed
    direction = !direction; // Switch the direction for the next press
    stepperL.setCurrentPosition(0);
    stepperR.setCurrentPosition(0);
  }
}

void updateStates() {
  lastBtn1_state = btn1_state;
  lastBtn2_state = btn2_state;
  lastBtn3_state = btn3_state;
  lastEND_L_STATE = END_L_STATE;
  lastEND_R_STATE = END_R_STATE;

  btn1_state = (digitalRead(BTN_1) == LOW);
  btn2_state = (digitalRead(BTN_2) == LOW);
  btn3_state = (digitalRead(BTN_3) == LOW);
  END_L_STATE = (digitalRead(END_L) == LOW);
  END_R_STATE = (digitalRead(END_R) == LOW);
}
1 Like

I dislike the multiple setCurrentPositions() because they make it difficult to follow the logic. Maybe they do work with the moveTo(stepperL.currentPosition() + 10000), etc, but it is awkward to understand what is happening.

Why not use (mostly) move() instead of moveTo and maybe pick one end of the range to be zero and only zero the positions at one of the end stops on that axis?

My intuition would be to consider a state machine (or two?) to deal with the different ways you'd like things to be moving.

And does it compile for you? The code in #1 seems to have a misplaced curly bracket somewhere.

1 Like

I'm sorry, I have been looking at the project for a long time, so I sometimes forget that others don't know the project as me.
Here are the pictures of the 3D model. The text represents the approximate position of buttons and end-stops (the END_M will be attached to the left side of the wardrobe).

Im struggling with the logic behind moving one wardrobe/stepper and then the other, but I guess, that the movement is not that complicated.

wardrobe_movement


1 Like

Thanks. As I said, I'm still learning, so I will try to do it with move(), maybe it will be easier for me too to understand it.

With picking one side as a zero position what would be the difference? I was trying to set the zero position after each button release so I could get the acceleration after each new press. Is that also possible with the move()?
Maybe I can set the zero position to be at the Left and Middle endstop (which means both wardrobes are on the left), but I'm not sure if I can get the acceleration in a different position (which is very much needed, the wardrobes are heavy af, so without acceleration, it would be very hard to move them).

Yes yes, it compiles, which is weird if you have found a mistake :smiley: I compared the code @kolaha provided and it seems a little bit simpler with one function to update the state of buttons and endstops and it is also without the mistake so thanks for that.

With the state machine, is it something like writing my own function, that I then call in the loop? (something like the checkButtons which I then call in loop to update it?)
I will also look on youtube for some tutorial for the state machines. I gues I have to write down all the possible movements, which will be then called based on the direction state/endstop state and button press right?

switches should be placed on one register and change interrupt attached. so is needles to check endstops self.

1 Like

But a far as my understanding goes, attach interrupt or the internal interupt is only on pin 2 and 3 right? But I have 3 endstops :confused: I would loose the ability to know, in which position the wardrobe is. Or maybe If I put L and R endstop to one interrupt and middle one to the second interput, then I would be able to distinguish between Ends and middle, but still If I trigger for example Left one and the other wardrobe would hit the right endstop I wouldn't know that, because the interrupt is already pressed right?
Or can you please explain how you meant to put it on one register?

That would be possible, but then it would be hard to recognise when it should move CW or CCW. That's why I think its easier to recognize only long press or hold as we speak and switch direction after each press. But it is nice idea of switching the wardrobes.

When I copy the #1 code, there doesn't seem to be a closing brace for loop() and I get this error:

sketch.ino: In function 'void loop()':
sketch.ino:78:3: error: 'updateButtonStates' was not declared in this scope
   updateButtonStates();
   ^~~~~~~~~~~~~~~~~~
sketch.ino:79:3: error: 'updateEndstopStates' was not declared in this scope
   updateEndstopStates();
   ^~~~~~~~~~~~~~~~~~~
sketch.ino:143:7: error: expected '}' before 'else'
     } else {
       ^~~~

Error during build: exit status 1

Adding a '}' at the apparent end of loop looks like it leaves two elses in a row.

Yes, you get acceleration from a stop at non-zero positions. You don't need to zero to get accelerations.

Looking at your animation, instead of the #1 code, to see your intentions, I see behavior such that one could use with a state machine with these states:

enum MoveStates {IDLE_RIGHTWARDS, B_RIGHTWARDS, A_RIGHTWARDS, IDLE_LEFTWARDS, A_LEFTWARDS, B_LEFTWARDS} motionState =IDLE_RIGHTWARDS ;

...where at any one time, only one cabinet is moving one direction until it hits its endstop or the button is released and it then does the next thing. Something like this completely untested snippet:

switch(motionState){
  case IDLE_RIGHTWARDS: // waiting to move things right
    if(buttonPressed){
      motionState = B_RIGHTWARDS; 
      stepperR.enableOutputs();
      stepperR.move(ManySteps);
    }
    break;
  case B_RIGHTWARDS; // moving the right cabinet rightwards
     stepperR.run();
     if(END_R_STATE == ACTIVE){ // far enough
        motionState = A_RIGHTWARDS;
        stepperR.stop();
        stepperR.disableOutputs();
        stepperL.enableOutputs();
        stepperL.move(ManySteps);
     }
     if(!buttonPressed){ // stop moving & switch directions
         motionState = IDLE_LEFTWARDS;   
         stepperR.stop();
         stepperR.disableOutputs();
     }
     break;
  case A_RIGHTWARDS:
     ...
  ...
}

The nice thing about state machines is that you can break the task down into distinct pieces, and easily focus on if and how you transition from one piece into the next.

In regard to acceleration and endstops, if you want to stop with acceleration, you would need to know the position so you can decelerate to a stop as you approach the expected endstop. If you don't know it's exact position, you have to plan to overshoot (move(ManySteps) or moveTo(ManySteps)) and do a harder stop when you trigger the limit switch while you are overshooting. If you have some absolute positions, (which you can determine automatically by running into endstops a time or two, called "Homing") you can decelerate to the planned positions with stepperL.moveTo(ARightEnd).

1 Like

tl;dr: why just one button? If you used a three position spring loaded switch, there is no need for long and short.

OK, first, which wardrobe has the goat, and which has the car?

Never mind.

There are three resting states, I would name them for where the gap is, Right, Middle and Left.

From a gap on the right and gap on the left, there is only one plausible movement, to move to having the gap in the middle.

Pressing when the wardrobes are in position left, middle or right would be unambiguous. If possible, move the wardrobe that can.

Pressing when the wardrobe is in motion could stop it, although besides keeping the cat from getting crushed I'm not sure why stopping in mid-transition is necessary.

Pressing again when the wardrobes aren't nicely parked R, M or L would move the unparked wardrobe in the direction left or right as pressed.

I think it would be good to plan this well enough so it scales for more wardrobes.

Sry, this may have already been said. I have always argued against UIs with too few buttons, that rely on short and long presses or any such things as may annly more ppl than just me.

a7

1 Like

I worked in a facility with a hand-crank version of your library shelves. Each shelf had a wheel-crank and a mechanical lockout that would allow only the "open" cabinet cranks to operate. Consider mechanical lockouts, releases and cranks in your design... tech loves to fail at the worst time.

2 Likes

We will not speak of it.

Don't you get two gaps if you take your finger off the button and stop the motion early? Oh, and if a (goat-faced) imp of the perverse triggered an endstop before the wardrobe touched it, they could leave the system with three gaps.

I figured that all the gap states essentially degenerate into idle-but-aim-system-towards-closing-right-gaps & idle-but-aim-system-towards-closing-left-gaps.

Re buttons: Yes Yes. There are so many rage-inducing things produced by cheap bastard companies that can't be bothered to add a button.

1 Like

I was seeing as click left or right and release, motion will start if possible and started will go to the limit unless another click stops it.

She who will not be named, nor kept waiting for that matter, wants each wardrobe to have two touch plates left and right that when, um, touched make that wardrobe go left or right if it can.

Another opinion is that the wardrobes should sense pressure exerted by the operator, and take off under power in the same direction, like those automatic doors except a bit more finely tuned, suitable for the circumstances.

And lastly, motorized wardrobes? Please. This sounds like lotsa fun, but a good bearing system might mean it could be done very old school - all you'd need during a power outrage is a flashlight.

I admire the mechanical system. Ppl know more about that than I ever will and just understanding the design is sometimes a challenge.

a7

1 Like

state machine and your provided snippet looks promising, I will give it a try to test it out.

Also after some thinking I will go for two buttons on each side, so one will move left, other right, to make things more simpler. (Which answers further questions why not add another button. I was still trying to think how to make it with one button, but as others pointed out, I would make my life much harder.

1 Like

I’m not looking for long and short click, just hold and release. But I understand that thruway switch would be easy option. But I want something which can be implemented into the side board with some nice finish, so I will be hiding the button behind the board with two tubes and attached wooden circle acting as a button.
The gap system seems cool, but as was pointed out, if I release the button earlier, it would create more gaps.

And you are very right with the buttons. I will add one more to each side, it will be much more simpler, it is true, that one button could be confusing and potentially problematic due to complexity of the code

I would love that. Those big turning wheels at the front with nice gear down to provide more torque? It would be awesome, but I have to confess that I came a little bit too late to this thing, so I had to find different solution.
Also, that’s why I’m disabling the motor after each move and also I’m not putting any gearbox on the system to make it backdriveable

I have to admit, that I was kinda lost in the dc motor options, so I went for stepper motor (which I guess will get a lot of hate and bad faces, which I totally get, normal dc motor could have some current sensor, which would detect weird things happening to the wardrobe)
But I went for stepper motor, I could choose the torque I need and it’s easier to mount it somewhere (since I don’t have that many tools and equipment).
Also that’s why I want to use sir relay for power supply and all pins on stepper driver. If something goes wrong and stepper skips it sends a message and disable power to motor. Arduino will then restart the power supply to restart the stepper driver.
And again, I have to totally agree, mechanically operated it would be sooo much nicer, because this arduino and all stuff I’m creating will die soon or later (and I don’t give it more than few months, before something goes bad, but as I said, I’m came later to the project, so have to find different solution, in this case the motors.

I really appreciate everybody’s helpfulness, I think, I’m slowly getting to the final stage of the project. I will work on it over weekend or next week and I will try all suggestions you are proposing here.