Salve a tutti,
sono nuovo del forum e del mondo Arduino.
‘Nuovo’ sta anche per ‘hobbista e neofita’ su quasi tutto. Ho un obiettivo: realizzare una piccola Engraver CNC.
Per fare ciò sono partito dalla parte che ritengo più debole per me e cioè la parte software ed elettronica.
Installo la versione 1.8.19 e provo un Blink. Tutto ok.
Credo che voi sappiate a memoria lo schema:
- Arduino UNO R3 (collegato al PC win10 tramite USB)
- Shield CNC con 3 driver A4988 (R100 i resistori)
- 3 Stepper NEMA 17 (1.5A, 2.30ohm, 1.8deg, 0.42Nm) con relative cavi già su morsettiere.
- Alimentatore 250W, 24V
Setto sui driver Vref = 1.5 x 8 x 0.100 x (0.7) = 0.84V
Collego il tutto e scarico uno, due, tre sketch da internet, li comprendo…almeno credo, ma…
Niente da fare i motori non si muovono e non fanno rumore.
Controllo la tensione di alimentazione 24V -> ok
Controllo la tensione sui driver 0.84V -> ok
Controllo la tensione sui cavi Stepper +24V, -24V proprio come in uno degli sketch che ho caricato <> ok
Controllo la corrente dall’alimentatore 0.009A: ops!
Ho letto i vari forum ma non ho risolto.
Non so più che fare. Qualcuno può darmi una mano, meglio un’idea  .
.
Grazie comunque per avermi letto fino a qui.
Mech n Wood
The motor enable for the stepper drivers is tied HIGH by the CNC shield, disabling the motors. One must make pin 8 LOW to enable the motors.
Try this to test the X axis motor:
#define CW 0
#define CCW 1

const byte stepPin = 2; // x axis > 2, y axis > 3, z axis > 4 a axis > 12
const byte dirPin = 5; // x axis > 5, y axis > 6, z axis > 7 a axis > 13
const byte enablePin = 8;

unsigned long stepTime = 800;

void setup()
{
   Serial.begin(115200);
   pinMode(stepPin, OUTPUT);
   pinMode(dirPin, OUTPUT);
   pinMode(enablePin, OUTPUT);
   digitalWrite(enablePin, LOW);
   digitalWrite(dirPin, CCW);
}

void loop()
{
  oneStep();
}

void oneStep()
{
   static unsigned long timer = 0;
   unsigned long interval = stepTime;
   if (micros() - timer >= interval)
   {
      timer = micros();
      digitalWrite(stepPin, HIGH);
      delayMicroseconds(10);
      digitalWrite(stepPin, LOW);
   }
}
Tested and known to work on real hardware.
Good heavens! It works.
Thank you so much GroundFungus.
Just for my info: I saw that someone uses a jumper between the two pins EN/GND on the CNC shield Like in the picture here in attached. Is this another solution to enable the pin 8 LOW?
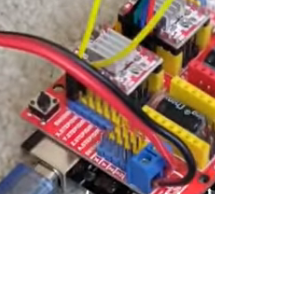
Yes, that will enable the motors. There is a pullup resistor on the CNC shield that ties pin 8 HIGH until you use the jumper to set pin 8 LOW.
So the jumper enables the motor, but you can't programmatically disable the drivers any more.
Thanks for the clarity of your explanation.
Hello everyone,
after turning on one of the motors, I find that the driver is way too hot.
• Shield CNC with A4988 driver (R100 resistors)
• NEMA 17 stepper (1.5A, 2.30ohm, 1.8deg, 0.42Nm see spec. attached)
• 250W, 24V power supply
Yes, it's true, I haven't applied the heat sink yet but anyway I deem that the Vref I setted is still too high.
Vref = 1.5A x 8 x 0.100ohm x (0.7) = 0.84V
Here attached the stepper data sheet.
I checked the current from the power supply: 0.40A.
Maybe I need to lower the Vref, but how much?
The A4988 driver is good for 1A coil current. That is for quality units like those from Pololu. EBay clones may not meet that specification. You can go up to 1.5A with a heat sink and fan cooling (again, quality units). The DRV8825 is a direct replacement for the A4988 and is good for 1.5A without heat sink.
Set coil current for the A4988 to less than 1A or apply the heat sink and install a small fan. The heat sink, by itself, is not good enough.
If your stepper will perform adequately and not miss steps at a lower current setting, the motor and driver will run cooler and last longer.
Stepper motors and drivers will run hot. Too hot to hold a finger on for very long. The spec sheet for the motor lists the maximum temperature rise as 80°C (above ambient). Temperature under that is acceptable though maybe not desirable.
Thak you groundFungus,
I'll decrease the Vref value to 1.0A x 8 x 0.100ohm x (0.7)= 0.56V and I'll install the heat sink.
When you use your steppers with no microstepping ("single step") you may notice that they skip steps at certain step rates. I have motors that will completely stall at 200 steps per second when run single step, for instance. That is the effect of resonance in the stepper.
Microstepping can mitigate the resonance effects. I usually run at least X4 microstepping just for that.
Also systems that are have more damping, like belt drives, are less subject to resonance where stiffer systems like gears or lead screws are more susceptible.
Salve a tutti,
HI everybody,
sorry for my delay in thank you (groudFungus) for the solution of driver heating.
I don’t want you think I am thankless but As you may have understood I am the kind of hobbyist that attend Arduino in the week end.
As suggested by you I decreased the Vref considering 1A instead of 1.5A for my NEMA 17 (Mnf wrote without specify the peak current and not the nominal one). The temperature of A4988 is now ok.
The problem with the resonance that you explained still remain.
I still haven’t managed the stepper as I would.
So now
First of all I have to buy some jumper wires (pls don’t blame me: I do not have any)
Second I have to reduce the microsteps on the CNC shield acting on MS0-1-2
Third I’ll check if it works.
Are there any other way to avoid resonance in the meanwhile?
Thanks for your time: any suggestion will be appreciate.
Mech n Wood
Might I suggest this page
I don't use any additional jumpers here.
Yes I understand the page is CNC related but it will verify your setup at the very least by using GRBL which is almost standard for 3 / 4 axis work..
It makes engraving so much more simple.
Thank you BAllscrewbob,
The link you provided is very interesting.
Never the less Something went wrong because every time I click for example on +X in USG interface the stepper seems to move once but actually it stays always in the same position.
Probably I have a lack of knowledge about sw installation.
I’m using Arduino UNO IDE 1.8.19,
Univesal Gcode Platform 2.0.13,
Grbl v0.9j Atmega328p 16mhz 115200baud.
Do you see any inconsistencies?
Mech n Wood
Using GRBL 1.1H or F here GRBL0.9 is considered quite old.
UGS is darned good software.
Maybe it is some of the "$" settings that are off ?
Also the driver boards must be calibrated which I think was mentioned already ?
Grab your "$" settings and post them as code back here.
I can compare them for the most part but I will certainly have some minor differences as I run quite high speeds for laser work.
Hi Ballscrewbob, now I've loaded the
Grbl ver 1.1 and installed UGPlatform 2.0.12. But nothing happened.
I tried using the setup wizard - it says "the setup wizard is not supported for this controller".
I tried sending a simple sketch to the stepper but nothing happened.
Maybe it's some of the "$" settings that are off?
Or I'm getting more and more confused.
It seems that my engarver is quite far in the distance.
I just want to make the three steppers run for one round CW and one round CCW.
here you find the setting file as it is.
thanks
UGPlatform_Mech_n_Wood_setting.txt (1.71 KB)
The settings don't look too bad and maybe they are "stock" settings ?
The code at the end does nothing here so I suspect whatever generated it may be a problem.
The code below should draw a box shape just to keep it simple and rule out circle commands that GRBL may not handle
G00 Z0.5 F70
G00 X5 Y15 F70
G01 Z-1 F50
G01 X5 Y35 F50
G01 X30 Y35
G01 X30 Y15
G01 X5 Y15
G00 Z0.5 F70
G00 X0 Y0 F70
M30
How did you get along with the square test ?
First of all, thanks for your interest.
As you may have understood I am the type who is busy with work during the week and at the weekend I dedicate myself to this hobby.
I tried and tried again to install and uninstall the software but I had no communication with the serial port. Finally, when I succeeded, I linked your box.txt file to the UGSender discovering that It worked very well in the Visualizer, But the motors didn't move a microinch.
I saw many tutorials on the subject and all of them seem to manage the steppers easily with the jog controller (e.g. 1 round CW and 1 CCW for all the three axes)
Just for reference my configuration is
Arduino UNO R3
WIN10
ARDUINO 1.8.19 (2021.12.20 SECURITY HOTFIX RELEASE)
GRBL_VERSION "1.1h"
UGSender ver. 2.0.12
DRIVER A4988 (Vref setted)
STEPPER NEMA17
Can you suggest one more step forward: ok Rome wasn't built in a day but I don't want to build an empire, just a CNC engraver.
Forgotten UGS setup (see attachment)
Mech_n_Wood_setting rev00.txt (1,6 KB)
You need to set the $100, 101, 102 parameters.
They will depend on any lead screws or pulleys that will be used for the calculations to be final.
However if you disconnect any lead screws or remove any belts attached for the moment you can play with those numbers a little.
Here mine are X 800, Y800, Z400
The rest can be left alone for the moment.
Also if you attached that enable jumper you may want to try with it removed.
Here I don't use them on any machine.
I do however have all the jumpers installed for the stepping under the drivers.

