Hello everyone, i have a broken Yamaha Jetski Gauge and i want to make a new with arduino, i dont have the required knowlegde how to do that and i want your help. What kind of parts do i need? Which are the steps that I need to follow?
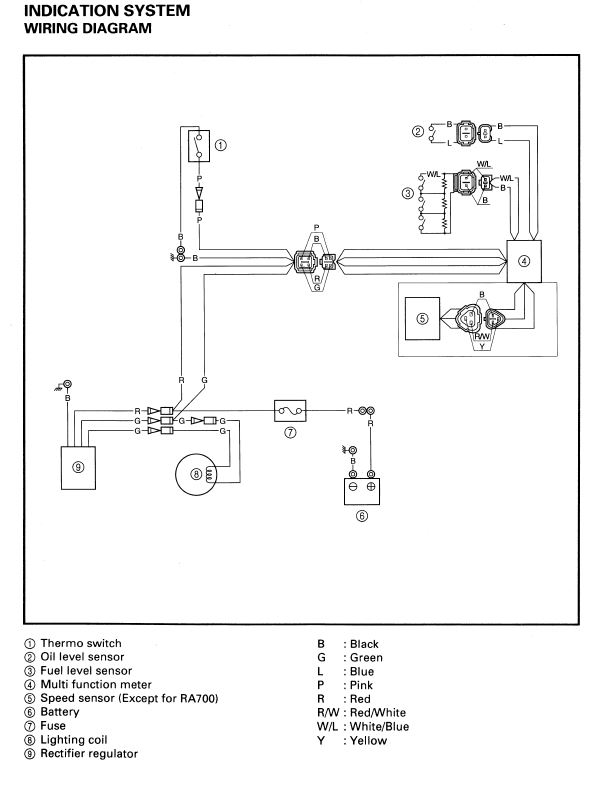
The sensors are already installed to my jetski and i want to read the data with the arduino and to project it in an lcd screen. The sensors are fuel capacity, oil capacity, overheating warning and speed tachometer. I have attached a photo of the original gauge. The wiring is RED and Green to Pos - Black to Ground - all segments will light up for 2 seconds - disconnect green lead and fuel meter only will stay lit for 30 seconds
With red green and black hooked up connect pink and black and overheat will blink.
To test oil level blue + black -. Fuel level white/blue + black -.
First you need the datasheets for the sensors. If you are lucky you might be able to find some on the web. If you are unlucky then the information you need is hidden away in the repair manuals owned by your local Yamaha authorized repair shop who have probably signed an agreement with Yamaha to not disclose this type of information.
If you cannot get hold of documentation then you are going to have to invest in some test equipment that will probably cost more than a new gauge.
mikb55:
If you cannot get hold of documentation then you are going to have to invest in some test equipment that will probably cost more than a new gauge.
No, an Arduino will not magically fix "any" problem.
If you can guarantee there is not simply a wiring problem - perhaps an auto or marine electrician with experience with these devices may know some tricks - then just go and buy the replacement now, otherwise you will simply have more trouble operating the jet-ski without until you eventually get sick of it and get the replacement.
mikb55:
First you need the datasheets for the sensors. If you are lucky you might be able to find some on the web. If you are unlucky then the information you need is hidden away in the repair manuals owned by your local Yamaha authorized repair shop who have probably signed an agreement with Yamaha to not disclose this type of information.
If you cannot get hold of documentation then you are going to have to invest in some test equipment that will probably cost more than a new gauge.
I have already the datasheets for the sensors, what's the next step?
vbessas88:
I don't know exactly, it is sealed. It doesn't shows anything. Black screen. Maybe it has corrosion inside.
Either you are going to try to reuse the gauge enclosure for the DIY gauge or you are going to chuck it away. Either way you might as well crack it open, ie. risk breaking it, and see what state things are inside. It might be repairable. Just take your time to figure out how to get it open with the least damage. A very quick search online suggests that some Yamaha marine gauges are held together with (melted?) plastic rivets - you'd need to cut the heads off by some means.
Feel free to post pictures if you go this route...
arduarn:
A very quick search online suggests that some Yamaha marine gauges are held together with (melted?) plastic rivets - you'd need to cut the heads off by some means.
Or use a hot air re-work tool to un-melt them.
The OP refers to
vbessas88:
It doesn't shows anything. Black screen.
but then shows pictures which do not show a black screen, Are these pictures of his actual display or what?
If he means a blank screen, it may be just a regulator failure or similar, which would be repairable. The same skills are required to repair a faulty device as to build a new one.
Need to provide truthful information if you want proper help.
Paul__B:
Or use a hot air re-work tool to un-melt them.
The OP refers to but then shows pictures which do not show a black screen, Are these pictures of his actual display or what?
If he means a blank screen, it may be just a regulator failure or similar, which would be repairable. The same skills are required to repair a faulty device as to build a new one.
Need to provide truthful information if you want proper help.
the pictures which i show you, they are from google, for example of what indications are the gauge project when it works.
arduarn:
Either you are going to try to reuse the gauge enclosure for the DIY gauge or you are going to chuck it away. Either way you might as well crack it open, ie. risk breaking it, and see what state things are inside. It might be repairable. Just take your time to figure out how to get it open with the least damage. A very quick search online suggests that some Yamaha marine gauges are held together with (melted?) plastic rivets - you'd need to cut the heads off by some means.
Feel free to post pictures if you go this route...
Im trying to figure out how to open it, with the less damage. When i open it i will post the photos!
mikb55:
Two of the sensors use resistance. If you do a Google search for "Arduino measure resistance" you will find many results including video tutorials.
yes, but how do i combine all these measurements in one lcd projection
vbessas88:
yes, but how do i combine all these measurements in one lcd projection
One step at a time:
Work through the sensors writing for each one a small sketch that reads a correct measurement and prints it to serial.
Once you can read all the sensors, write a sketch that combines the previous sketches. It will just read each sensor in turn and store the measurements in variables, then print out the variables to serial.
Make a backup copy of the sketch. Now add the code for the LCD. It just prints the values of the variables to the LCD instead of serial.
Make a backup copy of the sketch. Finally, polish what you have, for example, by arranging the data on the LCD nicely maybe using some graphics, by only writing to the LCD when something has changed to reduce flicker, by reducing the rate which you update fast changing data on the display to make it more legible, etc.
Did you have any luck getting the gauge enclosure open? You could post all round pictures if you want suggestions on how you might be able to do it. That said, if it is totally waterproofed then it may be completely bonded together and almost impossible to salvage.
Thank you for all your assistance, your answer is very helpful.
I didnt try yet to open the gauge, but it seems the only way is with a precise cut arround the lcd on top of the gauge.
vbessas88:
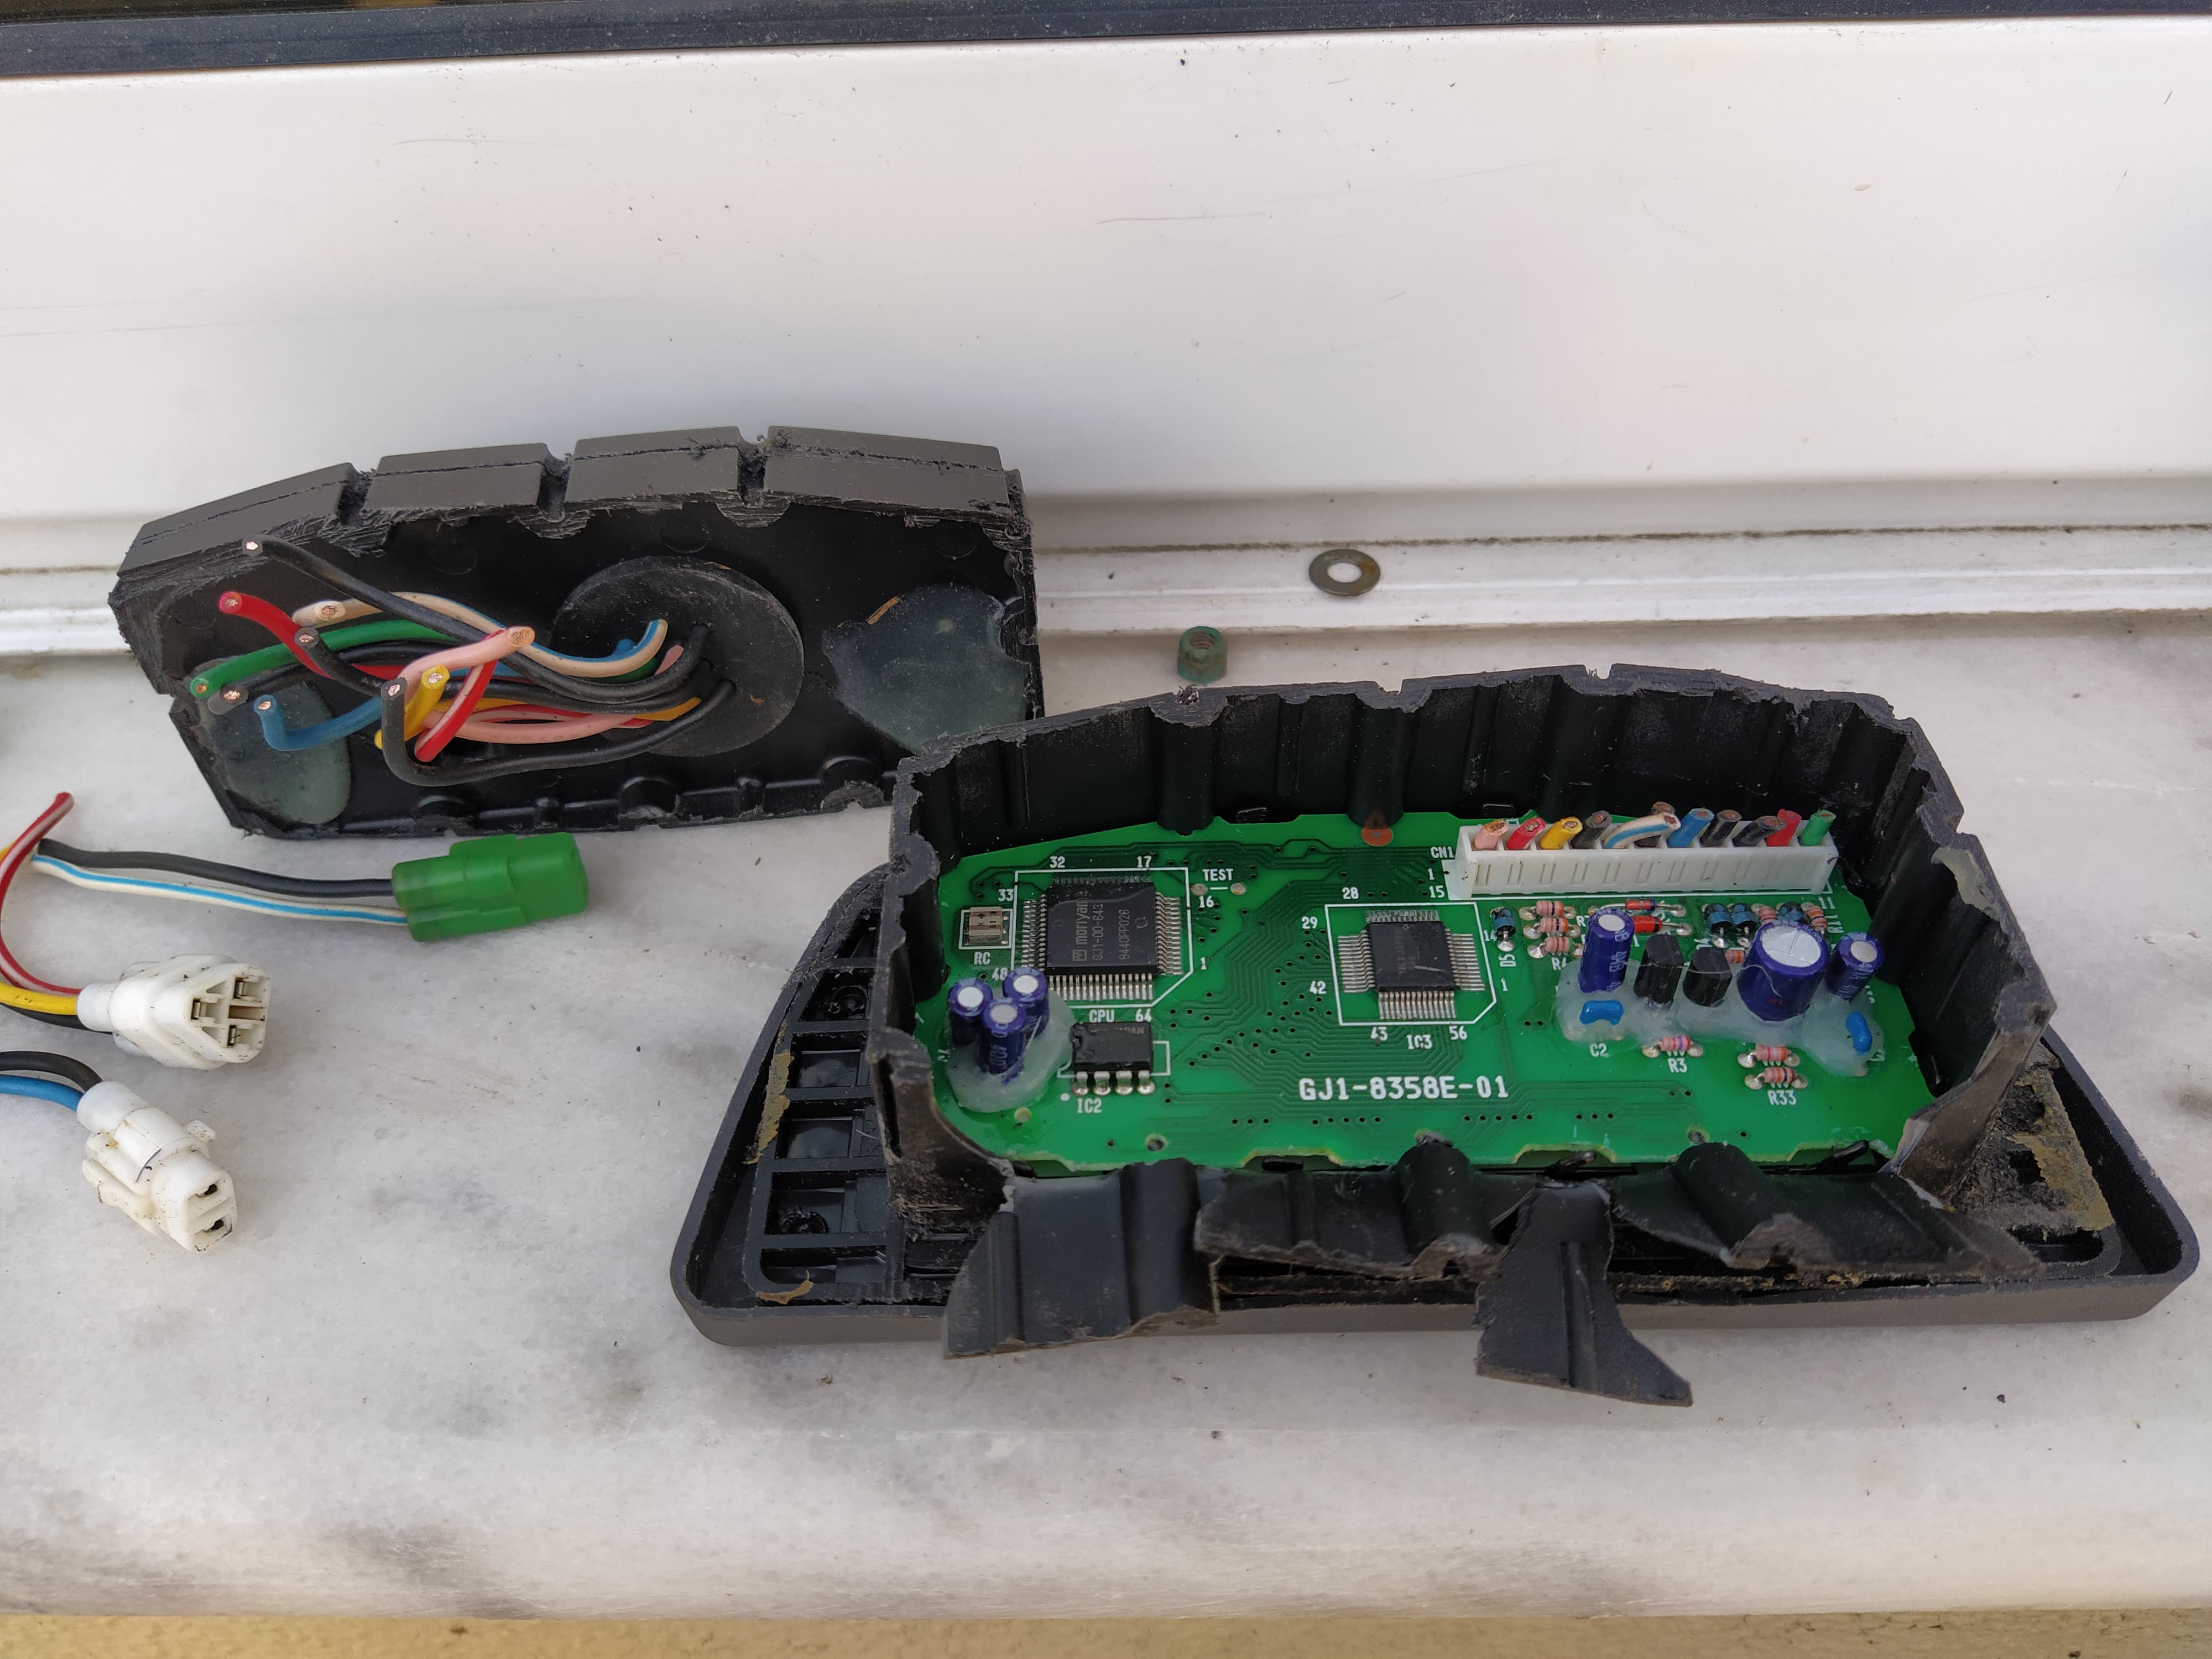
my unsuccessful attempt to open gently my gauge
Yeah, it's looking slightly soiled now. Pity, since fitting replacement electronics in the original enclosure would have been neater.
I wonder why the ICs have that "stripped" top on them. IC2 looks like a deliberate attempt to prevent reverse engineering. IC3 maybe ditto. But why the half-assed attempt at CPU?