what type of data does the probe of soil moisture sensor create?
is it possible for arduino read the data without module board of the sensor?
Can you please post a link to the sensor that you are asking about ?
it's name is yl 69
i want to make an arduino soil moisture sensor without sensor module board (only using the probe)
is it possible?
The probe would allow you to measure the resistance between its 2 prongs and this will vary depending on the amount of moisture in the soil
Why don't you want to use the sensor module ?
it's my project to only use arduino.
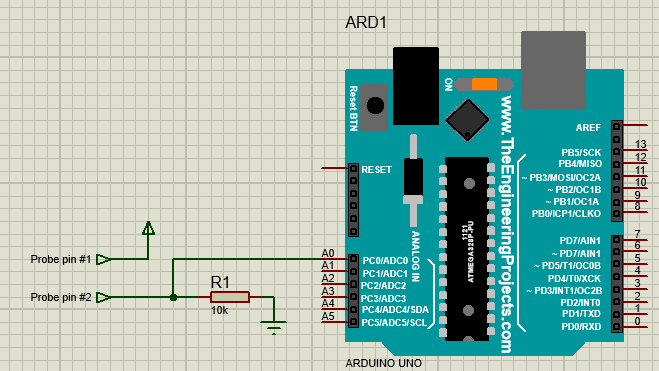
it's done now. all i need to do is to connect 1 pin of the probe with Vcc and the other pin to A0, resistor and ground.
void setup() {
  int SensorPin = A0;
}

void loop() {
  Serial.begin(9600);
  int Value = analogRead(SensorPin);
  Serial.println(Value);
  delay(3000);
}
Incorrectly.
If you want to know how to do it correctly, just ask.
please tell me how to do it correctly including the calculations of resistor so the data could be 0-1023. i know the bigger the resistor makes the data get bigger, but i don't know how to be precise making the output data 0-1023.
Your diagram shows one of the probe pins connected to 5V. This is very dangerous and could result in a damaging short circuit, for example if the probe pins touch a metal object which is grounded.
One probe pin should be connected to 5V with the 10K resistor, and directly to A0. The other probe pin should be connected to ground. This will prevent any short circuits.
However, it will cause rapid corrosion of the probes. To reduce this, connect the 10K to a digital output pin instead of 5V. In your sketch, make that digital pin HIGH just before reading the analog pin, and then immediately make the digital pin LOW. Use delay(500) in loop() to slow down the rate of measurements and reduce the rate of corrosion.
Getting the moisture levels to read from 0 to 1023 is not easy. The range of values you get will vary depending on the type of probes used and the composition of the soil. Why do you need 0 to 1023?
1 Like


Please follow the advice given in the link below when posting code, in particular the section entitled 'Posting code and common code problems'
Use code tags (the </> icon above the compose window) to make it easier to read and copy for examination
It confuses me, I'm really new in posting stuff. I don't know how to put the <> at the code.
In the IDE, right click on your sketch and select "Copy for Forum". The IDE will copy the code to the clipboard and add the code tags to it ready for you to paste it here in a post
Oh ok later I'll do it like that. Thanks
Yes
Yes
You mean the Arduino? Or some other board?
sensor's module board such as hl-69
2 pieces of metal stuck in the soil has no range. It is the A/D register in the microcontroller that has a range.
You may want to read this:
https://randomnerdtutorials.com/guide-for-soil-moisture-sensor-yl-69-or-hl-69-with-the-arduino/
What I mean isn't the metal that stuck in the soil. I mean the module board yl-38. It was wrong for me to say hl-69.
Please provide a link.
Forget that board. It does nothing for you. Connect the probe and your 10K resistor directly to the Arduino like the diagrams you posted in #9.
Like @mrburnette says, it is the Arduino analog pins that have a range 0 to 1023. The probe and the ly-38 board are analog circuits and output a voltage between 0 and 5V. With the probe in air, you should get a voltage of 5V. With the probe in perfectly dry soil, you should get a voltage very close to 5V. In very wet soil, you should get a voltage closer to 0V. If you short the two probe pins together with a wire, you should get exactly 0V