Hello,
I've recently got my hands on an Arduino Uno R4 Wifi and would like to try out the things in the IoT Cloud. I've looked everywhere, but after trying several thing my board remains ofline.
I've tried updating the firmware (and unplug my cable at the end and reconnect it). I don't know if this matters but I have firmware version 0.4.1, using different cabels, but nothing.
I can upload via the cloud and at the end it tells me to reset. I reset the board and it tells me it was succesfull. I've also uploaded the code maby some of you can find something that doesn't work.
/*
  Sketch generated by the Arduino IoT Cloud Thing "Untitled"
  https://create.arduino.cc/cloud/things/c538c7a9-89c6-425f-b3cc-4b4c90118c96

  Arduino IoT Cloud Variables description

  The following variables are automatically generated and updated when changes are made to the Thing

  bool led_Rood;

  Variables which are marked as READ/WRITE in the Cloud Thing will also have functions
  which are called when their values are changed from the Dashboard.
  These functions are generated with the Thing and added at the end of this sketch.
*/

#include "thingProperties.h"


const int LED = 2;


void setup() {
  // Initialize serial and wait for port to open:
  pinMode(LED, OUTPUT);
  Serial.begin(9600);
  // This delay gives the chance to wait for a Serial Monitor without blocking if none is found
  delay(1500);

  // Defined in thingProperties.h
  initProperties();

  // Connect to Arduino IoT Cloud
  ArduinoCloud.begin(ArduinoIoTPreferredConnection);

  setDebugMessageLevel(2);
  ArduinoCloud.printDebugInfo();
}

void loop() {
  ArduinoCloud.update();
}

void onLedRoodChange()  {
  // Add your code here to act upon LedRood change
  Serial.println("de status van de led = ");
  if(led_Rood)
  {
    Serial.println(led_Rood);
    digitalWrite(LED, HIGH);
  }
  else
  {
    digitalWrite(LED, LOW);
    Serial.println(led_Rood);
  }
}
Click the following link to open the list of your Arduino Cloud Things in the web browser: https://app.arduino.cc/things
Click the name of the Thing.
The "Setup" page for the Thing will open.
Select the "Sketch" tab at the top of the page.
The "Sketch" page for the Thing will open.
Make sure the serial port of the Arduino board is selected on the sketch editor toolbar. ⓘ Some Devices produce an "Over-the-Air" port and a serial port. In this case, there will be a menu on the toolbar that allows you to select either one. The serial port must be used for this procedure.
Click the icon that looks like a magnifying glass ("Open Serial Monitor") on the sketch editor toolbar.
A new browser window will open.
Make sure the correct port is shown on the toolbar in the window.
Select "9600" from the menu at the bottom of the window.
Press and release the reset button on the Arduino board.
You should now see information about the progress of the Thing initialization printed in the window.
If the board is able to connect to your Wi-Fi access point, you should see a message like this:
Connected to "some-ssid"
After that, if the board is able to connect through the Internet to the Arduino Cloud servers, you should see this message:
Connected to Arduino IoT Cloud
Was the Thing initialization successful as I described?
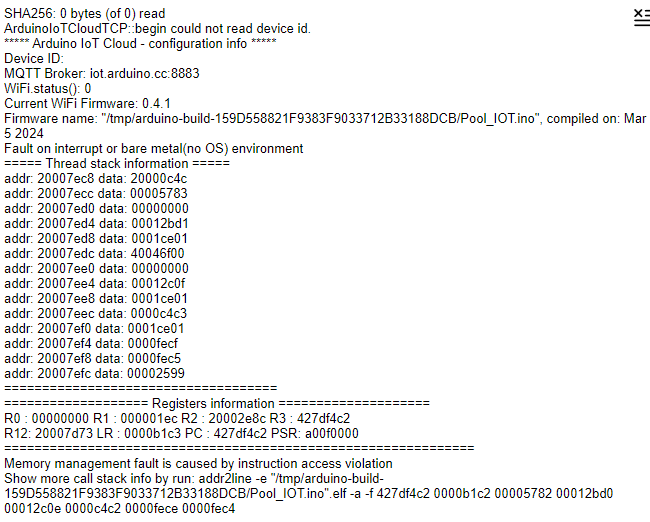
sorry for the late response. I've done as you told me and I got some new data.
The sketch gets trough the verification but it gives an error.
I don't really know what this means but I tried putting the Arduino in bootloader mode (by pressing the reset 2 times). And then I got this error. It also gave an error in the serial monitor.
Unfortunately the Arduino Cloud Serial Monitor interferes with the upload. You must close the serial monitor window before doing an upload.
If you find that inconvenient, close the serial monitor window, click the "</> Open full editor" button on the Thing sketch editor toolbar. The Thing sketch will open in Arduino Cloud Editor (AKA "full editor"). Then open Serial Monitor from the button on the Cloud Editor toolbar and use Cloud Editor to do any sketch development and uploads. Cloud Editor is smart enough to close the serial port connection in its serial monitor when doing an upload so that it doesn't interfere with the upload, then open the connection again after the upload finishes.
This definitely shows why the board remains offline. It is never connecting to the network.
I think this line of the Serial Monitor output is the important one:
Although the "instruction access violation" stuff that comes after looks very alarming, my hypothesis is this is only a side effect of the inability to read the device ID.
The inability to read the device ID indicates that something is wrong with the configuration of the Arduino CloudDevice. It might be possible to fix it by recreating the device. I'll provide instructions you can follow to do that:
Click the following link to open the list of your Arduino Cloud Devices in your web browser: https://app.arduino.cc/devices
Click the checkbox next to the device for your UNO R4 WiFi board.
A box will appear at the bottom of the page with the message "1 selected rows". Click the trash can icon ("Delete") at the right side of that bar.
The "Delete device" dialog will open.
Click the "YES, DELETE" button in the dialog.
The "Delete device" dialog will close.
Click the "+ DEVICE" button at the top right corner of the "Devices" page.
The "Setup Device" dialog will open.
Click the "Arduino board" section in the dialog.
Wait for the device creation system to recognize the UNO R4 WiFi:
Arduino UNO R4 WiFi found
An Arduino UNO R4 WiFi has been detected on port ...
Click the "CONFIGURE" button in the dialog.
An automatic configuration operation will start.
Wait for the configuration process to finish.
The dialog will prompt you to configure the Device name:
Give your device a name
Click the "NEXT" button in the dialog.
Another automatic configuration operation will start.
Unfortunately I am not sure what could cause this new problem.
I just tried following the instructions I provided in post 5 with my UNO R4 WiFi board and it connected to the Arduino Cloud server as expected. So it is not a matter of a universal service outage (or if it was one, it has since resolved). Does the problem still occur if you check it again now? You don't need to go through the whole device creation and upload instructions I provided, just open serial monitor and check whether it is still printing that "ArduinoIoTCloudTCP::handle_ConnectMqttBroker could not connect to iot.arduino.cc:8883" error message.
If it still isn't connecting, I can suggest the troubleshooting experiment of creating a new Thing and then checking to see if the problem occurs for that Thing as well. I don't have any specific reason to think that there is something wrong with your current Thing's configuration, but it is worth a try at least. I'll give an overview of what I am proposing you try:
Create a new Thing.
Associate the existing UNO R4 WiFi Device with the Thing
Upload the Thing sketch to your UNO R4 WiFi board.
Open Serial Monitor and check to see whether it indicates that it was able to connect to the Arduino Cloud server.
I'm happy to provide more detailed instructions for that procedure if needed.