Hello all, i am trying to make a weather station app but even after uploading my arduino shows as offline

i seen that it might be the firmware but i have the latest edition ![]()

i am also using 2.4 G as a connection
Hello all, i am trying to make a weather station app but even after uploading my arduino shows as offline
i seen that it might be the firmware but i have the latest edition ![]()
i am also using 2.4 G as a connection
Hi @smooples.
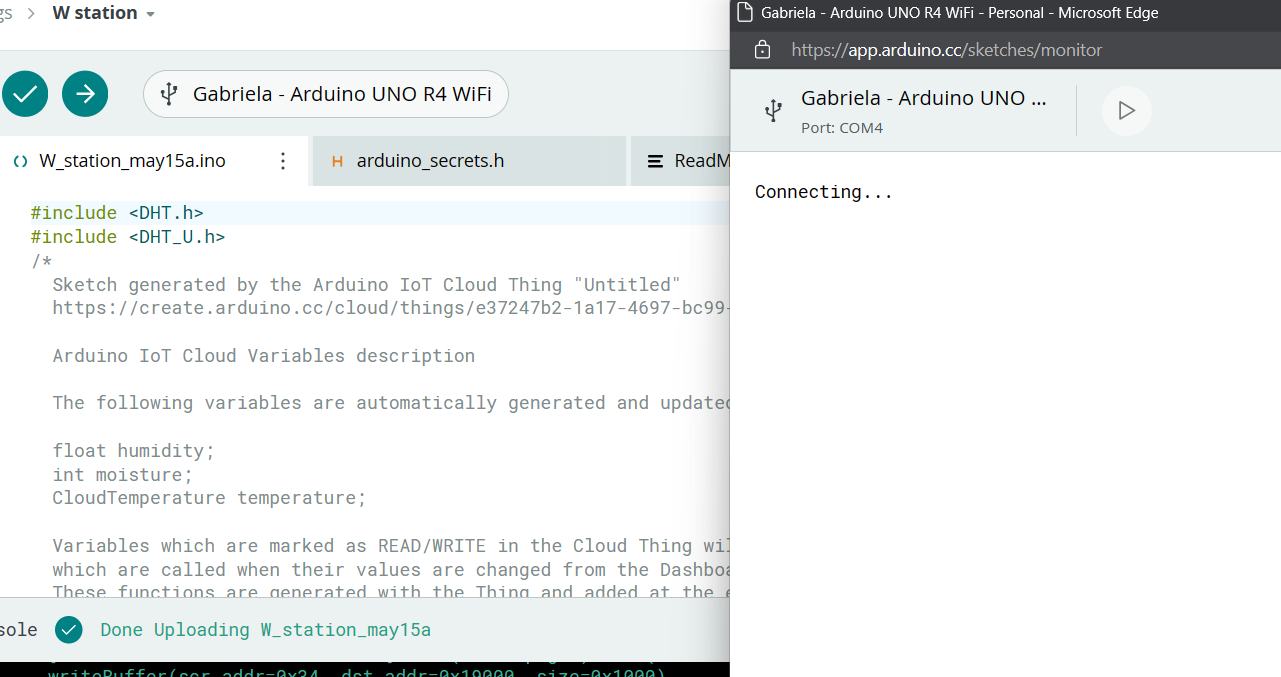
By "offline", are you referring to the problem of Cloud Editor's Serial Monitor not connecting to COM4?
I ask because this is what your first screenshot demonstrates, but we normally use the term "offline" in this context to refer to the status of an Arduino Cloud IoT Device connection to the Arduino Cloud server, which is shown on the Thing and Device pages:
So it is not clear to me what you mean by "my arduino shows as offline".
Hello @ptillisch the second , it shows offline at the same spot as your pic ( also sorry for my english )

Thanks for the clarification. Please post your full sketch.
I'll provide instructions you can follow to do that:
<CODE/> icon on the post composer toolbar.```) to your reply to make sure the error messages are correctly formatted.
If your code uses a library that you imported to your Arduino Cloud account (as opposed to the standard libraries that are pre-installed), please post a link to where you downloaded that imported library from.
I should also add a note about the phenomenon of Cloud Editor's Serial Monitor feature remaining in the "Connecting..." state, as shown in the first screenshot you shared:
This is a known bug, which the Arduino Cloud developers are working to fix. I see you already found the workaround of using Arduino IDE's Serial Monitor instead, which is great. The bug in Cloud Editor's Serial Monitor is unrelated to the problem you are experiencing with the Device being in an "offline" state.
this is my code
#include <DHT.h>
#include <DHT_U.h>
/*
  Sketch generated by the Arduino IoT Cloud Thing "Untitled"
  https://create.arduino.cc/cloud/things/e37247b2-1a17-4697-bc99-e871229bf351

  Arduino IoT Cloud Variables description

  The following variables are automatically generated and updated when changes are made to the Thing

  float humidity;
  int moisture;
  CloudTemperature temperature;

  Variables which are marked as READ/WRITE in the Cloud Thing will also have functions
  which are called when their values are changed from the Dashboard.
  These functions are generated with the Thing and added at the end of this sketch.
*/

#include "thingProperties.h"


//Sensor Pins

#define DHTPIN 13
byte Smoisture=A0;

/*
  # the sensor(Smoisture) value description
  # 0  ~300     dry soil
  # 300~700     humid soil
  # 700~950     in water
*/

// DHT Sensor Type and Initialization
//Sensor Type
#define DHTTYPE DHT11
//Initialize
DHT dht(DHTPIN, DHTTYPE);

void setup() {
  // Initialize serial and wait for port to open:
  Serial.begin(9600);
  // This delay gives the chance to wait for a Serial Monitor without blocking if none is found
  delay(1500);

  dht.begin();

  // Defined in thingProperties.h
  initProperties();

  // Connect to Arduino IoT Cloud
  ArduinoCloud.begin(ArduinoIoTPreferredConnection);

  /*
     The following function allows you to obtain more information
     related to the state of network and IoT Cloud connection and errors
     the higher number the more granular information you’ll get.
     The default is 0 (only errors).
     Maximum is 4
 */
  setDebugMessageLevel(2);
  ArduinoCloud.printDebugInfo();
}

void loop() {
  // put your main code here, to run repeatedly:
  delay(10000);

  float humidity = dht.readHumidity();
  float temperature = dht.readTemperature();

Serial.print("Υγρασία:"); Serial.print(humidity); Serial.print(", ");
Serial.print("Θερμοκρασία:"); Serial.print(temperature); Serial.print("\n");

int moisture = analogRead(Smoisture);
Serial.print("Soil_Moisture:"); Serial.println(analogRead(moisture));


//Serial.print(humidity); Serial.print(", ");
//Serial.print(temperature); Serial.print("\n");


}
i also tried the "getting started code" but it stills shows as offline ![]()
I see the problem with this sketch. The connection and communication between the Device and the Arduino Cloud servers is done when the Thing sketch calls the ArduinoCloud.update() function. You have removed that function call from your sketch, making it impossible for the Device to ever connect.
So you must add this line to the loop function of your sketch:
ArduinoCloud.update();
It might not be a problem in this specific project, but in general it is essential to design your Thing sketch code so that ArduinoCloud.update() is called frequently. The reason is that this function is what handles the syncing of your Arduino Cloud Variables between the device and the Arduino Cloud servers and your dashboards.
If the sketch code causes long intervals to occur during which ArduinoCloud.update() is not called, this will result in problems such as lags in response of the board to actions taken in the Arduino Cloud dashboard and of response of the dashboard to changes made to the Cloud Variable values by the Thing sketch program.
So adding a 10000 ms blocking delay in your loop function is generally a bit no-no for Thing sketches.
You can learn a useful technique for writing sketches that perform actions at defined intervals, while allowing the loop function to run freely and continue calling ArduinoCloud.update() frequently, from this tutorial:
https://docs.arduino.cc/built-in-examples/digital/BlinkWithoutDelay
Hello ptillisch i did the changes but it keeps showing offline , i also tried the Get started thing with the led but the board doesnt seem to go online either also thanks for the technique :D!!
also serial monitor worked for a moment in both sketches but it gaves me this message
SHA256: 0 bytes (of 0) read
ArduinoIoTCloudTCP::begin could not read device id.
***** Arduino IoT Cloud - configuration info *****
Device ID:
MQTT Broker: iot.arduino.cc:8883
WiFi.status(): 0
Current WiFi Firmware: 0.4.1
Bus fault is caused by instruction access violation
Show more call stack info by run: addr2line -e "/tmp/arduino-build-F07468E3EA1A6E0F6B55D2A662225074/Untitled_may19a.ino".elf -a -f 08d02566 0000b38a 0000594a 0000433e 00012d98 00012dd6 0000c68a 00010096 0001008c
Please post your updated sketch code.
Yeah, the Arduino Cloud developers fixed the bug with Serial Monitor yesterday. I'm glad you noticed. That should make troubleshooting the problem with your Thing much easier.
I think that explains the "offline" state of the device.
However, I just tried running your Thing code (with the addition of the essential ArduinoCloud.update(); call to my loop function) on my UNO R4 WiFi board and it worked as expected for me. I didn't experience the problem of the crash and the Device had the expected "online" status. It is possible the different result is caused by some difference between our code so I'll investigate further once I have your updated code.
Hello @ptillisch sorry for my late reply here is my code
#include <DHT.h>
#include <DHT_U.h>
/*
  Sketch generated by the Arduino IoT Cloud Thing "Untitled"
  https://create.arduino.cc/cloud/things/e37247b2-1a17-4697-bc99-e871229bf351

  Arduino IoT Cloud Variables description

  The following variables are automatically generated and updated when changes are made to the Thing

  float humidity;
  int moisture;
  CloudTemperature temperature;

  Variables which are marked as READ/WRITE in the Cloud Thing will also have functions
  which are called when their values are changed from the Dashboard.
  These functions are generated with the Thing and added at the end of this sketch.
*/

#include "thingProperties.h"


//Sensor Pins

#define DHTPIN 13
byte Smoisture=A0;

/*
  # the sensor(Smoisture) value description
  # 0  ~300     dry soil
  # 300~700     humid soil
  # 700~950     in water
*/

// DHT Sensor Type and Initialization
//Sensor Type
#define DHTTYPE DHT11
//Initialize
DHT dht(DHTPIN, DHTTYPE);

void setup() {
  // Initialize serial and wait for port to open:
  Serial.begin(9600);

  // This delay gives the chance to wait for a Serial Monitor without blocking if none is found
  delay(1500);

  dht.begin();

  // Defined in thingProperties.h
  initProperties();

  // Connect to Arduino IoT Cloud
  ArduinoCloud.begin(ArduinoIoTPreferredConnection);

  /*
     The following function allows you to obtain more information
     related to the state of network and IoT Cloud connection and errors
     the higher number the more granular information you’ll get.
     The default is 0 (only errors).
     Maximum is 4
 */
  setDebugMessageLevel(2);
  ArduinoCloud.printDebugInfo();
}

void loop() {
  // put your main code here, to run repeatedly:
  delay(1000);
  ArduinoCloud.update();

  float humidity = dht.readHumidity();
  float temperature = dht.readTemperature();

Serial.print("Υγρασία:"); Serial.print(humidity); Serial.print(", ");
Serial.print("Θερμοκρασία:"); Serial.print(temperature); Serial.print("\n");

int moisture = analogRead(Smoisture);
Serial.print("Soil_Moisture:"); Serial.println(analogRead(moisture));


}
also for some reason when i tried to run it today the error message kinda changed at the serial monitor while previously was saying something about bus fault now it says something about an invalid state
ArduinoIoTCloudTCP::begin could not read device id.
***** Arduino IoT Cloud - configuration info *****
Device ID: xxxxxxxx-xxxx-xxxx-xxxx-xxxxxxxxxxxx
MQTT Broker: iot.arduino.cc:8883
WiFi.status(): 0
Current WiFi Firmware: 0.4.1
Usage fault is caused by attempts to switch to an invalid state (e.g., ARM)
Show more call stack info by run: addr2line -e "/tmp/arduino-build-F07468E3EA1A6E0F6B55D2A662225074/Untitled_may19a.ino".elf -a -f 00000000 0000bc3a 000057ac 0000436a 00013834 00013872 0000cf5a 00010982 00010978
I just tried that code and I still can't reproduce the crash.
Our different results might be caused by different versions of the libraries being used when Cloud Editor compiles my sketch vs. when it compiles your sketch.
In order to test this hypothesis, I'm going to ask you to provide the full verbose output from a compilation (which will tell me exactly which libraries are being used to compile your sketch).
![]() This procedure is not intended to solve the problem. The purpose is to gather more information.
This procedure is not intended to solve the problem. The purpose is to gather more information.
Please do this:

<CODE/> icon on the post composer toolbar.```) to your reply to make sure the error messages are correctly formatted.In case the output is longer than the forum software will allow to be added to a post, you can instead save it to a .txt file and then attach that file to a reply here:
.txt format.
.txt file you saved from the "Open" dialog.Alternatively, instead of using the "Upload" icon on the post composer toolbar as described in steps (5) - (7) above, you can simply drag and drop the .txt file onto the post composer field to attach it.
Hello @ptillisch i am attaching the output
arduino_console_output.txt (1.7 MB)
Unfortunately that disproves my hypothesis. The exact same set of libraries are being used when compiling your sketch as with mine.
could it be a configuration issue ? also thanks for your time it is my first arduino project and your help really means a lot ![]()
Unfortunately I don't have a clear idea of what might be causing this.
One possible technique for investigating it would be to follow the advice provided in the stack trace:
Show more call stack info by run: addr2line -e "/tmp/arduino-build-F07468E3EA1A6E0F6B55D2A662225074/Untitled_may19a.ino".elf -a -f 00000000 0000bc3a 000057ac 0000436a 00013834 00013872 0000cf5a 00010982 00010978
However, you would need to run this addr2line command locally on your computer and it requires access to the .elf file that is generated from your sketch by the compiler. The path shown in the suggested command is the path of the file on the Arduino Cloud server where the compilation was performed, so you don't have access to the file at that path when running the command locally. This means you would need to compile the Thing sketch in Arduino IDE to get access to the .elf file. After managing that, the information provided by the addr2line command won't necessarily be clear.
So I think that the best way to proceed is to use the "bisection" technique to try to narrow the scope of the investigation as far as possible. The goal is to produce two things:
We can then infer that the fault conditions are produced by the specific code that is different between those two sketches.
You have a starting point of a "bad" sketch. The next step is to try to produce a "good" sketch. Please change your Thing sketch code to this minimal Thing sketch code:
/*
  Sketch generated by the Arduino IoT Cloud Thing "Untitled"
  https://create.arduino.cc/cloud/things/e37247b2-1a17-4697-bc99-e871229bf351

  Arduino IoT Cloud Variables description

  The following variables are automatically generated and updated when changes are made to the Thing

  float humidity;
  int moisture;
  CloudTemperature temperature;

  Variables which are marked as READ/WRITE in the Cloud Thing will also have functions
  which are called when their values are changed from the Dashboard.
  These functions are generated with the Thing and added at the end of this sketch.
*/

#include "thingProperties.h"

void setup() {
  // Initialize serial and wait for port to open:
  Serial.begin(9600);

  // This delay gives the chance to wait for a Serial Monitor without blocking if none is found
  delay(1500);

  // Defined in thingProperties.h
  initProperties();

  // Connect to Arduino IoT Cloud
  ArduinoCloud.begin(ArduinoIoTPreferredConnection);

  /*
     The following function allows you to obtain more information
     related to the state of network and IoT Cloud connection and errors
     the higher number the more granular information you’ll get.
     The default is 0 (only errors).
     Maximum is 4
 */
  setDebugMessageLevel(2);
  ArduinoCloud.printDebugInfo();
}

void loop() {
  // put your main code here, to run repeatedly:
  ArduinoCloud.update();
}
Upload the updated sketch to your board, open Serial Monitor, and then check to see whether you still see that "Fault on interrupt or bare metal(no OS) environment" error as before. If it does not occur, you will now have a "good" sketch. From there, the task will be to incrementally adjust your sketch code until you have narrowed the differences between your "good" and "bad" sketches as far as possible.
Hello @ptillisch sadly that sketch gives me error too ![]() ,
,
ArduinoIoTCloudTCP::begin could not read device id.
***** Arduino IoT Cloud - configuration info *****
Device ID: xxxxxxxx-xxxx-xxxx-xxxx-xxxxxxxxxxxx
MQTT Broker: iot.arduino.cc:8883
WiFi.status(): 0
Current WiFi Firmware: 0.4.1


Firmware name: "/tmp/arduino-build-F07468E3EA1A6E0F6B55D2A662225074/Untitled_may19a.ino", compiled on: May 20 2024
Fault on interrupt or bare metal(no OS) environment
===== Thread stack information =====
  addr: 20007ec8    data: 20000df8
  addr: 20007ecc    data: 00004f9d
  addr: 20007ed0    data: 00000000
  addr: 20007ed4    data: 00012c49
  addr: 20007ed8    data: 0001d0b1
  addr: 20007edc    data: 40046f00
  addr: 20007ee0    data: 00000000
  addr: 20007ee4    data: 00012c87
  addr: 20007ee8    data: 0001d0b1
  addr: 20007eec    data: 0000c593
  addr: 20007ef0    data: 0001d0b1
  addr: 20007ef4    data: 0000ff9f
  addr: 20007ef8    data: 0000ff95
  addr: 20007efc    data: 00002599
====================================
=================== Registers information ====================
  R0 : 00000000  R1 : 00000358  R2 : 20003298  R3 : 00000000
  R12: 20007d73  LR : 0000b273  PC : 00000000  PSR: 400f0000
==============================================================
Usage fault is caused by attempts to switch to an invalid state (e.g., ARM)
Show more call stack info by run: addr2line -e "/tmp/arduino-build-F07468E3EA1A6E0F6B55D2A662225074/Untitled_may19a.ino".elf -a -f 00000000 0000b272 00004f9c 00012c48 00012c86 0000c592 0000ff9e 0000ff94
Hi @smooples looks like your board is not provisioned as a cloud device. I can see it because the device id is xxxxxxxx-xxxx-xxxx-xxxx-xxxxxxxxxxxx.
Before running any ArduinoIotCloud sketch you need to register your board so it will store its device id and can connect to the cloud.
I see from the beginning of this thread that you have already registered your board once. Can you try to delete your cloud device and create a new one?
Can you also share your thingProperties.h file ?
Hello pennam after re-registering it seems to work , thanks both ![]()
![]() !
!
This topic was automatically closed 180 days after the last reply. New replies are no longer allowed.

