I'm having a tough time getting the Arduino IDE to recognise my ATTiny85.
I tried several people's implementations of what apparently used to be on the now dead Digistump website. Universally they fail to see the ATTiny85. I can't even see it using LSUSB.
I have an ATTiny85 on a board, I have a driver board for the ATTiny85 as well. The only thing not yet tried is programming the ATTiny85 through my Adafruit Metro. So far everything has led to a nil result. I got rather despondent by the lack of results today having tried most of the afternoon to get it working.
Has anybody any solutions? I'm using the Arduino IDE on Linux Mint.
This is what I have. Just the chip and I used one of the chip programmer devices.
I also have another variant where the chip has been soldered on by the manufacturer.
Do you own this board of post #5? If yes, then was it originally a baord without the ATtiny85 chip (Fig-1) on the 8-pin socket and later on you have inserted your fresh chip on the socket?
The IDE/PC will not see your board if you have the original board with an empty socket and then (later on) you have inserted your own fresh ATtiny85 chip into this empty socket.
There must be something else wrong then. I just rebooted since Mint needed an update. I plugged in the board with the chip in place. The IDE still cannot see the ATTiny85. The ports list does not contain the device. LSUSB comes up with nothing either.
This is most frustrating.
I get the same issue with the ATTiny85 that's on its own board. It's not just one ATTiny85 that's giving the problem.
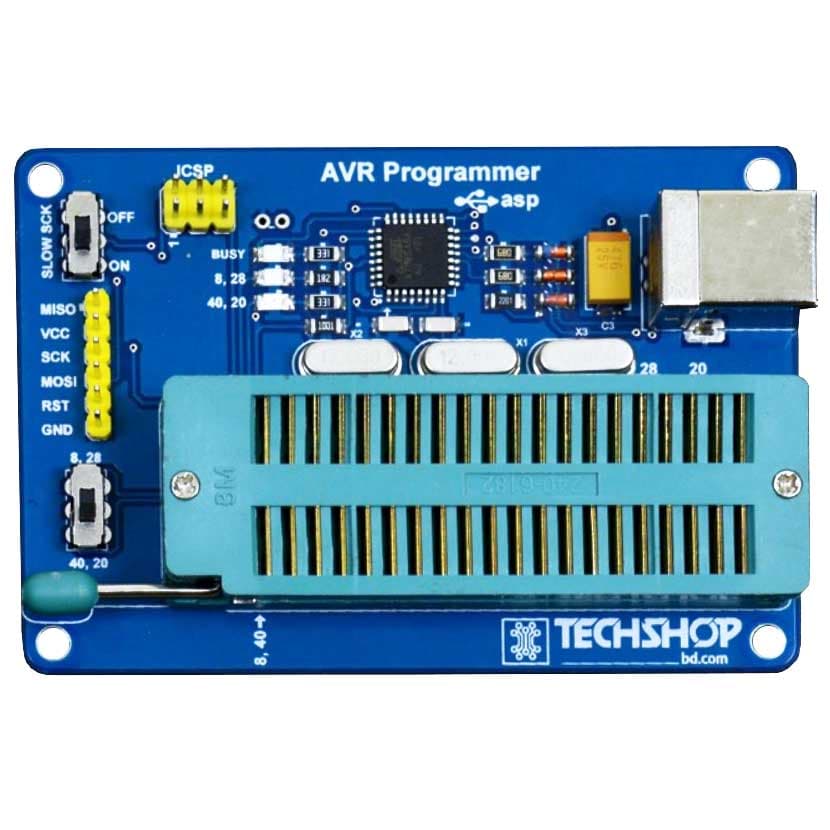
4. Using the same AVR Programmer of Fig-3, I have read the content of the flash memory (the Bootloader program) from the ATTiny85 MCU of Fig-2 and have saved as a file.
5. Using the same programmer of Fig-3, I have written the fuse bits of Step-3 into my fresh ATtiny85 MCU.
6. Using the same programmer of Fig-3, I have written the file (Bootloader Program) of Step-4 into the flsh memory of my fresh ATtiny85.
7. I have taken out the ATtiny85 from theprogrammer of Fig-3 and then have placed it into the empty socket of the board of Fig-1. The result is that I have got the following board (Fig-4) with an ATTiny85 MCU which hold Bootloader program.
Figure-4:
8. I have connected my board of Fig-4 using micro USB cable with PC and the board was detected by the PC.
9. To program the board, I followed some more steps which I may describe if you have finished all the above steps.
To me, top board with soldered ATtiny85 is authentic. I am sure that it contains a Booloader Programmer. If you connect it with the PC, it must be detceted. Connect it with your PC navigate throug Device Manager to see that the board is detected.
1. Connect again and chcek dong-dong-dong-dong sound has appeared.
2. If you don't hear the sound of Step-1, follow these steps: (1) Install/Include the ATTinyCore in the Arduino IDE**.** This is a software package and it is called a "core" because it forms the essential foundation for programming and interacting with microcontrollers. The Core can be installed this way: (a) Open the Arduino IDE and on the main menu, select Files -> Preferences. In the Additional Boards Manager URLs textbox, type the URL "http://drazzy.com/package_drazzy.com_index.json 26", and then press the OK button.
(b) Goto Boards Manage… and type AttinyCore and then follow the menu…
(2) Install the Windows USB Driver for the Board from the attached folder: Digistump.Drivers.zip (1.6 MB)
3. Connect the board and check that dong-dong-dong sound appears.
1. Install/Include the ATTinyCore in the Arduino IDE**.** This is a software package and it is called a "core" because it forms the essential foundation for programming and interacting with microcontrollers. The Core can be installed this way:
(1) Open the Arduino IDE and on the main menu, select Files -> Preferences. In the Additional Boards Manager URLs textbox, type the URL "http://drazzy.com/package_drazzy.com_index.json 26", and then press the OK button.
(2) Goto Boards Manage… and type AttinyCore and then follow the menu…
2. Install the Windows USB Driver for the Board from the attached folder: Digistump.Drivers.zip (1.6 MB)
3. Navigate --
Start ---> Device Manager ---> click on libsub-win32 devices and finds Digispark Bootloader message,
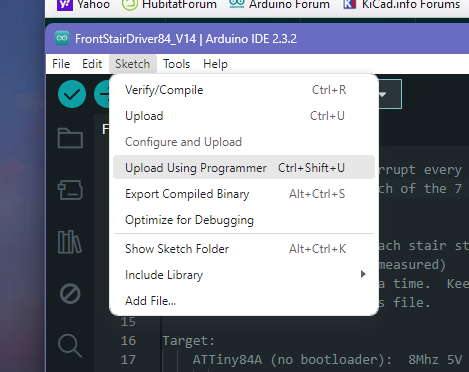
Its been a while since if programmed my ATTiny. I didn't take good notes and I have windows, however I do know you have to initiate programming using an option from tools.
There is no bing bong noise when I plug anything in. I am using Linux, not Windows. I don't have any computers with Windows on them. They arrive with Windows and Windows is swiftly deleted and replaced by Linux Mint.
ATTinyCore is installed. It's just not reading the board. I get no problem with any other boards. Having said that, I now cannot program the ATTiny88 either. I last programmed that before the Digistump website went away.
I didn't know about that. I'm going to wait a bit though...
I found Best Buy has a laptop I'm interested in - the Asus L200. I'd had one in my shopping cart for months. Yesterday I found they had dropped the price to $150 but only if you buy a white one. The spec is about perfect for Linux. But... I can always use it for Windows... if they supply. They have a terrible habit of advertising things they don't have and can't get at wonderful prices. Then a few days later they cancel the order.