I'm completely new to Arduino so bear with me, but I want to use it to automate a self-resetting airsoft target. The link below is basically my current setup, just without the automation side that I want to have.
From my research, I think the best way of achieving this would be using a piezo vibration sensor on the back of each target (there are 6 targets in total), along with a servo motor to automate the targets back to their default position like the below link, but only once all 6 targets have been knocked down.
Am I safe to assume I can achieve the above project with the following, or do I require other items?
x1 - Arduino Nano (or do I need a larger board for x6 sensors as above)
x1 - SG90 Servo Motor
x6 - Piezo Vibration Sensors
Jumper Cables (unsure what type I require?)
It seems like you want six servos, one for each target. Or am I missing something?
EDIT: Missed the Reddit link that shows a pretty slick target resetting mechanism with one servo, cheers @Railroader .
Don't forget to include external power for the servo. Arduino +5V regulators aren't really suited to servo use, especially once there's any sort of cantilevered load attached to the servo horn. The easy way to think of the Arduino +5V regulator: powering sensors or a few LEDs, ok; powering anything that moves things in the real world, not ok. Bonus: don't use a typical 9V smoke alarm battery for external power, either. They just aren't built to deliver much useful power.
Nano could work, just know it's pretty tight quarters working with them. If small board size is a goal over ease of use, then yep. Don't forget a target resetting button if you are following the Reddit video.
Another option would be LDR modules or just LDRs to the analog pins. Use the builtin pullup resistors on the board to make that part of the circuit very simple.
Yet another option would be mercury switches (tilt sensors) on the targets. Were it me, I would use the proximity switches or LDR modules first though, since it would be easier to wire in to the base of the project than to the back of each target.
Thank You, I think so being air rifle shoting in the past. The bullet times its velocity in square / 2 does become energy. Repeated shocks, vibrarions kill almost anything...
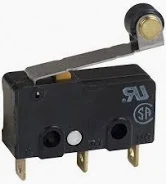
Use 6 limit switch placed on the bar that pulls the targets back.
You can find it in a variety of different shapes.
You can also use the circuit to count score.
Thank you for your reply. What power would you suggest for the servo?
Cheers for the suggestion on the board. In regard to the reset button, could this not be achieved automatically once the project detects that all 6 targets are down?
Thank you for the suggestion. So effectively, each target would drop back and activate the limit switch, and once all 6 are activated, this could enable the servo motor to lift a bar to push the targets back up to their default position?
The targets themselves are made out of 3mm stainless steel so I would imagine that would absorb a lot of the impact from a plastic BB, but still you could be right about it not lasting eventually.
Using reflective, optical sensors sensing "target down/hit" would be better/easier then proximity swiches that often need 12 volt. Opto stuff manages using 5 volt.
What servo do you have, specifically? That will be the real determining factor.
If you have access to mains power, and assuming it's a 5V servo, a 5V, 2A or more wall adapter (you may have an old one around the house or go to your local second hand shop) or if portable, 4 * AA batteries, minimum.
When I say minimum, keep in mind that the voltage must match (or be very close). With batteries, the size of the "gas tank" is measured in mAh.
With wall adapters, the amperage rating on those is the maximum amperage that can be "pulled" through the adapter, if you will. Again, the voltage must match; however, the amperage (say, in my example of the 5V, 2A) the most current that can be delivered to the load would be 2A. So you want one that is comfortably capable of delivering the current the device needs, which for most typical servos doing any sort of lifting, can be over 1A.
Again, check the datasheet for your servo.
Sure it could. The Reddit clip appears to show a button doing that exact task though. You could also use the reset button on the Arduino. If that's not a design goal of yours, then yes, certainly it could reset after it detects all six targets are down.
Work out all your power requirements ahead of time. If it's plugged into a wall, you might find it easier to run the whole shebang off a 9V adapter and further regulate that down to the voltages you need for the Arduino (usually 7V minimum) and the servo (the Tower Pro SG90 doesn't work from 3.5-8.4V, are you sure yours whether Tower Pro or a clone or something else does? The SG90 is a 5V servo from any specs/datasheet I can find.) https://components101.com/motors/servo-motor-basics-pinout-datasheet
and https://www.handsontec.com/dataspecs/SG90-Servo.pdf
to cite two examples.
You might use your DMM on the wall adapter to make sure you know which is + and -, then wire it into some terminal strip such as
or
, one for each of the + and one for all the grounds.
Use a buck converter to regulate the +9V down to +5V for the servo. Use a barrel jack adapter off the 9V terminal block bus to the Arduino.
Here's a good page that shows what I'm talking about better than i can explain it (in marine applications)
For the torque needed to lift 6 * 3mm thick stainless steel targets, you might be looking at a beefier servo than that 9g SG-90. Those are typically used to pull very lightweight linkages to control foam RC airplane rudders, ailerons and flaps. You might look to something used typically as a steering servo on a 1:10 scale hobby-grade RC truck (Losi, Traxxas, Aarma et al).
Lastly, here's a sketch that does something similar to what you're building (all instructions are in the sketch) that I cooked up for some high schooler a few months ago. It's not the same as what you're doing, but you might find a couple goodies in there if you're interested in keeping score, for example. The basic idea in this one is the longer you hold a laser on target against a servo that rotates down as you're on target, the higher you score will be.
Note that it writes to your (somewhat) limited write-cycle EEPROM, although only if your current score is higher than the last highest score.
/* Blast 'Em! Note to self: DO NOT MODIFY!

  by Hallowed31
    May 14-15, 2024

    Additional parts needed:
     - One or two light-dependent resistors. No
       additional pullup or pulldown resistors needed.
     - One or two servos. Attach some target to the servo
       horn after installing LDR through each one, like a
       bullseye.
     - One pushbutton.
     - Some light source as blaster. Cat laser toy, perhaps
     - External power supply for servos. Never use Arduino
       +5V regulator to power servos.
     - Computer connected to Arduino to use Serial Monitor
       or why not try your favorite terminal emulation program
       such as puTTY or CoolTerm?

    Gameplay circuit:
     - LDRs from A0 and A1 to ground.

     - Servos powered externally (+5V) from Arduino, signal pins
        to D9 and D10 and don't forget
        to ground servos to both Arduino AND external power supply

     - Start button (pushbutton) to D2 and Arduino GND.

     - Works with one sensor/servo combo or two.

     - Known issue: the timer will occasionally overflow/keep running
          when cycling between modes such as manual, BIOS, gameplay

     - Ensure Serial monitor is open, default size prints prettiest.
        Autoscroll should be checked, show timestamp unchecked,
        set to 115200 baud, no line ending.

     - CoolTerm settings: "blastEm.stc"

*/
#include <EEPROM.h>
#include <Servo.h>

Servo servoOne, servoTwo;

int targetOne = A0;
int targetTwo = A1;
int led = 13;
int playerButton = 2;
int target1Value, target2Value;
int gameMode, highScore, playerState, lastPlayerState;
int eeAddress;
unsigned long score, gameTime, lastGameTime, gameTimeLimit, targetDown, lastTargetDown, tar2Down, lastTar2Down;
unsigned long previousGameTimer;
const long interval = 1000;
const long biosWait = 3200;
unsigned long prevBios = 0;
int timer = 30;
int biosTimer = 3;
int bios;

void  setup() {
  Serial.begin(115200);
  eeAddress = 0;
  pinMode(targetOne, INPUT_PULLUP);
  pinMode(targetTwo, INPUT_PULLUP);
  pinMode(playerButton, INPUT_PULLUP);
  pinMode(led, OUTPUT);
  /* uncomment resetHighScore() function and upload to reset
    saved high score to zero,
    then comment out again, upload sketch again
    to resume playing normal game */
  // resetHighScore();
  servoOne.attach(10);
  servoTwo.attach(11);
  servoOne.write(0);
  servoTwo.write(0);
  cycleServos();
  gameTimeLimit = 31330;
  targetDown = 500;
  tar2Down = 500;
  lastTargetDown = 0;
  lastTar2Down = 0;
  lastPlayerState = LOW;
  target1Value = 0;
  target2Value = 0;
  credits();
  biosPrompt();
  unsigned long biosT = millis();
  while (biosT + biosWait >= millis()) {
    unsigned long thisBiosTimer = millis();
    if (Serial.available() > 0) {
      char biosMode = Serial.read();
      switch (biosMode) {
        case 'b':
          bios = true;
          break;
        case 'B':
          bios = true;
          break;
      }
    }
    if (thisBiosTimer - prevBios >= interval) {
      if (biosTimer > 0) {
        Serial.println(biosTimer);
      }
      biosTimer --;
      if (biosTimer == -1) {
        timer = 0;
      }
      prevBios = thisBiosTimer;
    }
  }
  playerState = digitalRead(playerButton);
  while (playerState != lastPlayerState) {
    playerState = digitalRead(playerButton);
    awaitingPlayerMessage();
    viewHighScore();
  }
  lastPlayerState = playerState;
  score = 0;
  gameTime = 0;
  lastGameTime = 0;
  previousGameTimer = 0;
  if (bios == true) {
    gameMode = 1;
  }
  else if (bios == false) {
    gameMode = 2;
  }
}

void loop() {
  // start game timer
  gameTime = millis();
  if (Serial.available() > 0) {
    char switchMode = Serial.read();
    switch (switchMode) {
      case 'b':
        gameMode = 1; // viewBios/menu
        break;
      case 'n':
        gameMode = 2; // new player
        break;
      case ' ':
        gameMode = 3; // play game
        break;
      case 'r':
        gameMode = 4; // gameover
        break;
      case '?':
        gameMode = 5; // view raw
        break;
      case 'h':
        gameMode = 6; // view hi scores
        break;
      case 'm':
        gameMode = 7; // read manual
        break;
    }
  }
  switch (gameMode) {
    case 1:
      viewBios();
      lastGameTime = gameTime;
      break;
    case 2:
      newPlayer();
      lastGameTime = gameTime;
      break;
    case 3:
      normalGameplay();
      if (gameTime - lastGameTime > gameTimeLimit) { // outta time
        gameMode = 4;
      }
      break;
    case 4:
      gameOver();
      break;
    case 5:
      viewRawTargetReadings();
      break;
    case 6:
      viewHighScore();
      break;
    case 7:
      manual();
      break;
  }
}
// gameMode 2
void newPlayer() {
  newPlayerMessage();
  lastGameTime = 0;
  score = 0;
  timer = 30;
  gameMode = 3;
}
// gameMode 3
void normalGameplay() {
  unsigned long thisGameTimer = millis();
  if (thisGameTimer - previousGameTimer >= interval) {
    timer --;
    if (timer == -1) {
      timer = 30;
    }
    previousGameTimer = thisGameTimer;
  }
  target1Value = analogRead(targetOne);
  target2Value = analogRead(targetTwo);
  if (target1Value < 75) {
    lastTargetDown = gameTime;
    if (gameTime - lastTargetDown <= targetDown) {
      digitalWrite(led,  HIGH);
      servoOne.write(90);
      score = score + 1;
      if (score > highScore) {
        highScore = score;
        EEPROM.put(eeAddress, highScore);
      }
    }
  }
  if (target2Value < 75) {
    lastTar2Down = gameTime;
    if (gameTime - lastTar2Down <= tar2Down) {
      digitalWrite(led,  HIGH);
      servoTwo.write(90);
      score = score + 1;
      if (score > highScore) {
        highScore = score;
        EEPROM.put(eeAddress, highScore);
      }
    }
  }
  if (gameTime - lastTargetDown >= targetDown) {
    digitalWrite(led, LOW);
    servoOne.write(0);
  }
  if (gameTime - lastTar2Down >= tar2Down) {
    digitalWrite(led, LOW);
    servoTwo.write(0);
  }
  Serial.print("score ");
  Serial.print(score);
  Serial.print("\t\t");
  if (timer >= 10) {
    Serial.print("Time ");
  }
  else if (timer < 10) {
    Serial.print("Time 0");
  }
  Serial.println(timer);
}

// gameMode 4
void gameOver() {
  gameOverMessage();
  awaitingPlayerMessage();
  playerState = digitalRead(playerButton);
  delay(20); // simple debouncing
  playerState = digitalRead(playerButton);
  if (playerState == LOW) {
    gameMode = 2; // reset
  }
}

/*****************************************************
 ***********        UTILITIES       ******************
 *****************************************************/
 unsigned long ma, mb, mc, lastMa, lastMb, lastMc;

void viewBios() {
  Serial.println();
  Serial.println(F("                              Blast 'Em v2"));
  Serial.println();
  Serial.println(F("            Type SPACE during game to resume normal gameplay"));
  Serial.println();
  Serial.println(("                   Type r during game to reset game"));
  Serial.println();
  Serial.println(("                        Type m to view manual"));
  Serial.println(("               Type ? during game to view raw sensor readings"));
  Serial.println(("           Type h during game to pause game and see high score"));
  EEPROM.get(eeAddress, highScore);
  Serial.println();
  Serial.print(("                 All Time High Score: "));
  Serial.println(highScore);
  Serial.println();
  Serial.println(("                     Type X to exit BIOS and return"));
  Serial.println();
  while (!Serial.available()) {
  }
  if (Serial.available() > 0) {
    char myBios = Serial.read();
    switch (myBios) {
      case 'x':
        gameMode = 2;
        bios = false;
        lastGameTime = gameTime;
        break;
      case 'X':
        gameMode = 2;
        bios = false;
        lastGameTime = gameTime;
        break;
      case ' ':
        gameMode = 3; // play game
        break;
      case 'r':
        gameMode = 4; // gameover
        break;
      case '?':
        gameMode = 5; // view raw
        break;
      case 'h':
        gameMode = 6; // view hi scores
        break;
      case 'm':
        gameMode = 7; // read manual
        break;
    }
  }
}


void manual() {
  Serial.println(F("press button when prompted to begin normal play"));
  Serial.println();
  Serial.println(F("Enter key commands during game and press ENTER"));
  Serial.println();
  Serial.println(("Key Commands: "));
  Serial.println(("  ? during game to view sensor data for calibration"));
  Serial.println(("  h to view high score"));
  Serial.println(("  r to reset game"));
  Serial.println(("  h to view high score"));
  Serial.println(("  Space bar + Enter to return to game time and score"));
  Serial.println(("  r to reset game"));
  Serial.println();
  Serial.println();
  Serial.println(("                             Type X to return"));
  Serial.println();
   while (!Serial.available()) {
  }
    if (Serial.available() > 0) {
      char escape = Serial.read();
      switch (escape) {
        case 'x':
          gameMode = 2;
          lastGameTime = gameTime;
          break;
        case 'X':
          gameMode = 2;
          lastGameTime = gameTime;
          break;
      }
    }
}

// called in newPlayer() gameMode 2
void newPlayerMessage() {
  score = 0;
  Serial.println();
  Serial.println(F("                         New Player Blast Em!"));
  Serial.println();
  delay(2000);
  Serial.print("score ");
  Serial.println(score);
}

// called in gameOver() gameMode 4
void awaitingPlayerMessage() {
  ma = millis();
  const unsigned long maTime = 5000;
  if (ma - lastMa >= maTime) {
    lastMa = ma;
    Serial.println();
    Serial.println(F("                          Press Button to Play"));
    Serial.println();
    Serial.println(F("                            Awaiting Player"));
    Serial.println();
  }
}

// called in gameOver() gameMode 4
void gameOverMessage() {
  mb = millis();
  const unsigned long mbTime = 7000;
  if (mb - lastMb >= mbTime) {
    lastMb = mb;
    Serial.println();
    Serial.println(F("                     Time's Up -------- Game Over"));
    Serial.println();
    Serial.print(F("                   Your Score: "));
    Serial.print(score);
    Serial.print(F("     High Score: "));
    Serial.println(highScore);
    Serial.println();
  }
}

// gameMode 6
void viewHighScore() {
  mc = millis();
  EEPROM.get(eeAddress, highScore);
  const unsigned long mcTime = 11000;
  if (mc - lastMc >= mcTime) {
    lastMc = mc;
    Serial.println();
    Serial.print(F("                            High Score: "));
    Serial.println(highScore);
    Serial.println();
  }
}

void credits() {
  Serial.println(F("Blast 'Em!"));
  Serial.println(F("by Hallowed31"));
  delay(1000);
  for (int i = 0; i < 3; i++) {
    Serial.println();
    delay(200);
  }
}

void biosPrompt() {
  Serial.println(F("Type in B and use button"));
  Serial.println(F("at prompt to enter BIOS"));
  delay(1500);
  for (int i = 0; i < 3; i++) {
    Serial.println();
    delay(200);
  }
}

// gameMode 5
void viewRawTargetReadings() {
  unsigned long readInterval = 1000;
  if (gameTime - lastGameTime >= readInterval) {
    lastGameTime = gameTime;
    target1Value = analogRead(targetOne);
    target2Value = analogRead(targetTwo);
    Serial.print(F("ADC readings :  Target 1 (A0) value is "));
    Serial.print(target1Value);  // for checking Photoresistor  input
    Serial.print(F("  Target 2 (A1) value is "));
    Serial.println(target2Value);
    Serial.println();
  }
}

void resetHighScore() {
  highScore = 0;
  EEPROM.put(eeAddress, highScore);
  while (1);
}

void cycleServos() {
  servoOne.write(90);
  servoTwo.write(90);
  delay(250);
  servoOne.write(0);
  servoTwo.write(0);
}
Ideally I think I need to stick with the nano due to space as I intended to mount this inside the target box, but I could always build a box on to the back lid instead if space becomes an issue. I just want to make sure I get the power requirements correct before I order.
I'd say the limit switch are ok, only mount them so that when the target fall down and presses the switch lever it does not push the lever against the plastic body ( it should only click, with an adequate margin ).
There are also versions with longer lever ( if needed ), faston or soldering terminals...