Best Method for Utilizing On-Board Flash?

Hi All. I bought the Nano ESP32 recently because I thought it was attractive price point and I liked that it had on-board Flash.

I've now come to realize that there is little no support offered by Arduino on what the best method is for reading/writing files to this flash. I've tried both SPIFFS and LittleFS in both the Arduino IDE and PlatformIO (using Arduino framework for both). I'm a little lost as to what to try next.

Does anyone have any recommendations on how I should proceed, tutorials on how to read/write to the on-board flash of the Nano ESP32, or anything else that may help? Much appreciated!

I have merged your cross-posts @zachdavis92.

Cross-posting is against the Arduino forum rules. The reason is that duplicate posts can waste the time of the people trying to help. Someone might spend a lot of time investigating and writing a detailed answer on one topic, without knowing that someone else already did the same in the other topic.

Repeated cross-posting can result in a suspension from the forum.

In the future, please only create one topic for each distinct subject matter. This is basic forum etiquette, as explained in the "How to get the best out of this forum" guide. It contains a lot of other useful information. Please read it.

Thanks in advance for your cooperation.

Hi @zachdavis92. I'm sorry if you have been disappointed with your Nano ESP32 board.

Please provide a link to where you found that claim and I'll see what I can do about correcting it.

The ability to upload file systems to ESP32 boards using Arduino IDE 1.x was something implemented by the Arduino community, not by the Arduino company. The Arduino company only ever provided the framework by which such a thing could be done, which we have now done for Arduino IDE 2.x as well. Hopefully the amazing community will implement an ESP32 filesystem uploader extension for Arduino IDE 2.x as well.

The Arduino company does not do any development or support for Platformio so you must take it up with the Platformio company and community if you find that framework to be deficient.

@ptillisch The Arduino Nano ESP32 is a board made by the Arduino Company (your company). The Arduino Company put on-board NOR flash on this board. Please explain to me or provide documentation on how, using the Arduino IDE, I can properly flash this board.

You say this board wasn't designed for PlatformIO, which I understand and you can't offer support for it. What I have a big problem with though is this board was designed to be used with Arduino 2.X. You haven't given any documentation or answers on how to upload files to this NOR Flash. The SPIFFS example given in the Nano ESP32 documentation doesn't address the fact that users can't upload files to the on-board flash for use in a program. How can I take a file and upload it to this NOR flash that Arduino chose to integrate into their HW design. If you can't give me a solid answer, then that really should be escalated to your team and fixed.

I primarily work with Nordic and STM32 devices and have never seen such poor documentation or lack of support for something as simple as a tutorial on how to utilize on-board Flash.

1 Like

Open the sketch project you want to flash in Arduino IDE and then select Sketch > Upload from the Arduino IDE menus. The sketch program will be compiled and the binary flashed to the Nano ESP32 board.

I did not say that. I said that the PlatformIO framework is a 3rd party project that the Arduino company is not involved with.

@ptillisch please instead of trying to argue semantics with me, please try and help me solve my issue.

When I said flash this board, I did not mean upload the sketch to it. I meant utilize the on-board flash by uploading files to it. How do I create a file partition system using this NOR flash and then upload data to it, as the context of this thread suggests. I know you said I am spamming by posting my issue on others threads. I am not spamming however. I am pointing out to you that my issue is not just mine, but a very common one that a lot of other people are experiencing and upset about. Instead of trying to fix our issue, your team is getting upset with me about "spamming". Please provide us customer service that we are owed.

Again, one last time, please provide instuctions on how to upload data to the NOR flash on the Arduino Nano ESP32 board. If there is no way to do this, then state as such.

2 Likes

@zachdavis92 can you post a copy of the error messages you got when you tried littleFS and SPIFFS. The examples work fine on my system.

I realize you want to create a file system but have you managed to upload any of the basic examples.

What is it you aim to use the file system for so we can better answer your particular problem, what kind of data are you wanting to upload and under what circumstances do you want to retrieve the data, is it for display or perhaps calculation.

Will your application run under micropython which by default comes with a file system and runs well on the nano esp32.

A post was split to a new topic: How to flash WLED to my nano esp32?

This has happened. There is now a nice littlefs filesystem uploader extension for Arduino IDE 2.x:

1 Like

following guidelines and instruction always fail to upload the file in NANO ESP32. Any support or tips are appreciated!
Partition Scheme SPIFFS:
LittleFS Filesystem Uploader v1.1.8 -- GitHub - earlephilhower/arduino-littlefs-upload: Build and uploads LittleFS filesystems for the Arduino-Pico RP2040, ESP8266, and ESP32 cores under Arduino IDE 2.2.1 or higher
Sketch Path: C:\Users\USER\Documents\Arduino\673OEE_db
Data Path: C:\Users\USER\Documents\Arduino\673OEE_db\data
Device: ESP32 series, model esp32s3
Using partition: spiffs
Partitions: C:\Users\USER\AppData\Local\Arduino15\packages\arduino\hardware\esp32\2.0.13\tools\partitions\spiffs.csv
ERROR: Partition file not found!

Partition Scheme Default:
LittleFS Filesystem Uploader v1.1.8 -- GitHub - earlephilhower/arduino-littlefs-upload: Build and uploads LittleFS filesystems for the Arduino-Pico RP2040, ESP8266, and ESP32 cores under Arduino IDE 2.2.1 or higher

Sketch Path: C:\Users\USER\Documents\Arduino\673OEE_db
Data Path: C:\Users\USER\Documents\Arduino\673OEE_db\data
Device: ESP32 series, model esp32s3
Using partition: default
Partitions: C:\Users\USER\AppData\Local\Arduino15\packages\arduino\hardware\esp32\2.0.13\tools\partitions\default.csv

Building LittleFS filesystem
Command Line: C:\Users\USER\AppData\Local\Arduino15\packages\esp32\tools\mklittlefs\3.0.0-gnu12-dc7f933\mklittlefs.exe -c C:\Users\LMATEEV\Documents\Arduino\673OEE_db\data -p 256 -b 4096 -s 1441792 C:\Users\LMATEEV\AppData\Local\Temp\tmp-58792-b8pjMUPqCff5-.littlefs.bin
/data.sqlite3

Uploading LittleFS filesystem
Command Line: C:\Users\USER\AppData\Local\Arduino15\packages\esp32\tools\esptool_py\4.5.1\esptool.exe --chip esp32s3 --port COM12 --baud NaN --before default_reset --after hard_reset write_flash -z --flash_mode dio --flash_freq 80m --flash_size detect 2686976 C:\Users\USER\AppData\Local\Temp\tmp-58792-b8pjMUPqCff5-.littlefs.bin
usage: esptool [-h]
[--chip {auto,esp8266,esp32,esp32s2,esp32s3beta2,esp32s3,esp32c3,esp32c6beta,esp32h2beta1,esp32h2beta2,esp32c2,esp32c6,esp32h2}]
[--port PORT] [--baud BAUD]
[--before {default_reset,usb_reset,no_reset,no_reset_no_sync}]
[--after {hard_reset,soft_reset,no_reset,no_reset_stub}]
[--no-stub] [--trace] [--override-vddsdio [{1.8V,1.9V,OFF}]]
[--connect-attempts CONNECT_ATTEMPTS]
{load_ram,dump_mem,read_mem,write_mem,write_flash,run,image_info,make_image,elf2image,read_mac,chip_id,flash_id,read_flash_status,write_flash_status,read_flash,verify_flash,erase_flash,erase_region,merge_bin,get_security_info,version}
...
esptool: error: argument --baud/-b: invalid arg_auto_int value: 'NaN'
ERROR: Upload failed, error code: 2
In order to make all relevant information available to any who are interested in this subject, I'll share a link to @lmateev's report about the failure in the issue tracker for the arduino-littlefs-upload extension:

I see the creator of the extension has explained the cause of the failure there.

So seems according to "Creator" original Arduino Nano ESP32 are not suitable for littefs, which was definitely misleading as it was clearly stated as a solution.

Hi @lmateev. I'll provide instructions for using the arduino-littlefs-upload extension with the Nano ESP32 board:

A. Put Board in "Hardware CDC" Mode

By default, the Nano ESP32 is configured to use a mode where sketches are uploaded to the board via a special DFU (device firmware upgrade) interface. This interface can't be used by the arduino-littlefs-upload extension to upload filesystems, so it is necessary to put the board into the alternative "hardware CDC" mode that is supported by the arduino-littlefs-upload extension.

  1. Select File > New Sketch from the Arduino IDE menus.
  2. Select Tools > Board > Arduino ESP32 Boards > Arduino Nano ESP32 from the Arduino IDE menus.
  3. Select Tools > USB Mode > Debug mode (Hardware CDC) from the Arduino IDE menus.
  4. Select Sketch > Upload from the Arduino IDE menus (or click the upload button if you prefer).
    β“˜ This upload will put the board into the "hardware CDC" mode.
  5. Wait for the upload to finish successfully.
  6. Press the "RST" button on the Nano ESP32 board.

B. Configure Arduino IDE for Use with Filesystem Uploader Extension

Various parameters are configured in Arduino IDE according to which board you have selected from the Tools > Board menu. Unfortunately the configuration you get when you select "Arduino Nano ESP32" from the menu is not compatible with the arduino-littlefs-upload extension. For this reason, we must use an alternative board selection that is compatible.

The "Arduino ESP32 Boards" platform that adds the "Arduino Nano ESP32" board definition to Arduino IDE is a fork of the 3rd party "esp32" boards platform. That platform provides a flexible general purpose "ESP32S3 Dev Module board definition for use with all boards based on the ESP32-S3 microcontroller, including the Nano ESP32 board. The "ESP32S3 Dev Module" board definition is compatible with the arduino-littlefs-upload extension so we can work around the incompatibility of the "Arduino Nano ESP32" board definition by instead selecting this board from the Tools > Board menu.

  1. If you haven't already, use the Arduino IDE Boards Manager to install the "esp32" boards platform by following these instructions:
    https://docs.espressif.com/projects/arduino-esp32/en/latest/installing.html#installing-using-arduino-ide
  2. Select Tools > Board > esp32 > ESP32S3 Dev Module from the Arduino IDE menus.
  3. Select Tools > CPU Frequency > 240MHz (WiFi) from the Arduino IDE menus.
  4. Select Tools > USB DFU On Boot > Disabled from the Arduino IDE menus.
  5. Select Tools > Events Run On > Core 1 from the Arduino IDE menus.
  6. Select Tools > Flash Mode > QIO 80MHz from the Arduino IDE menus.
  7. Select Tools > Flash Size > 16MB (128Mb) from the Arduino IDE menus.
  8. Select Tools > Arduino Runs On > Core 1 from the Arduino IDE menus.
  9. Select Tools > USB Firmware MSC On Boot > Disabled from the Arduino IDE menus.
  10. Select Tools > Partition Scheme > Default 4MB with spiffs (1.2MB APP/1.5MB SPIFFS) from the Arduino IDE menus.
    β“˜ You can use any of the SPIFFS partitions schemes from the menu, as appropriate for your application.
  11. Select Tools > PSRAM > OPI PSRAM from the Arduino IDE menus.
  12. Select Tools > Upload Mode > UART0 / Hardware CDC from the Arduino IDE menus.
  13. Select Tools > USB Mode > Hardware CDC and JTAG from the Arduino IDE menus.
  14. Select the port of the Nano ESP32 board from Arduino IDE's Tools > Port menu.
    :exclamation: It is necessary to select the port again because the port may have changed after you performed the "Put Board in "Hardware CDC" Mode" procedure.
    β“˜ The port will be labeled in the menu as "(ESP32 Family Device)" instead of "(Arduino Nano ESP32)" as usual. This is normal and expected.
  15. Select Sketch > Upload from the Arduino IDE menus (or click the upload button if you prefer).
  16. Wait for the upload to finish successfully.

C. Upload Filesystem

Use the arduino-littlefs-upload extension to upload the filesystem to the board as usual, per the instructions provided by the extension author:

https://github.com/earlephilhower/arduino-littlefs-upload#usage

Restoring Board to Normal Mode

When you aren't working with uploaded filesystems, you might prefer to go back to using the Nano ESP32 board normally. I'll provide instructions you can follow to switch the board back to the mode where you can use it with the "Arduino Nano ESP32" board definition once more.

  1. Select File > New Sketch from the Arduino IDE menus.
  2. Select Tools > Board > Arduino ESP32 Boards > Arduino Nano ESP32 from the Arduino IDE menus.
  3. Select Tools > USB Mode > Normal mode (TinyUSB) from the Arduino IDE menus.
  4. Select Tools > Programmer > esptool from the Arduino IDE menus.
  5. Select the port of the Nano ESP32 board from Arduino IDE's Tools > Port menu.
  6. Select Sketch > Upload Using Programmer from the Arduino IDE menus (or click the upload button if you prefer).
  7. Wait for the upload to finish successfully.

Please let me know if you have any questions or problems while following those instructions.

1 Like

Hi, just installed LittleFS on an arduino nano ESP32 following these instructions

Works ok, upload successfull
But what shall i do now ? i tried to run the littleFS test sketch but nothing append, then i tried the blink basic sketch, no more success. Seems the board ESP32S3 dev module used for uploading littleFS does not work when i upload usuals sketches.
If i come back to the board arduino nano esp32 as described in the instructions above i have no more littleFS...
Regards
Yves

@yves14

You already started your own topic LittleFS with arduino nano esp32.

Why did you post in this topic as well? It's called cross-posting, wastes people's time and is against the rules of the forum.

I've locked your other topic for now till you decide where you would like the answers.

Ok sorry, this is a mistake, i think the best is to get answers from here, so you can suppress the other topic. Regards.

Hi @yves14.

Unlike when you have "Nano ESP32" selected from Arduino IDE's Tools > Board menu, when you have "ESP32S3 Dev Module" selected from the menu the USB CDC serial port of the board is disabled by default. With that default configuration, the Serial.println, etc. calls in the code of the File > Examples > LittleFS > LITTLEFS_test sketch don't send data to the serial port produced by the USB connection between the board and your computer. So it is expected that you won't see anything in Serial Monitor while that sketch is running if you have the board in the default configuration.

Please try this:

  1. If it is not already open, select Tools > Serial Monitor from the Arduino IDE menus to open the "Serial Monitor" view.
  2. Select Tools > USB CDC on Boot > Enabled from the Arduino IDE menus.
  3. Upload the "LITTLEFS_test" example sketch to the Nano ESP32 board again.

You should now see the sketch print the results of various tests it performs using the littlefs filesystem:

Reading file: /hello.txt
- read from file:
Hello World!
Renaming file /hello.txt to /foo.txt
- file renamed
Reading file: /foo.txt
- read from file:
Hello World!
Deleting file: /foo.txt
- file deleted
Testing file I/O with /test.txt
- writing................................................................
 - 1048576 bytes written in 12539 ms
- reading................................................................
- 1048576 bytes read in 235 ms
Deleting file: /test.txt
- file deleted
Test complete

Note that the "LITTLEFS_test" example sketch writes its own files to the filesystem, so it isn't useful for testing the functionality of the arduino-littlefs-upload extension. If you want to perform a basic test of the extension, you can follow these instructions:

  1. Select File > New Sketch from the Arduino IDE menus.
    A new sketch will open in a new Arduino IDE window.
  2. Replace the code of the new sketch with the following code:
    #include <FS.h>
    #include <LittleFS.h>
    
    void setup() {
      Serial.begin(9600);
      while(!Serial) {}
      delay(500);
    
      if (!LittleFS.begin()) {
        Serial.println("LittleFS Mount Failed");
        while (true) {}
      }
      Serial.println("LittleFS Mount success");
    
      File root = LittleFS.open("/");
      if (!root) {
        Serial.println("Failed to open root directory");
        while (true) {}
      }
    
      Serial.println("Listing root directory:");
      File file = root.openNextFile();
      while (file) {
        Serial.print(file.name());
        Serial.print("\tSIZE: ");
        Serial.print(file.size());
        Serial.println(" B");
        file = root.openNextFile();
      }
    
      Serial.println("Listing complete");
    }
    
    void loop() {}
    
  3. Select Sketch > Add File... from the Arduino IDE menus.
    The "Add File" dialog will open.
  4. Select a small file that has a file extension (e.g., .txt) other than those supported by the Arduino IDE editor.
    β“˜ The reason for avoiding files with extensions supported by the Arduino IDE editor (e.g., .ino, .h). Is that the "Add File" feature adds files with these extensions to the root of the sketch folder, but we want to add the file to the data subfolder of the sketch, which the feature does for files with other extensions.
  5. Click the "Open" button.
    The dialog will close and the file will be added to the data subfolder of the sketch.
  6. Connect an ESP32, ESP8266, or RP2040-based board to the computer.
  7. Select the board and port from the Arduino IDE menus.
  8. Close the "Serial Monitor" view and Serial Plotter window if they are open.
    β“˜ If the port is open, the filesystem upload process will fail:
    A fatal error occurred: Could not open COM42, the port doesn't exist
    
  9. Press the Ctrl+Shift+P keyboard shortcut (Command+Shift+P for macOS users) to open the "Command Palette".
    A menu will appear on the editor toolbar.
  10. Select the "Upload LittleFS to Pico/ESP8266/ESP32" command from the menu.
    A "LittleFS Upload" view will open in the bottom panel of the Arduino IDE window and the upload process will be shown there.
  11. Wait for the filesystem upload to complete successfully.
  12. Upload this sketch to the board.
    β“˜ The filesystem uploader does not upload the sketch. It also does not overwrite the existing sketch.
  13. Open Serial Monitor.

You should see the first file present in the data subfolder of the sketch listed in the output (note that for the sake of simplicity, the sketch only listed the first file it found). For example, I selected a file named asdf.txt at step (4) of the instructions, and so I saw this in Serial monitor:

LittleFS Mount success
Listing root directory:
asdf.txt	SIZE: 0 B
Listing complete

Unlike when you have "Nano ESP32" selected from Arduino IDE's Tools > Board menu, when you have "ESP32S3 Dev Module" selected from the menu you must use the GPIO numbers of the ESP32-S3 microcontroller as Arduino pin numbers; not the numbers written on the board's silkscreen.

You can learn the GPIO number for each pin by looking at the pinout diagram provided on the Nano ESP32 documentation page:

https://docs.arduino.cc/hardware/nano-esp32/

You can open the simple pinout diagram by clicking the icon that looks like a male pin header under the Nano ESP32 board graphic near the top right corner of that page.

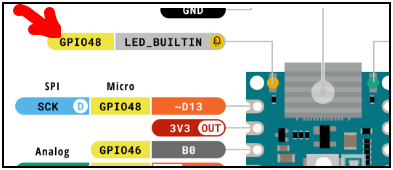
From looking at the diagram, we can see that the monochrome built-in LED is on GPIO 48:

πŸ“·

ABX00083-pinout.png by Arduino - CC BY-SA 4.0 (cropped, annotated)

So if you want to blink that LED using the File > Examples > 01.Basics > Blink sketch, you must change all occurrences of LED_BUILTIN in the code with 48. Make that change and then upload the sketch to the board. You should now see the yellow LED next to the USB socket on the board blink at 0.5 Hz.

Hi ptillisch, tnx a lot for your answer, really good, all you said is working here now. I need of course to understand a little bit more all that stuff :slight_smile: but i thank you really very much for these clear and complete explanations.
Best regards
Yves

You are welcome. I'm glad it is working now.

Regards, Per

Guys how to do it with Arduino 1.8.19 version ?