no i would get the same error code
TheBossCookie:
no i would get the same error code
You can't expect a complex example to work if you can't get a simple example like Blink to work. Go back to those instructions and try to get Blink to work first.
Many people find that their breadboard connections are not as reliable as one would hope. Use a multimeter to check the resistance of every wire and connection. Should be no more than a few ohms end-to-end.
johnwasser:
TheBossCookie:
no i would get the same error codeYou can't expect a complex example to work if you can't get a simple example like Blink to work. Go back to those instructions and try to get Blink to work first.
Many people find that their breadboard connections are not as reliable as one would hope. Use a multimeter to check the resistance of every wire and connection. Should be no more than a few ohms end-to-end.
I know this and they are all .1 and .2 ohms
Incorrect wiring.
Faulty ATtiny chip.
Faulty programmer.
Bad wire or connector.
Missing system clock.
I'm sorry. I can't think of any other reason why your programming would be failing.
Perhaps it is time to post in Gigs and Collaboration to see if anyone in your area of the world would be willing to check your work in person.
TheBossCookie:
I know this and they are all .1 and .2 ohms
Something basic is wrong. Disconnect everything, start over.
TheBossCookie:
Error while burning boot loader
avrdude: stk500_getsync(): not in sync: resp=0x00
Actually, this looks like the Arduino as ISP is not responding. Either the ArduinoISP sketch is not loaded or you will need to disable auto-reset if the UnoR3 has an older bootloader for some reason.
Can you post full output from burn bootloader?
From the File->Preferences, make sure upload box is checked under Show verbose output during.
Using the Arduino Uno to program ATTINY84-20PU (Newark item # 68T3783)
- Ensure the Arduino IDE is NOT running.
- Create new folder named "tiny" in your Arduino "hardware" folder
C:\Projects\Arduino\hardware\tiny - Download the Arduino-Tiny archive (ZIP-file)
Google Code Archive - Long-term storage for Google Code Project Hosting. - Copy and paste the contents of the ZIP-file into the "tiny" folder:
C:\Projects\Arduino\hardware\tiny
The contents should look like this:
C:\Projects\Arduino\hardware\tiny\bootloaders
C:\Projects\Arduino\hardware\tiny\cores
C:\Projects\Arduino\hardware\tiny\license.txt
C:\Projects\Arduino\hardware\tiny\Prospective Boards.txt
C:\Projects\Arduino\hardware\tiny\readme.txt - Create a new file named "boards.txt" in the tiny directory.
C:\Projects\Arduino\hardware\tiny\boards.txt - Open the "boards.txt" file and the "Prospective Boards.txt" file using a text editor.
- Copy board entries of interest from "Prospective Boards.txt" to "boards.txt"
(or copy the entire contents of "Prospective Boards.txt" to "boards.txt").
Board entries are delineated by a long line of pound-signs. - Save and close "boards.txt". Close "Prospective Boards.txt". The contents of the "tiny" directory should now look like this:
C:\Projects\Arduino\hardware\tiny\bootloaders
C:\Projects\Arduino\hardware\tiny\cores
C:\Projects\Arduino\hardware\tiny\license.txt
C:\Projects\Arduino\hardware\tiny\Prospective Boards.txt
C:\Projects\Arduino\hardware\tiny\readme.txt
C:\Projects\Arduino\hardware\tiny\boards.txt
8 ) Start the Arduino IDE and ensure the new boards of interest are listed under
the [Tools] [Board] menu. If you copied all available boards from "Prospective Boards.txt" to "Boards.txt" you see boards such as ATtiny84, ATtiny44, ATtiny24, ATtiny85, ATtiny45, ATtiny25, ATtiny4313, and ATtiny2313. - Before connecting any ATtiny to the Arduino, upload the ARduinoISP sketch to your Uno by selecting [File] [Examples] ArduinoISP. Make sure your Arduino board is selected ([Tools]Boards and the AVR ISP programmer is selected ([Tools] [Programmer] AVR ISP.
- Now your Uno is ready to be used as an ISP.
- Select board to be programmed [Tools][Boards] Attiny84 @ 1MHz (internal oscillator; BOD disabled)
- Select use Arduino as ISP [Tools]Programmer]Arduino as ISP
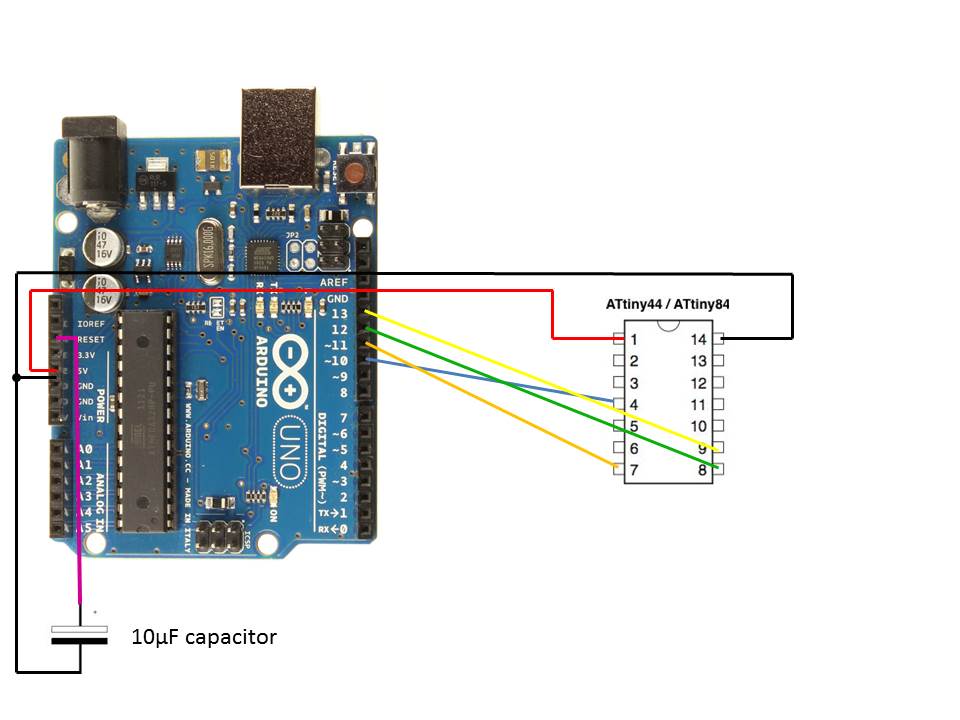
- Connect the ISP pins of Arduino Uno to the Target AVR as indicated, in this case the ATtiny84.
Arduino 5V to ATtiny84 Pin 1
Arduino Pin 10 to ATtiny84 Pin 4
Arduino Pin 11 to ATTiny84 Pin 7
Arduino Pin 12 to ATtiny84 Pin 8
Arduino Pin 13 to ATtiny84 Pin 9
Arduino GND to ATtiny84 Pin 14
Arduino RESET to 10uF cap
10uF cap to GND - Create sketch for ATtiny. I tried the blink sketch: [File] [Example][Basics]Blink and modified the LED pin to match a pin on the ATtiny. That is, I change "int led = 13;" to read "int led = 0;"
- Upload modified blink sketch to ATtiny84.
- Remove ATtiny84 from Arduino Uno.
- Connect ATtiny for Blink Program
ATtiny Pin 1 to 5V (I used Arduino as a pwr supply)
ATtiny Pin 2 to LED (apparently this is Pin 0 when programming the blink sketch)
LED to Resistor
Resistor to GND
ATtiny Pin 14 to GND (I used Arduino as a pwr supply) - Apply power and LED should blink.