Code not uploading

I am doing a project using LEDs, but the code i have written for it won't upload to the board. I tried another example code (the blinker one) and it uploaded to the board. What could be the issue?
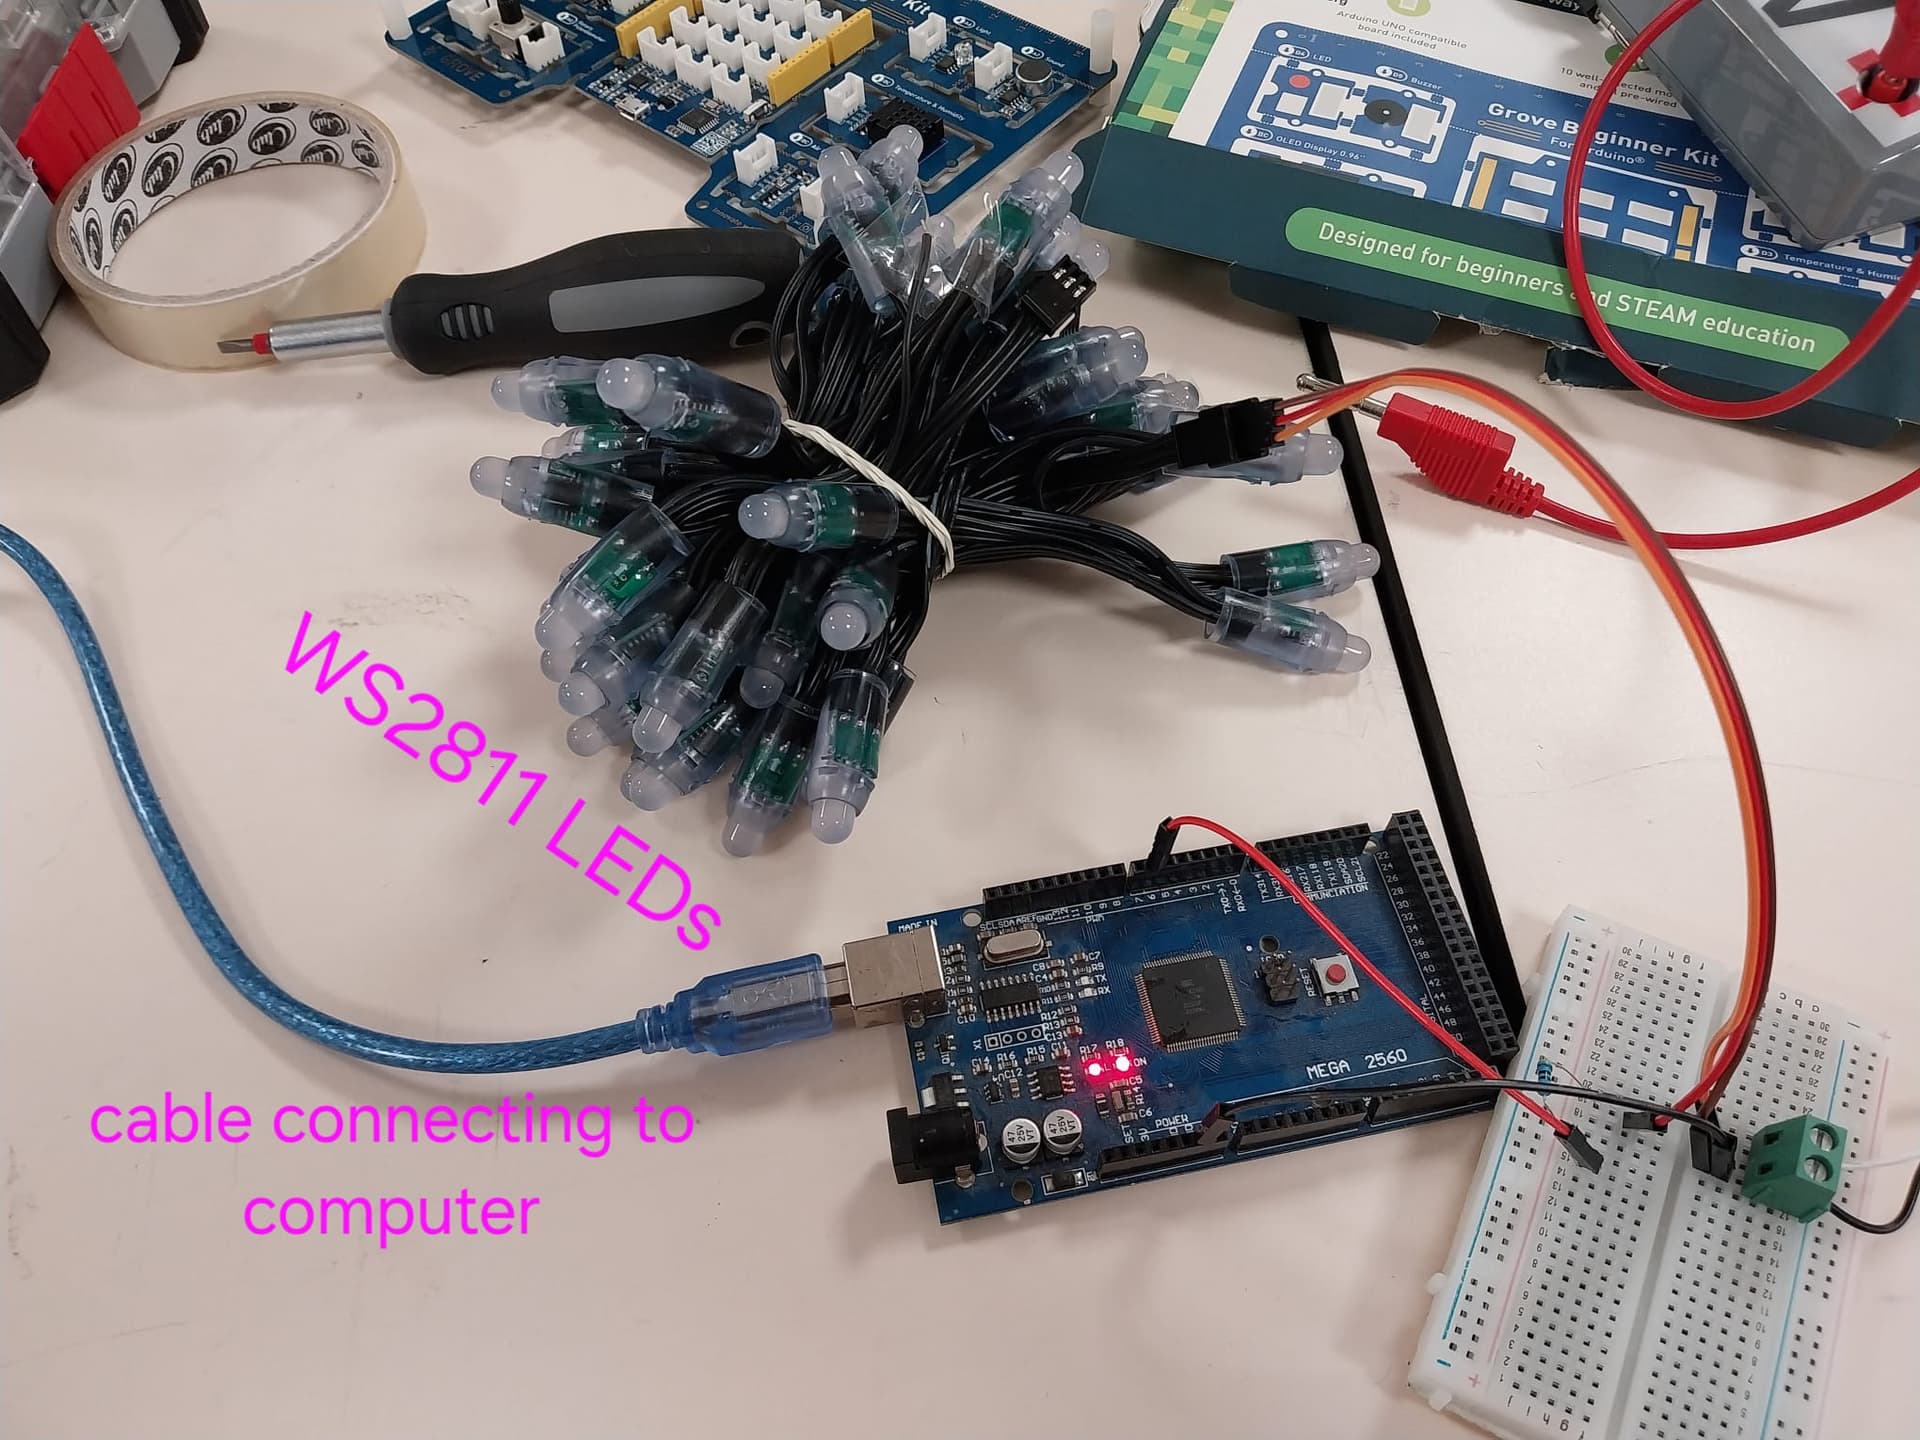
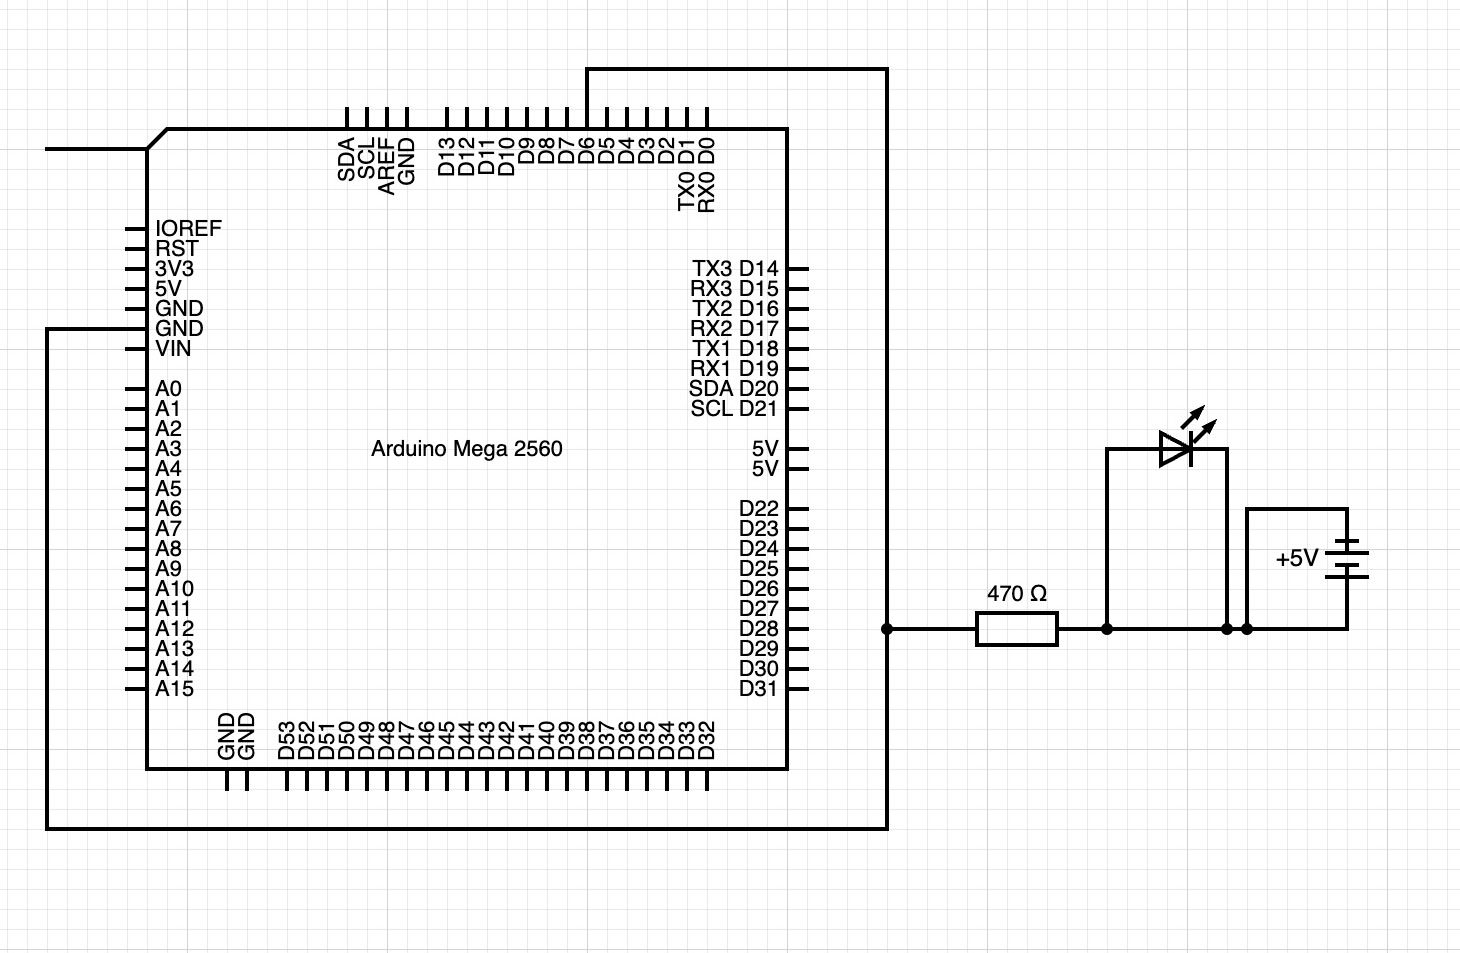
I am using the Seed Studio Grove beginner kit for arduino board and i am using these LEDs:

This is also my code:

#include <FastLED.h>

#define LED_PIN     6          // Pin connected to the data input of the LEDs
#define LED_COUNT   24         // Number of LEDs (one for each key)
#define DIAL_PIN    A0         // Pin connected to the dial (potentiometer or rotary encoder)
#define CLOCK_PIN   7          // If using clocked WS2811 LEDs, define the clock pin

CRGB leds[LED_COUNT];         // Declare the LED array for FastLED

int dialValue = 0;            // Variable to store the dial value
int previousDialValue = 0;    // Variable to store the previous dial value
int currentMode = 0;          // 0 - Chord mode, 1 - Twinkle Twinkle, 2 - Hot Cross Buns

unsigned long previousMillis = 0;  // For timing the 2-second delay between notes
const long interval = 2000;        // Interval (in ms) for note delay

void setup() {
  FastLED.addLeds<WS2811, LED_PIN, GRB>(leds, LED_COUNT);  // Use FastLED with WS2811 protocol
  FastLED.setBrightness(100);  // Set a brightness level (0-255)

  Serial.begin(9600);  // For debugging purposes
}

void loop() {
  dialValue = analogRead(DIAL_PIN) / 42;  // Map dial value to a mode (0-5)

  // Check for dial change
  if (dialValue != previousDialValue) {
    previousDialValue = dialValue;
    currentMode = dialValue; // Set the current mode based on dial position
    resetLEDs(); // Reset all LEDs when switching modes
  }

  if (currentMode == 0) {
    // Chord mode (example: C chord, D chord, etc.)
    playChord();
  } else if (currentMode == 1) {
    // Song mode (Twinkle Twinkle)
    playSongTwinkle();
  } else if (currentMode == 2) {
    // Hot Cross Buns
    playSongHotCrossBuns();
  }

  delay(100);  // Short delay for responsiveness
}

// Function to reset all LEDs to off
void resetLEDs() {
  for (int i = 0; i < LED_COUNT; i++) {
    leds[i] = CRGB::Black;  // Turn off the LED
  }
  FastLED.show();  // Update the LED strip
}

// Function to simulate a chord (for teaching mode)
void playChord() {
  // Chords: C, Dm, F, G
  int chords[][3] = {
    {0, 4, 7},  // C Major (C, E, G)
    {2, 5, 9},  // D Minor (D, F, A)
    {5, 9, 12}, // F Major (F, A, C)
    {7, 11, 14} // G Major (G, B, D)
  };
  
  // Loop through each chord
  for (int i = 0; i < 4; i++) {
    for (int j = 0; j < 3; j++) {
      leds[chords[i][j]] = CRGB::Green;  // Green for chord note
    }
    FastLED.show();  // Show the updated LED strip
    delay(2000);  // Wait for 2 seconds before turning off
    resetLEDs();  // Reset the LEDs
  }
}

// Function to play "Twinkle Twinkle" (Full Song)
void playSongTwinkle() {
  // Full "Twinkle Twinkle Little Star" melody in C Major scale
  int notes[] = {0, 0, 7, 7, 9, 9, 7,  // Twinkle Twinkle
                 5, 5, 4, 4, 2, 2, 0,  // Little Star
                 7, 7, 5, 5, 4, 4, 2,  // How I wonder
                 7, 7, 5, 5, 4, 4, 2,  // What you are
                 0, 0, 7, 7, 9, 9, 7,  // Twinkle Twinkle
                 5, 5, 4, 4, 2, 2, 0}; // Little Star
  
  int songLength = sizeof(notes) / sizeof(notes[0]);

  for (int i = 0; i < songLength; i++) {
    leds[notes[i]] = CRGB::Red;  // Red for song note
    FastLED.show();  // Show the updated LED strip
    delay(2000);  // Wait for 2 seconds before the next note
    resetLEDs();  // Reset LEDs
    delay(500);  // Short pause between notes
  }
}

// Function to play "Hot Cross Buns"
void playSongHotCrossBuns() {
  // Full melody for "Hot Cross Buns" (E, D, C)
  int notes[] = {4, 2, 0, 4, 2, 0, 4, 2, 0};  // E, D, C
  int songLength = sizeof(notes) / sizeof(notes[0]);

  for (int i = 0; i < songLength; i++) {
    leds[notes[i]] = CRGB::Blue;  // Blue for song note
    FastLED.show();  // Show the updated LED strip
    delay(2000);  // Wait for 2 seconds before the next note
    resetLEDs();  // Reset LEDs
    delay(500);  // Short pause between notes
  }
}

Please follow the advice given in the link below when posting code, in particular the section entitled 'Posting code and common code problems'

Use code tags (the < CODE/ > icon above the compose window) to make it easier to read and copy for examination

https://forum.arduino.cc/t/how-to-get-the-best-out-of-this-forum

Please post your sketch, using code tags when you do

Posting your code using code tags prevents parts of it being interpreted as HTML coding and makes it easier to copy for examination

In my experience the easiest way to tidy up the code and add the code tags is as follows

Start by tidying up your code by using Tools/Auto Format in the IDE to make it easier to read. Then use Edit/Copy for Forum and paste what was copied in a new reply. Code tags will have been added to the code to make it easy to read in the forum thus making it easier to provide help.

Please show us what error you get when you try to upload. Post the error message in code tags ideally.

I don't think there was an error message that displayed. But there is an LED on the board that lights up when the code has been uploaded and it didn't light up for my code, but it did for the example ones. My code wasn't able to run. Does this mean something else is wrong with my components?

That indicates you do not fully understand what is happening. That LED is controlled by the software as it lights after the code is uploaded. You need to add code to do that in your code. Copy part of the blink sketch and try again.

I have no idea what your code should do or is doing. You should post an annotated schematic showing all of the hardware as you have wired it. Include links to technical information on hardware devices.

If you suspect that, start with some basic examples. To test the LEDs, pick a few examples from the FastLED library; start with FastLED's blink which will blink the first LED; adjust the code to test all LEDs.

How do you power your setup? 24 LEDs require 24x60 mA (each pixel full white) = 1.44 A. You need an external power supply for that.

You must not think, you must know. Try the upload again and check the output.

It is very unlikely that you will get two identical readings from the internal A/D converter.

Use this instead:-

 //if (dialValue != previousDialValue) {
 if (dialValue > abs(previousDialValue - threshold)) {

Where threshold is the amount the reading must move before it is considered to have changed over and above the noise from the A/D. And so triggering the action. I would start with a threshold value of at least 4, but you may need more.

That is very good advice and you should take heed of it.

So can you post a link to that board please.

We need to know the processor's pin output voltage.

This is the link
Grove Beginner Kit for Arduino | Seeed Studio Wiki
I will be able to send a picture of the whole thing later when I am at school to set it up again

My code should light up certain parts of the LEDs that correspond to a certain key on a piano
Here are pictures of the hardware I used


I tried the code and the blinker lit up but I couldn't get the LEDs to light up, does this mean that there is a problem with the LEDs?

I used a different microcontroller here incase the board I was using before was the issue but it still didn't work.

I tried the code again and there is no error message, but the LEDs still didn't turn on

So why not do as you were advised to do?

Take things one step at a time, do not try and do it all in one go. This is a classic beginners mistake.

Forget the audio input or playing anything for the moment, just connect the LEDs like one of the examples in the FastLed library. Slightly modify it so will light up say 8 LEDs, a different colour each second or so.

Post your now modified code again in a new post and say what happens.

Now you have a problem using an external battery. If it is connected up and the Arduino is not powered up, then the external battery will try and power the Arduino through the static protection diodes inside the Arduino chip. This can cause latch up which can cause excessive currents to flow which can damage your Arduino. It might be damaged already.

1 Like

The pictures are useless to me they are very cluttered and do not show how it is connected. Post a schematic as requested in #5, without that I cannot help.


Here is a schematic of it, sorry if it's bad as I haven't done this before.
The wire that just goes off and doesn't connect to anything is meant to connect to the computer but there wasn't a computer symbol

That drawing does not appear correct. If it is why is D6 grounded and your battery shorted? I suggest you get a copy of the Arduino Cookbook, it will probably have your project in it in various forms.


Do you really have a short circuit across the 5V supply and another one across the LED ?


Sorry, I think this would be more accurate.

What is the purpose of tying D6 to GND? Why is one end of the LED not connected? Why is one side of your 5V not connected?

Sadly it is not.

A schematic shows every connection on a circuit, yours just seems to be a random collection of parts that just go nowhere.

This is an example of a schematic for something else, just to let you see what they look like.

This is the schematic for driving addressable LED strips where you have a processor that will only give you a 3v3 voltage signal. Like a Raspberry Pi or an ESP32.

The dotted line around the 74LS14 (or a 74HCT14 can also be used here) shows there are six inverting buffer chips inside this IC and how you need only two if them because two inverting chips placed is series like this result in a non inverting buffer.

The unused buffers in this chip should not be left with an unconnected input, so the remaining buffers are connected in a chain with the input connected to ground, and the output not connected to anything. Maybe you will need this because while you will not need it with a Mega processor, you might need one with the chip/board from your kit.

Maybe have a look at this video:-
Colin's Lab video on reading a schematic

This topic was automatically closed 180 days after the last reply. New replies are no longer allowed.