I'm attempting to hookup a coin hopper which I want to control via Arduino. I'm a tad confused as to the pinout of the hopper and what it's asking me to do... so I thought I would post here to try and get some clarification.
The 4 pins on the hopper that are relevant to the question are:
Pin 1 = Supply (24V DC)
Pin 2 = Ground (0V)
Pin 3 = Motor On+
Pin 4 = Motor On-
Here's the instructions on how to connect the hopper:
Supply Pin 1 with 24V DC and Pin 2 with 0V continuously.
‘Motor On+’ should be held high to a reference voltage of between 5V DC and 12V DC.
If the connection of ‘Motor On+’ to a higher voltage is desired, then use of a series resistor is recommended to limit the current to between 8mA and 23mA.
To drive the hopper the host machine must pull ‘Motor On-‘ down to below 1.0V DC.
This can be achieved by use of a switch, relay or open collector transistor.
So I'm a bit confused here... I understand connecting 24V DC to Pin 1 and connecting Ground to Pin 2.... but I haven't run across this pinout where there are two pins needing specific voltages in this manner. Is this just like the digital high/low pins on Arduino? Would I just connect these to two digital arduino pins and turn them high or low via Arduino? It says to use a "switch, relay or open collector transistor" but I need a bit more detail to figure this out. I don't want to wire things up incorrectly and short something out.
How would I make sure Pin 4 is only getting 1.0V DC or below? I'm a bit new to supplying power to stuff like this so any help would be greatly appreciated.
Weird connection.
Sounds like you can simply connect motor+ to the +5V and motor- to an digital output, then to run the motor set that pin to LOW, to stop it set the pin to HIGH.
But I may be wrong considering how limited info you really provided (no schematics, no link to the data sheet, not even a type number or so).
Hi,
Can you post link to specs/data/supplier of the coin hopper?
Thanks.. Tom.. 
It's an Asahi Seiko SA-595 Compact Hopper

Hi;
Thanks, this makes it a bit easier, lists INPUT/OUTPUT function.
Where did you get this table?
Link to manual please....
Tom..
It's a tech manual. This is all the relevant info it has in there... The rest of the pages are just operating instructions and how to replace the hopper bowl and disc and stuff. Just these two pages to go on.
That info is quite sufficient to figure out connections.
Pin 1, 2: 24V main power supply.
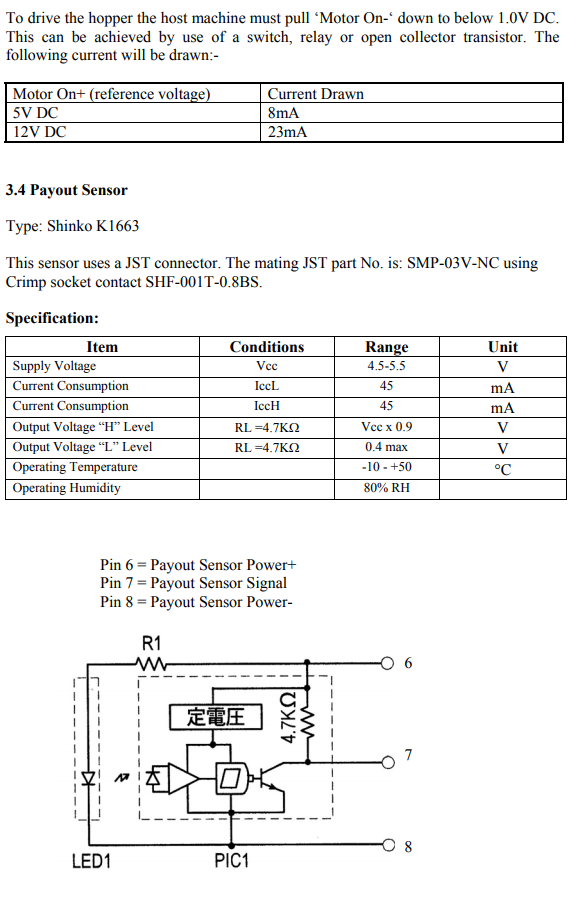
Pin 3, 4: motor control. My interpretation was apparently correct, albeit indeed a rather odd way of control. So it's through an optocoupler on the machine's side. The 8 mA current drawn at 5V is no problem for the Arduino. So pin 3 to Arduino 5V, pin 4 to an output pin (the motor is active LOW).
Pin 5 remains unconnected.
Then the output side:
Pin 6 to Arduino 5V.
Pin 7 to an Arduino input pin. Depending on how long the pulses are, you may need an interrupt to count them. I suppose you get a pulse for each coin dispensed.
Pin 8 to Arduino GND.
The whole assembly will take 53 mA from the Arduino (45 mA for the sensor part; 8 mA for the motor control). That's normally safe, but if you power the Arduino from a 12V source it may cause the regulator to overheat. Better lower the supply voltage in that case.
So if I power the hopper with 24V DC and power the Arduino with 5V DC that should be fine, correct?
Would I need to have them share ground or is that not necessary?
konidias:
So if I power the hopper with 24V DC and power the Arduino with 5V DC that should be fine, correct?
Seems so - based on the data sheet info, which tells you to provide 5V power to the sensor.
Would I need to have them share ground or is that not necessary?
Probably not.
I think, based on the info provided, that the motor (24V) and the sensor are two separate circuits. This as you have to provide full power to the sensor circuit, not just connect the output and GND, and as the motor control is apparently connected through an optocoupler.
Awesome! Thanks everyone for the help. Gonna give it a go tonight.
konidias:
How would I make sure Pin 4 is only getting 1.0V DC or below? I'm a bit new to supplying power to stuff like this so any help would be greatly appreciated.
Connect it to Ground. Ground (0V) is below 1.0V.
They recommend a switch, relay contact, or transistor. To use an NPN transistor: connect Motor- (pin 4) to Collector, Connect Arduino Ground and Emitter to Ground (pin 2), Connect your Arduino digital pin through a resistor (200 to 1000 Ohm) to Base. Setting the digital pin to HIGH will turn on the transistor and pull Motor- to Ground.