Color changing neopixel with button ending with2 white LEDs

Hi everyone,

I haven't coded in years but decided to take on a project for my own interest this weekend.

I have searched the forum but not found exactly my problem. I did use various codes from around the net and merge them to do what I wanted so there might be some unnecessary stuff that I haven't figured out I can remove yet.

The goal is to have an arduino make a 12 pixel neopixel change color every 10 minutes ending in all white pixels. I have been doing this on TinkerCAD. I have the following code (note that I reduced the times while working since I don't actually want to wait 10 minutes between each color change while writing the program) which does what I want, except for some reason the last direction to make the pixels white results in only the first 2 pixels turning white. My workaround has been to add the strip.clear() command to get rid of any other colors. But ideally I'd have 12 white pixels, not just 2.
I know that this is maybe just a TinkerCAD problem and it won't happen when I eventually get my hardware.

Would anyone mind giving a quick check and telling me if I've missed something?
Thanks

`// Simple demonstration on using an input device to trigger changes on your
// NeoPixels. Wire a momentary push button to connect from ground to a
// digital IO pin. When the button is pressed it will change to a new pixel
// animation. Initial state has all pixels off -- press the button once to
// start the first animation. As written, the button does not interrupt an
// animation in-progress, it works only when idle.

#include <Adafruit_NeoPixel.h>
#ifdef __AVR__
 #include <avr/power.h> // Required for 16 MHz Adafruit Trinket
#endif

// Digital IO pin connected to the button. This will be driven with a
// pull-up resistor so the switch pulls the pin to ground momentarily.
// On a high -> low transition the button press logic will execute.
#define BUTTON_PIN   2

#define PIXEL_PIN    6  // Digital IO pin connected to the NeoPixels.

#define PIXEL_COUNT 12  // Number of NeoPixels

// Declare our NeoPixel strip object:
Adafruit_NeoPixel strip(PIXEL_COUNT, PIXEL_PIN, NEO_GRB + NEO_KHZ800);
// Argument 1 = Number of pixels in NeoPixel strip
// Argument 2 = Arduino pin number (most are valid)
// Argument 3 = Pixel type flags, add together as needed:
//   NEO_KHZ800  800 KHz bitstream (most NeoPixel products w/WS2812 LEDs)
//   NEO_KHZ400  400 KHz (classic 'v1' (not v2) FLORA pixels, WS2811 drivers)
//   NEO_GRB     Pixels are wired for GRB bitstream (most NeoPixel products)
//   NEO_RGB     Pixels are wired for RGB bitstream (v1 FLORA pixels, not v2)
//   NEO_RGBW    Pixels are wired for RGBW bitstream (NeoPixel RGBW products)

boolean oldState = HIGH;
int     mode     = 0;    // Currently-active animation mode, 0-9

void setup() {
  pinMode(BUTTON_PIN, INPUT_PULLUP);
  strip.begin(); // Initialize NeoPixel strip object (REQUIRED)
  strip.show();  // Initialize all pixels to 'off'
}

void loop() {
  // Get current button state.
  boolean newState = digitalRead(BUTTON_PIN);

  // Check if state changed from high to low (button press).
  if((newState == LOW) && (oldState == HIGH)) {
    // Short delay to debounce button.
    delay(20);
    // Check if button is still low after debounce.
    newState = digitalRead(BUTTON_PIN);
    if(newState == LOW) {      // Yes, still low
      if(++mode > 1) mode = 0; // Advance to next mode, wrap around after #8
      switch(mode) {           // Start the new animation...
        case 0:
          colorWipe(strip.Color(  0,   0,   0), 50);    // Black/off
        delay(5000)  ;
        break;
        case 1:
        
        colorWipe(strip.Color(255,  0,   0), 0);    // Red
        delay(50)  ;
        colorWipe(strip.Color(255,  40,   0), 0);    // Orange
        delay(50)  ;
        colorWipe(strip.Color(255,  150,   0), 0);    // Yellow
        delay(50)  ;
        colorWipe(strip.Color(0,  255,   0), 0);    // Green
        delay(50)  ;
        colorWipe(strip.Color(0,  0,   255), 0);    // Blue
        delay(50)  ;
        colorWipe(strip.Color(180,  0,   255), 0);    // Purple
        delay(50)  ;
        strip.clear();
        colorWipe(strip.Color(255,  255,   255), 0);    // White
        delay(0)  ;
        break;
         }
    }
  }

  // Set the last-read button state to the old state.
  oldState = newState;
}

// Fill strip pixels one after another with a color. Strip is NOT cleared
// first; anything there will be covered pixel by pixel. Pass in color
// (as a single 'packed' 32-bit value, which you can get by calling
// strip.Color(red, green, blue) as shown in the loop() function above),
// and a delay time (in milliseconds) between pixels.
void colorWipe(uint32_t color, int wait) {
  for(int i=0; i<strip.numPixels(); i++) { // For each pixel in strip...
    strip.setPixelColor(i, color);         //  Set pixel's color (in RAM)
    strip.show();                          //  Update strip to match
    delay(wait);                           //  Pause for a moment
  }
}
Hi again,
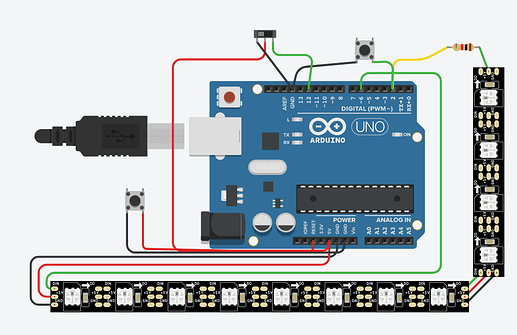
In addition to my post about the 2 white light issue, I'm hoping to add a switch. The coding below is not finished, but I'm hoping someone can tell me if I'm going about this a logical way or if there is a better way.
What I want:
2 position switch:

  • Position 1: no action until a button is pushed, then a preprogrammed light show happens
  • position 2: no action until the same button is pushed and a different preprogrammed light show happens.

so basically, 1 switch and 1 button to control 2 programs.
Does that make sense? Am I going about this a logical way?

If someone can tell me how to add a picture I can post the mock up in TinkerCAD

Thanks for the help

// Simple demonstration on using an input device to trigger changes on your
// NeoPixels. Wire a momentary push button to connect from ground to a
// digital IO pin. When the button is pressed it will change to a new pixel
// animation. Initial state has all pixels off -- press the button once to
// start the first animation. As written, the button does not interrupt an
// animation in-progress, it works only when idle.

#include <Adafruit_NeoPixel.h>
#ifdef __AVR__
 #include <avr/power.h> // Required for 16 MHz Adafruit Trinket
#endif

// Digital IO pin connected to the button. This will be driven with a
// pull-up resistor so the switch pulls the pin to ground momentarily.
// On a high -> low transition the button press logic will execute.
#define BUTTON_PIN   2

#define PIXEL_PIN    6  // Digital IO pin connected to the NeoPixels.

#define PIXEL_COUNT 12  // Number of NeoPixels

#define switchPin 12 //the switch connect to pin 12


// Declare our NeoPixel strip object:
Adafruit_NeoPixel strip(PIXEL_COUNT, PIXEL_PIN, NEO_GRB + NEO_KHZ800);
// Argument 1 = Number of pixels in NeoPixel strip
// Argument 2 = Arduino pin number (most are valid)
// Argument 3 = Pixel type flags, add together as needed:
//   NEO_KHZ800  800 KHz bitstream (most NeoPixel products w/WS2812 LEDs)
//   NEO_KHZ400  400 KHz (classic 'v1' (not v2) FLORA pixels, WS2811 drivers)
//   NEO_GRB     Pixels are wired for GRB bitstream (most NeoPixel products)
//   NEO_RGB     Pixels are wired for RGB bitstream (v1 FLORA pixels, not v2)
//   NEO_RGBW    Pixels are wired for RGBW bitstream (NeoPixel RGBW products)

boolean oldState = HIGH;
int     mode     = 0;    // Currently-active animation mode, 0-9

int
switchState = 0;         // variable for reading the pushbutton status

void setup() {
  pinMode(switchPin, INPUT); //initialize thebuttonPin as input

  pinMode(BUTTON_PIN, OUTPUT); //initialize the led in as output
  
  pinMode(BUTTON_PIN, INPUT_PULLUP);
  strip.begin(); // Initialize NeoPixel strip object (REQUIRED)
  strip.show();  // Initialize all pixels to 'off'
  pinMode(switchPin, INPUT); //initialize thebuttonPin as input

  
}

void loop() 
{
  //read the state of the switch value

  switchState = digitalRead(switchPin);

  if (switchState == HIGH ) //if it is,the state is HIGH
 {

   
digitalWrite(BUTTON_PIN, HIGH); //turn the button on

  }

  else

  {

    digitalWrite(BUTTON_PIN, LOW); //turn the button off

  }

}

  // Get current button state.
  boolean newState = digitalRead(BUTTON_PIN);

// Check if state changed from high to low (button press).
  if((newState == LOW) && (oldState == HIGH)) {
    // Short delay to debounce button.
    delay(20);
    // Check if button is still low after debounce.
    newState = digitalRead(BUTTON_PIN);
    if(newState == LOW) {      // Yes, still low
      if(++mode > 1) mode = 0; // Advance to next mode, wrap around after #8
      switch(mode) {           // Start the new animation...
        case 0:
          colorWipe(strip.Color(  0,   0,   0), 0);    // Black/off
        delay(5000)  ;
        break;
        case 1:
        
        colorWipe(strip.Color(255,  0,   0), 0);    // Red
        delay(50)  ;
        colorWipe(strip.Color(255,  40,   0), 0);    // Orange
        delay(50)  ;
        colorWipe(strip.Color(255,  150,   0), 0);    // Yellow
        delay(50)  ;
        colorWipe(strip.Color(0,  255,   0), 0);    // Green
        delay(50)  ;
        colorWipe(strip.Color(0,  0,   255), 0);    // Blue
        delay(50)  ;
        colorWipe(strip.Color(180,  0,   255), 0);    // Purple
        delay(50)  ;
        strip.clear();
        colorWipe(strip.Color(255,  255,   255), 0);    // White
        delay(0)  ;
        break;
         }
    }
  }

  // Set the last-read button state to the old state.
  oldState = newState;
}

// Fill strip pixels one after another with a color. Strip is NOT cleared
// first; anything there will be covered pixel by pixel. Pass in color
// (as a single 'packed' 32-bit value, which you can get by calling
// strip.Color(red, green, blue) as shown in the loop() function above),
// and a delay time (in milliseconds) between pixels.
void colorWipe(uint32_t color, int wait) {
  for(int i=0; i<strip.numPixels(); i++) { // For each pixel in strip...
    strip.setPixelColor(i, color);         //  Set pixel's color (in RAM)
    strip.show();                          //  Update strip to match
    delay(wait);                           //  Pause for a moment
  }
}
@

Your two topics on the same or similar subject have been merged.

Please do not duplicate your questions as doing so wastes the time and effort of the volunteers trying to help you as they are then answering the same thing in different places.

Repeated duplicate posting could result in a temporary or permanent ban from the forum.

Could you take a few moments to Learn How To Use The Forum

It will help you get the best out of the forum in the future.

Thank you.

1 Like

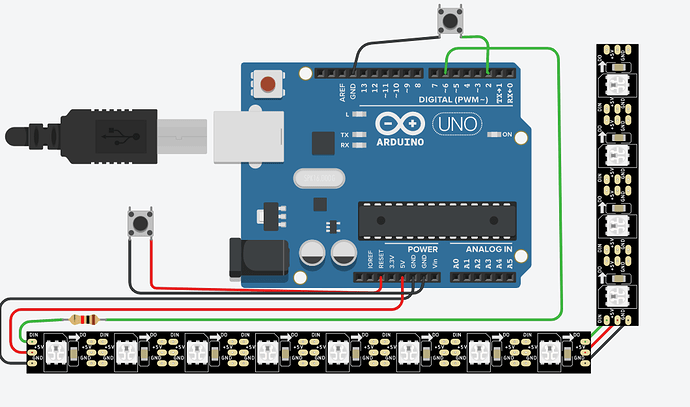
Here is a picture of the mock up

Your slide switch is currently creating a short circuit. <- see what I did there?

… or is it?

What is a resistor doing between DOUT of the strip and pin 2?

Both pushbuttons shoukd be wired between the respective input pin and ground. Both input pins shoukd be INPUT_PULLUP.

Both pushbuttons will read LOW when pressed.

Can't see clearly, but you are using the RESET pin somehow; this is not typically necessary.

A hand drawn schematic would be preferred. Just draw it, snap a celly and post it.

a7

Thank you for your feedback :slight_smile:
I will check the slide switch, I'm not really far enough into that yet to have realized it was wrong. Can you advise where to put it?
The resistor was there in the pre-made schematic so I left it. I can move it to before pixel 1.
The pushbuttons work fine in the simlator (but I understand what you are saying so may need to be switched to LOW in the real thing).
The reset switch is correct. I want to make access to the reset function of the board without having to touch the actual Uno board. Therefore I can wire the reset switch to be attached to whatever I decide to put the circuit in. The way the light show is written currently, I cannot stop it by pushing the button. But if I reset the board it does stop the show and reset everything.

Do you have any advice for the coding to make the slide switch do the 2 different actions? (same button but different light shows).
I suspect I need something like
If switch set right, then pushbutton triggers light show A
If switch set left, then pushbotton triggers light show B
I'm just not sure how to get going on that.

Thank you for your assistance

I'm looking at this again, I'm wondering if the resistor should be on the red wire from 5V?

I can look closer later, on my iPhone now and I'm an older person.

But this is, in a word, lame.

Be sure that in the end you will be able to make the bored do almost anything you want, anything it can do, without resort to the big lever which is reset.

a7

Thank you for your feedback.
Do you have another way to make the show stop? I have been searching forums, tutorials, etc, but none so far have showed me how to make is stop before the end of the program. I agree, big reset = bad, I just haven't found another way yet.
Thanks

hello,
I'm not sure if I should be posting this here or in a new thread. It is the same problem but I am coming at it from a different angle.

here is the code:

// Simple demonstration on using an input device to trigger changes on your
// NeoPixels. Wire a momentary push button to connect from ground to a
// digital IO pin. When the button is pressed it will change to a new pixel
// animation. Initial state has all pixels off -- press the button once to
// start the first animation. As written, the button does not interrupt an
// animation in-progress, it works only when idle.

#include <Adafruit_NeoPixel.h>
#ifdef __AVR__
 #include <avr/power.h> // Required for 16 MHz Adafruit Trinket
#endif

// Digital IO pin connected to the button. This will be driven with a
// pull-up resistor so the switch pulls the pin to ground momentarily.
// On a high -> low transition the button press logic will execute.
#define BUTTON_PIN   2

#define PIXEL_PIN    6  // Digital IO pin connected to the NeoPixels.

#define PIXEL_COUNT 12  // Number of NeoPixels
unsigned long interval = 1000;
unsigned long previousMillis=0;

#define INTERVAL_LENGTH1 5000

unsigned long time_1 = 0;
unsigned long time_2 = time_1;
unsigned long time_3 = time_2;
unsigned long time_4 = time_3;


// Declare our NeoPixel strip object:
Adafruit_NeoPixel strip(PIXEL_COUNT, PIXEL_PIN, NEO_GRB + NEO_KHZ800);
// Argument 1 = Number of pixels in NeoPixel strip
// Argument 2 = Arduino pin number (most are valid)
// Argument 3 = Pixel type flags, add together as needed:
//   NEO_KHZ800  800 KHz bitstream (most NeoPixel products w/WS2812 LEDs)
//   NEO_KHZ400  400 KHz (classic 'v1' (not v2) FLORA pixels, WS2811 drivers)
//   NEO_GRB     Pixels are wired for GRB bitstream (most NeoPixel products)
//   NEO_RGB     Pixels are wired for RGB bitstream (v1 FLORA pixels, not v2)
//   NEO_RGBW    Pixels are wired for RGBW bitstream (NeoPixel RGBW products)

boolean oldState = HIGH;
int     mode     = 0;    // Currently-active animation mode, 0-9

void setup() {
 
  pinMode(BUTTON_PIN, INPUT_PULLUP);
  strip.begin(); // Initialize NeoPixel strip object (REQUIRED)
  strip.show();  // Initialize all pixels to 'off'
}

void loop() {
  unsigned long currentMillis = millis(); //grab current time    
  // Get current button state.
  boolean newState = digitalRead(BUTTON_PIN);
  // Check if state changed from high to low (button press).
  if((newState == LOW) && (oldState == HIGH)) {
    // Short delay to debounce button.
    delay(20);
    // Check if button is still low after debounce.
    newState = digitalRead(BUTTON_PIN);
    if(newState == LOW) {      // Yes, still low
      if(++mode > 2) mode = 0; // Advance to next mode, wrap around after #1
     
      switch(mode) {           // Start the new animation...
        case 0: 
        colorWipe(strip.Color(  0,   0,   0), 0);    // Black/off
        delay(0)  ;
        break;
        case 1:
        
        colorWipe(strip.Color(255,  0,   0), 50);    // Red        


        // check if 'interval' time has passed (1000 milliseconds)
        if ((unsigned long(currentMillis - previousMillis) >= interval)  { // we've waited "interval" lamount of time, so lets do something       
          colorWipe(strip.Color(255,  40,   0), 50); // Orange across all pixels
          // save the "current" time
          previousMillis = currentMillis();
        }
            else {
            }
        break;
        case 2:
        strip.clear();
        colorWipe(strip.Color(255,  255,   0), 0);    // Yellow
        delay(0)  ;
        break;
         }
    }
  }

  // Set the last-read button state to the old state.
  oldState = newState;
}

// Fill strip pixels one after another with a color. Strip is NOT cleared
// first; anything there will be covered pixel by pixel. Pass in color
// (as a single 'packed' 32-bit value, which you can get by calling
// strip.Color(red, green, blue) as shown in the loop() function above),
// and a delay time (in milliseconds) between pixels.
void colorWipe(uint32_t color, int wait) {
  for(int i=0; i<strip.numPixels(); i++) { // For each pixel in strip...
    strip.setPixelColor(i, color);         //  Set pixel's color (in RAM)
    strip.show();                          //  Update strip to match
    delay(wait);                           //  Pause for a moment
  }
}

And here is the error:


 In function 'void loop()':
78:14: error: expected primary-expression before 'unsigned'
78:14: error: expected ')' before 'unsigned'
85:9: error: expected primary-expression before 'break'
85:9: error: expected ')' before 'break'


 exit status 1

My goal for this code is to have the button pressed once for light show A, then pushed again for light show B, then again for light show C... etc... without having to wait for each light show to end before being able to push the button.

I want the light shows to be a series of colors that each last for 10 mins before transitioning to the next color. I was able to get it done using the delay command, but then everything is stuck until those delays finish (which at 10 mins x 5 colors will take too long).

Alternatively I could do multiple buttons but I'd still want to be able to shut off the light show before it ends.

Any suggestions? I appreciate any help.

Thanks

You have never seen this anywhere…

if ((unsigned long(currentMillis - previousMillis) >= interval) 

not in a working program.

There may be others. It should read

if (currentMillis - previousMillis >= interval) 

Variables need one declaration, which you have near the top of you loop().

BTW continuing here is fine, preferred actually.

L8R: one other syntax error

    previousMillis = currentMillis();

currentMillis is a variable, you've used it like a function. Food for your thinking. Should be

    previousMillis = currentMillis;

With just those changes, the code now does something, no time just now to see if it what you describe above, so:

a7

1 Like

*EDIT - fixed board

Thank you very much!
I have made those changes. I am still getting an error with the colorWipe part. my code now:

// Simple demonstration on using an input device to trigger changes on your
// NeoPixels. Wire a momentary push button to connect from ground to a
// digital IO pin. When the button is pressed it will change to a new pixel
// animation. Initial state has all pixels off -- press the button once to
// start the first animation. As written, the button does not interrupt an
// animation in-progress, it works only when idle.

#include <Adafruit_NeoPixel.h>
#ifdef __AVR__
#include <avr/power.h> // Required for 16 MHz Adafruit Trinket
#endif

// Digital IO pin connected to the button. This will be driven with a
// pull-up resistor so the switch pulls the pin to ground momentarily.
// On a high -> low transition the button press logic will execute.
#define BUTTON_PIN   2

#define PIXEL_PIN    6  // Digital IO pin connected to the NeoPixels.

#define PIXEL_COUNT 12  // Number of NeoPixels
unsigned long interval1 = 1000;
unsigned long interval2 = 10000;
unsigned long previousMillis = 0;

#define INTERVAL_LENGTH1 5000

unsigned long time_1 = 0;
unsigned long time_2 = time_1;
unsigned long time_3 = time_2;
unsigned long time_4 = time_3;


// Declare our NeoPixel strip object:
Adafruit_NeoPixel strip(PIXEL_COUNT, PIXEL_PIN, NEO_GRB + NEO_KHZ800);
// Argument 1 = Number of pixels in NeoPixel strip
// Argument 2 = Arduino pin number (most are valid)
// Argument 3 = Pixel type flags, add together as needed:
//   NEO_KHZ800  800 KHz bitstream (most NeoPixel products w/WS2812 LEDs)
//   NEO_KHZ400  400 KHz (classic 'v1' (not v2) FLORA pixels, WS2811 drivers)
//   NEO_GRB     Pixels are wired for GRB bitstream (most NeoPixel products)
//   NEO_RGB     Pixels are wired for RGB bitstream (v1 FLORA pixels, not v2)
//   NEO_RGBW    Pixels are wired for RGBW bitstream (NeoPixel RGBW products)

boolean oldState = HIGH;
int     mode     = 0;    // Currently-active animation mode, 0-9

void setup() {

  pinMode(BUTTON_PIN, INPUT_PULLUP);
  strip.begin(); // Initialize NeoPixel strip object (REQUIRED)
  strip.show();  // Initialize all pixels to 'off'
}

void loop() {
  unsigned long currentMillis = millis(); //grab current time
  // Get current button state.
  boolean newState = digitalRead(BUTTON_PIN);
  // Check if state changed from high to low (button press).
  if ((newState == LOW) && (oldState == HIGH)) {
    // Short delay to debounce button.
    delay(20);
    // Check if button is still low after debounce.
    newState = digitalRead(BUTTON_PIN);
    if (newState == LOW) {     // Yes, still low
      if (++mode > 2) mode = 0; // Advance to next mode, wrap around after #1

      switch (mode) {          // Start the new animation...
        case 0:
          colorWipe(strip.Color(  0,   0,   0), 0);    // Black/off
          delay(0)  ;
          break;
        case 1:
          colorWipe(strip.Color(255,  0,   0), 50);    // Red

          // check if 'interval' time has passed (1000 milliseconds)
          if (currentMillis - previousMillis >= interval1)
            // we've waited "interval1" lamount of time, so lets do something
            colorWipe(strip.Color(255,  40,   0), 50); // Orange across all pixels
          // save the "current" time
          previousMillis = currentMillis;

          // check if 'interval1' time has passed (1000 milliseconds)
          if (currentMillis - previousMillis > + interval1)
            colorWipe(strip.Color(255, 150, 0), 50); //Yellow across all pixels
          // save the "current time"
          previousMillis = currentMillis;

          // check if 'interval1' time has passed (1000 milliseconds)
          if (currentMillis - previousMillis > + interval1)
            colorWipe(strip.Color(0, 255, 0), 50); //Green across all pixels
          // save the "current time"
          previousMillis = currentMillis;
      }
      else {
      }
      break;
    case 2:
      colorWipe(strip.Color(180,  0,   255), 50);    // Purple

      // check if 'interval2' time has passed (10000 milliseconds)
      if (currentMillis - previousMillis >= interval2)
        // we've waited "interval" lamount of time, so lets do something
        colorWipe(strip.Color(255,  40,   0), 50); // Orange across all pixels
      // save the "current" time
      previousMillis = currentMillis;

      // check if 'interval2' time has passed (10000 milliseconds)
      if (currentMillis - previousMillis > + interval2)
        colorWipe(strip.Color(255, 150, 0), 50); //Yellow across all pixels
      // save the "current time"
      previousMillis = currentMillis;

      // check if 'interval2' time has passed (10000 milliseconds)
      if (currentMillis - previousMillis > + interval2)
        colorWipe(strip.Color(0, 255, 0), 50); //Green across all pixels
      // save the "current time"
      previousMillis = currentMillis;
    }
    else {
    }
    break;
  }
}


// Set the last-read button state to the old state.
oldState = newState;
}

// Fill strip pixels one after another with a color. Strip is NOT cleared
// first; anything there will be covered pixel by pixel. Pass in color
// (as a single 'packed' 32-bit value, which you can get by calling
// strip.Color(red, green, blue) as shown in the loop() function above),
// and a delay time (in milliseconds) between pixels.
void colorWipe(uint32_t color, int wait) {
  for (int i = 0; i < strip.numPixels(); i++) { // For each pixel in strip...
    strip.setPixelColor(i, color);         //  Set pixel's color (in RAM)
    strip.show();                          //  Update strip to match

  }
}


the error:

Arduino: 1.8.19 (Windows 10), Board: "Arduino Uno"

C:\Users\lisac\Documents\Arduino\try_4_millis_delay\try_4_millis_delay.ino: In function 'void loop()':

try_4_millis_delay:70:11: error: 'colorWipe' was not declared in this scope

           colorWipe(strip.Color(  0,   0,   0), 0);    // Black/off

           ^~~~~~~~~

try_4_millis_delay:95:7: error: expected '}' before 'else'

       else {

       ^~~~

try_4_millis_delay:97:7: error: break statement not within loop or switch

       break;

       ^~~~~

try_4_millis_delay:98:5: error: case label '2' not within a switch statement

     case 2:

     ^~~~

try_4_millis_delay:99:7: error: 'colorWipe' was not declared in this scope

       colorWipe(strip.Color(180,  0,   255), 50);    // Purple

       ^~~~~~~~~

try_4_millis_delay:122:5: error: break statement not within loop or switch

     break;

     ^~~~~

C:\Users\lisac\Documents\Arduino\try_4_millis_delay\try_4_millis_delay.ino: At global scope:

try_4_millis_delay:124:1: error: expected declaration before '}' token

 }

 ^

exit status 1

'colorWipe' was not declared in this scope


This report would have more information with
"Show verbose output during compilation"
option enabled in File -> Preferences.


Do you have any advice for those errors?
Thank you in advance. I really appreciate your assistance.

Hi again,
Thank you for your help and patience!
I was able to figure out the error codes, but the code is not doing what I want. It does not show the light shows, just goes black or purple. I'm sure i'm misuderstanding some of the code.
Any advice is greatly appreciated.

// Simple demonstration on using an input device to trigger changes on your
// NeoPixels. Wire a momentary push button to connect from ground to a
// digital IO pin. When the button is pressed it will change to a new pixel
// animation. Initial state has all pixels off -- press the button once to
// start the first animation. As written, the button does not interrupt an
// animation in-progress, it works only when idle.

#include <Adafruit_NeoPixel.h>
#ifdef __AVR__
#include <avr/power.h> // Required for 16 MHz Adafruit Trinket
#endif

// Digital IO pin connected to the button. This will be driven with a
// pull-up resistor so the switch pulls the pin to ground momentarily.
// On a high -> low transition the button press logic will execute.
#define BUTTON_PIN   2

#define PIXEL_PIN    6  // Digital IO pin connected to the NeoPixels.

#define PIXEL_COUNT 12  // Number of NeoPixels
unsigned long interval1 = 1000;
unsigned long interval2 = 10000;
unsigned long previousMillis = 0;

#define INTERVAL_LENGTH1 5000

unsigned long time_1 = 0;
unsigned long time_2 = time_1;
unsigned long time_3 = time_2;
unsigned long time_4 = time_3;


// Declare our NeoPixel strip object:
Adafruit_NeoPixel strip(PIXEL_COUNT, PIXEL_PIN, NEO_GRB + NEO_KHZ800);
// Argument 1 = Number of pixels in NeoPixel strip
// Argument 2 = Arduino pin number (most are valid)
// Argument 3 = Pixel type flags, add together as needed:
//   NEO_KHZ800  800 KHz bitstream (most NeoPixel products w/WS2812 LEDs)
//   NEO_KHZ400  400 KHz (classic 'v1' (not v2) FLORA pixels, WS2811 drivers)
//   NEO_GRB     Pixels are wired for GRB bitstream (most NeoPixel products)
//   NEO_RGB     Pixels are wired for RGB bitstream (v1 FLORA pixels, not v2)
//   NEO_RGBW    Pixels are wired for RGBW bitstream (NeoPixel RGBW products)

boolean oldState = HIGH;
int     mode     = 0;    // Currently-active animation mode, 0-9

void setup() {

  pinMode(BUTTON_PIN, INPUT_PULLUP);
  strip.begin(); // Initialize NeoPixel strip object (REQUIRED)
  strip.show();  // Initialize all pixels to 'off'
}

void loop() {
  unsigned long currentMillis = millis(); //grab current time
  // Get current button state.
  boolean newState = digitalRead(BUTTON_PIN);
  // Check if state changed from high to low (button press).
  if ((newState == LOW) && (oldState == HIGH)) {
    // Short delay to debounce button.
    delay(20);
    // Check if button is still low after debounce.
    newState = digitalRead(BUTTON_PIN);
    if (newState == LOW) {     // Yes, still low
      if (++mode > 2) mode = 0; // Advance to next mode, wrap around after #1

      switch (mode) {          // Start the new animation...
        case 0:
          colorWipe(strip.Color(  0,   0,   0), 0);    // Black/off
          delay(0)  ;
          break;
        case 1:
          colorWipe(strip.Color(255,  0,   0), 50);    // Red

          // check if 'interval' time has passed (1000 milliseconds)
          if (currentMillis - previousMillis >= interval1)
            // we've waited "interval1" lamount of time, so lets do something
            colorWipe(strip.Color(255,  40,   0), 50); // Orange across all pixels
          // save the "current" time
          previousMillis = currentMillis;

          // check if 'interval1' time has passed (1000 milliseconds)
          if (currentMillis - previousMillis > + interval1)
            colorWipe(strip.Color(255, 150, 0), 50); //Yellow across all pixels
          // save the "current time"
          previousMillis = currentMillis;

          // check if 'interval1' time has passed (1000 milliseconds)
          if (currentMillis - previousMillis > + interval1)
            colorWipe(strip.Color(0, 255, 0), 50); //Green across all pixels
          // save the "current time"
          previousMillis = currentMillis;

        case 2:
          colorWipe(strip.Color(180,  0,   255), 50);    // Purple

          // check if 'interval2' time has passed (10000 milliseconds)
          if (currentMillis - previousMillis >= interval2)
            // we've waited "interval" lamount of time, so lets do something
            colorWipe(strip.Color(255,  40,   0), 50); // Orange across all pixels
          // save the "current" time
          previousMillis = currentMillis;

          // check if 'interval2' time has passed (10000 milliseconds)
          if (currentMillis - previousMillis > + interval2)
            colorWipe(strip.Color(255, 150, 0), 50); //Yellow across all pixels
          // save the "current time"
          previousMillis = currentMillis;

          // check if 'interval2' time has passed (10000 milliseconds)
          if (currentMillis - previousMillis > + interval2)
            colorWipe(strip.Color(0, 255, 0), 50); //Green across all pixels
          // save the "current time"
          previousMillis = currentMillis;
      }

    }
  }


  // Set the last-read button state to the old state.
  oldState = newState;
}

// Fill strip pixels one after another with a color. Strip is NOT cleared
// first; anything there will be covered pixel by pixel. Pass in color
// (as a single 'packed' 32-bit value, which you can get by calling
// strip.Color(red, green, blue) as shown in the loop() function above),
// and a delay time (in milliseconds) between pixels.
void colorWipe(uint32_t color, int wait) {
  for (int i = 0; i < strip.numPixels(); i++) { // For each pixel in strip...
    strip.setPixelColor(i, color);         //  Set pixel's color (in RAM)
    strip.show();                          //  Update strip to match

  }
}

You need to add

    Serial.begin(9600);  // or whatever baud rate you like

to the setup() function. It may have worked without for you, not for me.

Now the funny thing about code is that it usually does exactly what you write, not what you may have necessarily meant.

Both your current version and the previous do exactly what you wrote.

Pushbutton steps amongst three cases. Each case does something to completion. During that time, the button is ignored.

If a case quickly does something, you get to move on to the next with the button.

If a case slowly does something, you get to (must!) wait before you can move on to the next with the button.

And should a case be written to do something forever, well that's what will happen. Your button will never be looked at again and that process will run until doomsday.

At this point you should:

Figure out and code and test the individual cases as small standalone programs.

Then re-write them as individuals using non-blocking coding techniques to allow for checking the button even as the process in what will become a case is playing out.

There are several many ways to do this, and a virtual crap-ton of tutorials, examples and other expositions of these ways. I will go first and steer you to

arduino finite state machine


and

 arduino two things at once


and

 arduino blink without delay

as fruit for your friend google. Your sketch at this point is already using millis() and the ideas informing "blink without delay".

It is a hard jump to help people with - it's just one of those many things that is really hard until a light-bulb moment, after which I can practically guarantee it will be easy, and perhaps so easy as to make you ask yourself what was so hard about it.

With these small machines, the code is the code, and you can always figure out what is happening by placing your finger on the program text and single-stepping yourself through it "playing computer". Prosaic and boring but true. Do not galze your eyes and assume you "know"what a few lines of code are doing. Trace it step by step and stop if a step is not clear, switch to learning mode, cinsult your favorite resources, google, ask here until the intent and function of every single line is clear.

There is no instant gratification in this hobby - there can be brief massive progress, but if is uninformed it will land you up headed towards a wall at 80 kph.

a7

This topic was automatically closed 180 days after the last reply. New replies are no longer allowed.