Hey all,
I am trying to control my 3 terraria with an Arduino Nano and the use of 6 DHT22 (2 for each terrarium) , 7 relais (for heating, light and the waterpumps), a DS3231 RTC, some LEDs and switches for the water level.
Where is the problem? My code does not do what I want it to do ![]() . My Arduino is a little short on inputs/outputs. So I have to use Pin 0/1 for some funktions.
. My Arduino is a little short on inputs/outputs. So I have to use Pin 0/1 for some funktions.
I implemented the necessary libraries and made a (you might laugh at me) noob-like code to run. I already used a similar code for my other two terraria and it runs for years now. It is way simpler though, only for controlling the humidity with DHT22, a DS3231 and a Display to show it all.
I cannot, for the love of God, figure out what I made wrong with my code (other than looking funny to all of you I guess). Is it because of the pins 0/1 I used? They should be ok to use since I don't use a Serial connection.
What I did so far:
I reduced the code to it's minimum(from top to bottom). And it works as far as showing all the temperatures and humidities on the display, also the time and light-level of the lightsensor. The LEDs for my water-tank work fine (of course the two switches work fine, too).
I added more and more code but when I get to the part with the if-statements it gets funny. I tried simplifying the if-statements as to only look for the time and then switch the relais on. It does it but only for a fraction of a second. Same with the light.
I tried using a different DS3231 library but I had no luck with it either. (although updating my current library made my code run less 'funny')
At first I tried switching all the relais on the way they are wired and it worked.
As a last resort I tried replacing all the temperature floats with integers. Didn't work either.
I checked all the wiring, looked for shorts. The wiring is good. My guess is that it has something to do with my code and/or the libraries.
My code: (sorry for all the german comments ![]() )
)
// Date and time functions using a DS3231 RTC connected via I2C and Wire lib
#include <Wire.h>
#include "RTClib.h"
#include <LiquidCrystal_I2C.h>
#include <DHT.h>
LiquidCrystal_I2C lcd(0x27, 20, 4); // Set the LCD I2C address
RTC_DS3231 rtc;
#define DHT1_Pin 2 // Datenpin des DHT22(1) ist Pin 2
#define DHT2_Pin 3 // Datenpin des DHT22(2) ist Pin 3
#define DHT3_Pin 4 // Datenpin des DHT22(3) ist Pin 4
#define DHT4_Pin 5 // Datenpin des DHT22(4) ist Pin 5
#define DHT5_Pin 6 // Datenpin des DHT22(5) ist Pin 6
#define DHT6_Pin 7 // Datenpin des DHT22(6) ist Pin 7
#define DHT_Typ DHT22 // DHT 22 als Sensortyp festlegen
DHT dht1(DHT1_Pin, DHT_Typ); // Sensor 1 initialisieren
DHT dht2(DHT2_Pin, DHT_Typ); // Sensor 2 initialisieren
DHT dht3(DHT3_Pin, DHT_Typ); // Sensor 3 initialisieren
DHT dht4(DHT4_Pin, DHT_Typ); // Sensor 4 initialisieren
DHT dht5(DHT5_Pin, DHT_Typ); // Sensor 5 initialisieren
DHT dht6(DHT6_Pin, DHT_Typ); // Sensor 6 initialisieren
// Merker
unsigned long mil1;
unsigned int STD;
unsigned int MIN;
int Fuellstandswert;
int Fuellstandswert1;
int Intervallmerker;
// Sensoren
int Sensor = A7; //Umgebungslichtsensor
int Fuellstand_low = 14;
int Fuellstand_empty = 15;
// Relais
int Sprueh1 = 8;
int Sprueh2 = 10;
int Heizung1 = 13;
int Heizung2 = 16;
int Heizung3 = 17;
int Beleuchtung_Tag = 1;
int Beleuchtung_Abend = 0;
// Sonstige Outputs
int LED_low = 11;
int LED_empty = 12;
int Display_Licht = 9; // PIN9 ist belegt von der DisplayLED
void setup() {
dht1.begin(); // Sensor 1 starten
dht2.begin(); // Sensor 2 starten
dht3.begin(); // Sensor 3 starten
dht4.begin(); // Sensor 4 starten
dht5.begin(); // Sensor 5 starten
dht6.begin(); // Sensor 6 starten
lcd.begin();
pinMode(Fuellstand_low, INPUT);
pinMode(Fuellstand_empty, INPUT);
pinMode(Sensor, INPUT);
pinMode(Sprueh1, OUTPUT);
pinMode(Sprueh2, OUTPUT);
pinMode(Heizung1, OUTPUT);
pinMode(Heizung2, OUTPUT);
pinMode(Heizung3, OUTPUT);
pinMode(Beleuchtung_Tag, OUTPUT);
pinMode(Beleuchtung_Abend, OUTPUT);
pinMode(Display_Licht, OUTPUT);
pinMode(LED_low, OUTPUT);
pinMode(LED_empty, OUTPUT);
digitalWrite(Sprueh1, HIGH);
digitalWrite(Sprueh2, HIGH);
digitalWrite(Heizung1, HIGH);
digitalWrite(Heizung2, HIGH);
digitalWrite(Heizung3, HIGH);
digitalWrite(Beleuchtung_Tag, HIGH);
digitalWrite(Beleuchtung_Abend, HIGH);
DateTime now = rtc.now();
}
void loop() {
DateTime now = rtc.now();
STD = now.hour();
MIN = now.minute();
float h1 = dht1.readHumidity(); // Auslesen der Luftfeuchtigkeit (Sensor 1)
float t1 = dht1.readTemperature(); // Auslesen der Temperatur (Sensor 1)
float h2 = dht2.readHumidity(); // Auslesen der Luftfeuchtigkeit (Sensor 2)
float t2 = dht2.readTemperature(); // Auslesen der Temperatur (Sensor 2)
float h3 = dht3.readHumidity(); // Auslesen der Luftfeuchtigkeit (Sensor 3)
float t3 = dht3.readTemperature(); // Auslesen der Temperatur (Sensor 3)
float h4 = dht4.readHumidity(); // Auslesen der Luftfeuchtigkeit (Sensor 4)
float t4 = dht4.readTemperature(); // Auslesen der Temperatur (Sensor 4)
float h5 = dht5.readHumidity(); // Auslesen der Luftfeuchtigkeit (Sensor 5)
float t5 = dht5.readTemperature(); // Auslesen der Temperatur (Sensor 5)
float h6 = dht6.readHumidity(); // Auslesen der Luftfeuchtigkeit (Sensor 6)
float t6 = dht6.readTemperature(); // Auslesen der Temperatur (Sensor 6)
Sensor = analogRead(A7); // Lichtsensor für Displaybeleuchtung
Fuellstandswert = digitalRead(Fuellstand_empty); // Merker für Füllstand der Sprühanage
Fuellstandswert1 = digitalRead(Fuellstand_low);
// Beleuchtungsregelung fürs Display
Sensor = map(Sensor, 0, 600, 10, 255);
analogWrite(9, Sensor);
// Platzhalter für Lichtlevelanzeige im Display
if (Sensor <=99) {
lcd.setCursor(17,3);
lcd.print(" ");
lcd.setCursor(18,3);
lcd.print(Sensor);
}
else {
lcd.setCursor(17,3);
lcd.print(Sensor);
}
// Platzhalterstriche
lcd.setCursor(17, 2);
lcd.print("---");
// Anzeige der Temperatur und Luftfeuchtigkeit
// Sensor1
lcd.setCursor(0, 0); // 1. Zeichen, 1. Zeile
lcd.print(t1); // Temperaturwert anzeigen
lcd.setCursor(4, 0);
lcd.print(" "); // Leerzeichen, damit die letzte 0 im Wert verschwindet
lcd.setCursor(0, 1); // 1. Zeichen, 2. Zeile
lcd.print(h1); // Feuchtigkeitswert anzeigen
lcd.setCursor(4, 1);
lcd.print(" "); // Leerzeichen, damit die letzte 0 im Wert verschwindet
// Sensor2
lcd.setCursor(0, 2); // 7. Zeichen, 1. Zeile
lcd.print(t2); // Temperaturwert anzeigen
lcd.setCursor(4, 2);
lcd.print(" "); // Leerzeichen, damit die letzte 0 im Wert verschwindet
lcd.setCursor(0, 3); // 7. Zeichen, 2. Zeile
lcd.print(h2); // Feuchtigkeitswert anzeigen
lcd.setCursor(4, 3);
lcd.print(" "); // Leerzeichen, damit die letzte 0 im Wert verschwindet
//Sensor3
lcd.setCursor(6, 0); // 7. Zeichen, 1. Zeile
lcd.print(t3); // Temperaturwert anzeigen
lcd.setCursor(10, 0);
lcd.print(" "); // Leerzeichen, damit die letzte 0 im Wert verschwindet
lcd.setCursor(6, 1); // 7. Zeichen, 2. Zeile
lcd.print(h3); // Feuchtigkeitswert anzeigen
lcd.setCursor(10, 1);
lcd.print(" "); // Leerzeichen, damit die letzte 0 im Wert verschwindet
//Sensor4
lcd.setCursor(6, 2); // 7. Zeichen, 1. Zeile
lcd.print(t4); // Temperaturwert anzeigen
lcd.setCursor(10, 2);
lcd.print(" "); // Leerzeichen, damit die letzte 0 im Wert verschwindet
lcd.setCursor(6, 3); // 7. Zeichen, 2. Zeile
lcd.print(h4); // Feuchtigkeitswert anzeigen
lcd.setCursor(10, 3);
lcd.print(" "); // Leerzeichen, damit die letzte 0 im Wert verschwindet
//Sensor5
lcd.setCursor(12, 0); // 7. Zeichen, 1. Zeile
lcd.print(t5); // Temperaturwert anzeigen
lcd.setCursor(16, 0);
lcd.print(" "); // Leerzeichen, damit die letzte 0 im Wert verschwindet
lcd.setCursor(12, 1); // 7. Zeichen, 2. Zeile
lcd.print(h5); // Feuchtigkeitswert anzeigen
lcd.setCursor(16, 1);
lcd.print(" "); // Leerzeichen, damit die letzte 0 im Wert verschwindet
//Sensor6
lcd.setCursor(12, 2); // 7. Zeichen, 1. Zeile
lcd.print(t6); // Temperaturwert anzeigen
lcd.setCursor(16, 2);
lcd.print(" "); // Leerzeichen, damit die letzte 0 im Wert verschwindet
lcd.setCursor(12, 3); // 7. Zeichen, 2. Zeile
lcd.print(h6); // Feuchtigkeitswert anzeigen
lcd.setCursor(16, 3);
lcd.print(" "); // Leerzeichen, damit die letzte 0 im Wert verschwindet
// Aktuelle Uhrzeit im Display anzeigen
if (STD <= 9) // Uhrzeit verschieben (STD)
{
lcd.setCursor(18, 0);
lcd.print("0");
lcd.setCursor(19, 0);
lcd.print(now.hour(), DEC);
}
else
{
lcd.setCursor(18, 0);
lcd.print(now.hour(), DEC);
}
if (MIN <= 9) // Uhrzeit verschieben (MIN)
{
lcd.setCursor(18, 1); // Zeichen, Spalte
lcd.print("0");
lcd.setCursor(19, 1);
lcd.print(now.minute(), DEC);
}
else
{
lcd.setCursor(18, 1);
lcd.print(now.minute(), DEC);
}
// Anzeige-LEDs für geringen Füllstand
if (Fuellstandswert == LOW) {
digitalWrite(LED_empty, HIGH);
}
else {
digitalWrite(LED_empty, LOW);
}
if (Fuellstandswert1 == LOW) {
digitalWrite(LED_low, HIGH);
}
else {
digitalWrite(LED_low, LOW);
}
// Sprühintervall in Abhängigkeit von Uhrzeit und Füllstand
if ((STD >= 8) && (STD <= 17) && (Fuellstandswert == HIGH)) { // Uhrzeit zwischen 8:00 und 17:59 Uhr
if ((millis() - mil1) >= 900000) { // if: viertel Stunde abgelaufen
digitalWrite(Sprueh2, LOW); // Sprühen
delay(2000);
digitalWrite(Sprueh2, HIGH); // Sprühen beenden
delay(500);
mil1 = millis(); // Zeitstempel nullen
delay(500);
if (Intervallmerker == 1) {
digitalWrite(Sprueh1, LOW); // Sprühen
delay(2000);
digitalWrite(Sprueh1, HIGH); // Sprühen beenden
delay(500);
Intervallmerker = 0;
}
else {
Intervallmerker = 1;
}
}
}
// Letztes Sprühen um 18 Uhr
if ((STD == 18) && (MIN == 0) && (Fuellstandswert == HIGH)) {
digitalWrite(Sprueh2, LOW); // Sprühen
delay(3000);
digitalWrite(Sprueh2, HIGH); // Sprühen beenden
delay(500);
digitalWrite(Sprueh1, LOW); // Sprühen
delay(3000);
digitalWrite(Sprueh1, HIGH); // Sprühen beenden
delay(60000);
mil1 = millis(); // Zeitstempel nullen
}
// Beleuchtung des Terrariums
if ((STD >= 8) && (STD <= 17)) {
digitalWrite(Beleuchtung_Tag, LOW);
}
else {
digitalWrite(Beleuchtung_Tag, HIGH);
}
if ((STD >= 18) && (STD <= 19)) {
digitalWrite(Beleuchtung_Abend, LOW);
}
else {
digitalWrite(Beleuchtung_Abend, HIGH);
}
// Heizung im Terrarium
// Tagsüber
if ((STD >= 8) && (STD <= 17) && (t1 <= 27)) { // Entweder t1 oder t2 für Kornnattern
digitalWrite(Heizung1, LOW);
}
else {
digitalWrite(Heizung1, HIGH);
}
if ((STD >= 8) && (STD <= 17) && (t3 <= 30)) { // Entweder t3 oder t4 für Königspython 1 (unten)
digitalWrite(Heizung2, LOW);
}
else {
digitalWrite(Heizung2, HIGH);
}
if ((STD >= 8) && (STD <= 17) && (t5 <= 30)) { // Entweder t5 oder t6 für Königspython 2 (oben)
digitalWrite(Heizung3, LOW);
}
else {
digitalWrite(Heizung3, HIGH);
}
// Nachtabsenkung (Kornnattern ganz aus)
if ((STD >= 18) && (t3 <= 26)) { // für Königspython 1 (unten)
digitalWrite(Heizung2, LOW);
}
else {
digitalWrite(Heizung2, HIGH);
}
if ((STD >= 18) && (t5 <= 26)) { // für Königspython 2 (oben)
digitalWrite(Heizung3, LOW);
}
else {
digitalWrite(Heizung3, HIGH);
}
if ((STD <= 7) && (t3 <= 26)) { // für Königspython 1 (unten)
digitalWrite(Heizung2, LOW);
}
else {
digitalWrite(Heizung2, HIGH);
}
if ((STD <= 7) && (t5 <= 26)) { // für Königspython 2 (oben)
digitalWrite(Heizung3, LOW);
}
else {
digitalWrite(Heizung3, HIGH);
}
delay(2500);
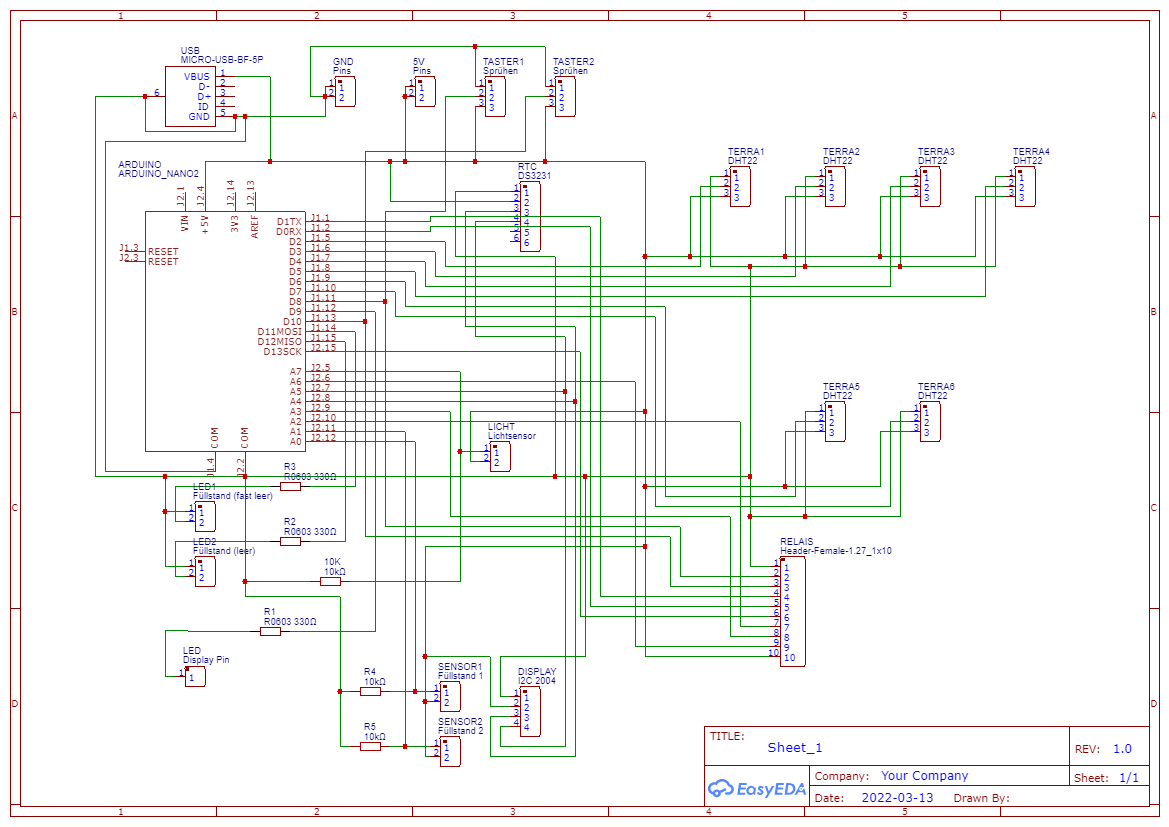
}Also a picture of my 'wiring', well, at least how I planned it.

I hope you can help me.
Sorry for my bad english...