Hello, ive recently tried to program a esp 01 8266 module using one of these
but apparently it doesnt work. All components are brand new.
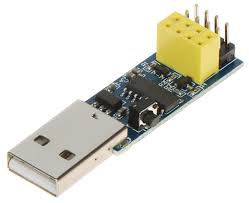
Hello, ive recently tried to program a esp 01 8266 module using one of these
What problem did you face in specific? Is your board not being detected?
That video is about using the cloud, here is one on the FTDI https://youtu.be/t_BQAqgQoDk?si=WgdtU_HvYNWt50vv
You have the one with the push button so you don't need to connect any wires or do any soldering.
Just plug the ESP01 into the yellow connector and connect the USB
Sorry for not answering yall but the image is not the one i have. I have the black board without the button so i had to solder some wires. Watched a couple of videos and by soldering a button between Gpio0 and griund a had a partial success where the programm i think was uploaded but dudnt seem to work. I only used the blink example and then a serial example and i got some exclamation marks at the monitor. I think i shouldnt use generic esp 8266.
What did you set as the LED pin ? It should be GPIO 1(tx) that has an "active LOW" blue led connected to it.
The ESP always puts out a boot message at 74880bps, which will show something or other at different baud rates.
GPIO 0 needs to be connected to GND at Boot (power up) for it to go into upload mode.
You most definitely should ! you can set the flash size to 1MB (unless you have an extremely rare these days ESP-01 with a blue PCB, in that case it's 512KB) but leaving it on the default settings is also OK.
Still working on that i am afraid. Lack of priority, but who knows i may find some time soon.
so it worked at 9600 baud rate it printed hello world but it also blinked once a second for no reason my code is this : void setup() {
// put your setup code here, to run once:
Serial.begin(9600);
}
void loop() {
// put your main code here, to run repeatedly:
Serial.println("Hello World!");
delay(1000);
}
is this normal behavior ?
Yes it is.
You see when you print to Serial. The TX pin goes from HIGH to LOW (and back) The TX pin is also the pin where the Blue LED is connected to (GPIO 1) It is the same Physical pin. It is connected like
Vcc -> Resistor -> Blue Led -> GPIO 1 (TX). So every time That Pin goes LOW The LED lights up.
You can not use The LED if you are using Serial(Tx) at the same time.
If you want to use Serial and an LED at the same time you should connect it to a different pin. GPIO 0 & GPIO 2 are available, but with both of those pins (as with GPIO 1 btw) you will have to connect the LED 'active LOW' just like the blue LED, or the ESP will go into an alternate boot-mode.
So anyway it worked ! that great !!
yeah thats great, and time has passed since my tryout. Now i try to make it work with wifi functions. Specifically i tried using arduino cloud but it didnt successfully work. Used this https://www.youtube.com/watch?v=lGsFOYyZ0Dc&t=198s video as a base for blinking a LED using buttons on the cloud interface but it didnt work at all. I think it didnt even connect to my network. Can you post some test code for me to try because i am kinda lost?
Ok so i never use the CloudIOT thing but here is a simple webserver that controls a LED that is connected to GPIO 2.
Make sure you connect the LED to be active LOW.
3.3v -> LED -> 1K -> GPIO 2 or the ESP will not start up in the right boot mode if GPIO 2 is connected to GND.
#include <ESP8266WiFi.h>
#include <ESP8266WebServer.h>
#include <ESP8266mDNS.h>

const char *ssid = "XXX";
const char *password = "xxxxxxxx";  // set your LANcredentials here
const char *apname = "esp8266";
const char *appass = "password"; // minimum length 8 characters

ESP8266WebServer server(80);

const int ledpin = 2;  // I'm running this on an ESP-01
// i have a led connected to this active LOW
// i can't use the internal (pin 1) for the use of Serial

uint8_t ledstatus = 0; // this is keeping track of the state (of our statemachine)

const char   // like this these lines are statically declared and const, so we can't change them at all
*pageheader = "<!DOCTYPE html PUBLIC \"-//W3C//DTD XHTML 1.0 Transitional//EN\"\"http://www.w3.org/TR/xhtml1/DTD/xhtml1-transitional.dtd\">",
 *htmlhead = "<html><head><title>ESPwebserver</title><meta http-equiv=\"Content-Type\" content=\"text/html;charset=utf-8\" ></head>",
  *bodystyle = "<body style=\"color: wheat; background-color: teal; font-size: 12pt; font-family: sans-serif;\">",
   *accessIP = "http://192.168.4.1",
    *htmlclose = "</body></html>";

String webIP;

void setup() {
  webIP.reserve(30);  // prevent fragments
  digitalWrite(ledpin, HIGH);
  pinMode(ledpin, OUTPUT);

  Serial.begin(115200);

  WiFi.softAP(apname, appass); // start AP mode
  webIP = accessIP;
  Serial.print("Started Access Point \"");
  Serial.print(apname);
  Serial.println("\"");
  Serial.print("With password \"");
  Serial.print(appass);
  Serial.println("\"");
  WiFi.begin(ssid, password);  // attempt starting STA mode
  Serial.println("Attempting to start Station mode");

  uint32_t moment = millis();
  while ((WiFi.status() != WL_CONNECTED) && (millis() < moment + 8000)) {
    delay(500);
    Serial.print(".");
  }
  Serial.println("");
  if (WiFi.status() == WL_CONNECTED) {
    Serial.print("Connected to ");
    Serial.println(ssid);
    Serial.print("IP address: ");
    Serial.println(WiFi.localIP());

    if (MDNS.begin("esp8266")) {  // type esp8266.local/ in your browser
      Serial.println("MDNS responder started, type esp8266.local/ in your browser");
    }
    webIP = StationIP();
  }
  else if (WiFi.status() == WL_CONNECT_FAILED) {
    Serial.print("Connecting to ");
    Serial.print(ssid);
    Serial.println(" Unsuccessful.");
  }
  else if (WiFi.status() == WL_NO_SSID_AVAIL) {
    Serial.print("Network ");
    Serial.print(ssid);
    Serial.println(" not available.");
  }
  WiFi.reconnect();   // reconnect AP after attempting to connect STA

  server.on("/", handleRoot);
  server.begin();
  Serial.println("HTTP server started");
}

void loop() {
  server.handleClient();
  checkLedStatus();
}

void checkLedStatus() {  // our statemachine
  switch (ledstatus) {
    case 0: {
        digitalWrite(ledpin, HIGH);
        return;
      }
    case 1: {
        digitalWrite(ledpin, LOW);
        return;
      }
    case 2: {
        if (ledBlink(500)) ; // here the return value (of ledBlink() ) gets discarded
        return;
      }
    case 3: {
        modulateLed();
        return;
      }
  }
}

void modulateLed() {
  static uint16_t ms = 100;
  static bool increase = true;

  if (!ledBlink(ms)) return;
  if (ms > 250) increase = false;
  if (ms < 20) increase = true;
  if (increase) ms = (ms * 10) / 9;
  else ms = (ms * 9) / 10;
}

bool ledBlink(uint32_t wait) {
  static bool pinstate = false;
  static uint32_t moment = millis();
  if (millis() > moment + wait) {
    pinstate = !pinstate;
    moment = millis();
    if (pinstate) digitalWrite(ledpin, LOW);
    else digitalWrite(ledpin, HIGH);
    return pinstate;  // if pinstate is true and the pinstate has changed, the modulator will change speed
  }
  return false;
}

void handleRoot() {
  String ledstatusupdate;
  if (server.hasArg("led")) {
    if (server.arg("led") == "off") {
      ledstatus = 0;
      ledstatusupdate = "The LED has been turned Off<br>";
    }
    else if (server.arg("led") == "on") {
      ledstatus = 1;
      ledstatusupdate = "The LED has been turned On<br>";
    }
    else if (server.arg("led") == "blink") {
      ledstatus = 2;
      ledstatusupdate = "The LED has been set to Blink<br>";
    }
    else if (server.arg("led") == "modulate") {
      ledstatus = 3;
      ledstatusupdate = "The LED has been set to Modulate<br>";
    }
  }

  String s = "";
  s += pageheader;
  s += htmlhead;
  s += bodystyle;

  s += "<h1>Welcome to ESP webserver</h1><p>From here you can control your LED making it blink or just turn on or off. ";
  s += "</p>";

  s += ledstatusupdate;
  s += "<br>";

  s += "<form action=\"";
  s += webIP;
  s += "\" method=\"get\" name=\"button\">";
  s += "<input type=\"hidden\" name=\"led\" value=\"on\">"; // the hidden parameter gets included
  s += "<input type=\"submit\" value=\" LED ON \"></form><br>"; // the button simply submits the form

  s += "<form action=\"";
  s += webIP;
  s += "\" method=\"get\" name=\"button\">";
  s += "<input type=\"hidden\" name=\"led\" value=\"off\">";
  s += "<input type=\"submit\" value=\" LED OFF\"></form><br>";

  s += "<form action=\"";
  s += webIP;
  s += "\" method=\"get\" name=\"button\">";
  s += "<input type=\"hidden\" name=\"led\" value=\"blink\">";
  s += "<input type=\"submit\" value=\"  BLINK  \"></form><br>";

  s += "<form action=\"";
  s += webIP;
  s += "\" method=\"get\" name=\"button\">";
  s += "<input type=\"hidden\" name=\"led\" value=\"modulate\">";
  s += "<input type=\"submit\" value=\"MODULATE\"></form><br>";

  s += htmlclose;
  yield();  // not stricktly neccesary, though the String class can be slow
  server.send(200, "text/html", s); //Send web page
}


String StationIP() {
  String stationIP = "http://";
  stationIP += WiFi.localIP().toString();
  return stationIP;
}
This sketch creates an Access point that you can connect to with your phone (and go to IP 192.168.4) as well as running it in station mode to connect to your network. Serial information is also sent.
thank you very much, i will try it
