/*****************************************************************************
******************* HALLOWE'EN SONIC FOGGER 2024 EDITION ********************
*****************************************************************************
--general info and summary--
THIS USES AN ARDUINO AND ULTRASONIC SENSOR OR THREE TO ACTIVATE THE SWITCH
ON A PREHEATED SPIRIT HALLOWE'EN LOW LYING FOG MACHINE BY BYPASSING THE SWITCH
AND SWITCHING IT INSTEAD WITH A RELAY MODULE.
THIS WILL WORK THE SAME FOR ANY OF THEIR FOGGERS THAT COME WITH A MANUAL
SWITCH, WHICH THEY ALL HAVE FOR AT LEAST THE TEN YEARS I'VE BEEN A
HALLOWE'EN NUT. WILL ALSO WORK WITH ANY 5V ARDUINO BOARD THAT SUPPORTS THE
NEWPING LIBRARY (ALL AVR BOARDS PLUS MOST OF THE OTHERS).
------------------build details---------------------
<<< EQUIPMENT >>>
[hardware]
ARDUINO NANO EVERY x 1
WHADDA 5V RELAY MODULE x 1
HCSR-04 Ultrasonic sensor modules 1-3x
SPIRIT HALLOWE'EN 01423078 400W LOW LYING FOG MACHINE (COFFIN SKELETON)
GENERIC SMART PHONE BATTERY BACKUP OUTPUT 5V/2.4A MAX, 5200mAh/19.2Wh
CORD TO CONNECT BATTERY BACKUP TO ARDUINO NANO EVERY.
FEMALE-TO-FEMALE DUPONT JUMPER WIRES min 7, max 15
[software]
Arduino IDE v2.3.2
NewPing Arduino library v1.9.7 (available in IDE under Sketch > Include Library > Manage Libraries > NewPing )
or here: https://bitbucket.org/teckel12/arduino-new-ping/wiki/Home as of the time of this writing.
<<< UPLOAD THIS CODE TO YOUR ARDUINO >>>
BEING SURE TO SELECT THE CORRECT BOARD AND
COM PORT UNDER Tools > Board and Tools > Port in the Arduino IDE.
<<< ASSEMBLE THE CIRCUIT: >>>
The switch that comes with Spirit Hallowe'en fog machines has 3 wires:
mine had white, black and green. I cut them all off the switch and
stripped back 1/4" on the white and green. We will use a 5V relay
module (I used a Whadda brand model WPM406 5V relay module).
The HCSR-04 ultrasonic sensor senses something within 400 cm (about 13').
Change as needed below.
I did not use the black wire but it is cut off the switch and just taped
to the switch housing plastic.
The switch will measure something like 8VAC when the heater isn't warm enough
across the two stripped wires. Once the heater is warm, you will be
able to hear the built in internal relay of the fog machine click to
activate the stock switch. This is the action we are bypassing with the
Arduino and relay module. If you measure the voltage now, you will see
about 120VAC (North America).
WIRE fog machine Normally Open (NO) switch as follows:
switch green to relay C (common)
switch white to relay NO (Normally Open)
WIRE HCSR-04 sensors (use one, two or three, spaced out to cover some
periphery as you like):
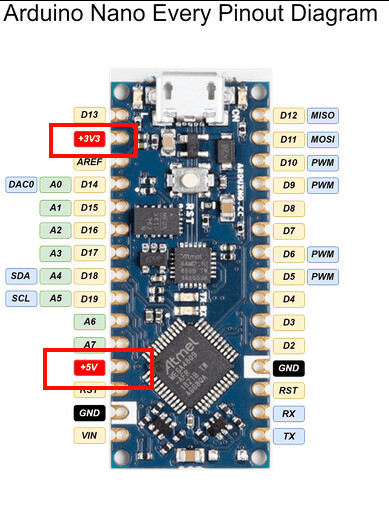
the sensors themselves are all powered by Arduino analog pins
driven HIGH during void setup(). Choose any of A0, A1 or A2.
Typically this is ill-advised as a way to power devices; however,
since the Nano Every can tolerate up to 20mA current per I/O pin
and each sensor needs only 15mA @ 5V to function, it's fine.
WIRE all the grounds of all the sensors to Arduino GND.
WIRE Sensor Trigger/Echo pin combos:
D6, D7 and D8, D9 and D10, D11.
WIRE Arduino to relay module connections:
Connect Arduino D5 to relay S (Signal)
Connect Arduino GND to relay module -
Connect Arduino +5V pin to relay module +
Power Arduino with USB smart phone battery backup
power bank.
Tested and working as expected.
By Hallowed31
Five-second timer revision courtesy of Arduino Forum member kolaha
2024-09-09
*/
#include <NewPing.h>
const int sonarNum = 3; // Number of HC-SR04 sensors
const int maxDistance = 400; // Max distance to ping for (cm). Adjust this number as needed up to 400
const int sensor1PowerPin = A0; // we will use the analog pins to power the sensors
const int sensor2PowerPin = A1;
const int sensor3PowerPin = A2;
// use one to three sensors to cover desired range of detection, sketch won't care which
NewPing sonar[sonarNum] = {
// Each sensor's trigger pin, echo pin, and max distance to ping for.
NewPing(6, 7, maxDistance), // each of these can be manually adjusted if needed different distances
NewPing(8, 9, maxDistance),
NewPing(10, 11, maxDistance)
};
const int fogPin = 5;
const int led = LED_BUILTIN;
const unsigned long pingTimer = 50;
unsigned long lastPingInterval = 0;
unsigned long lastFogCountdown = 0;
unsigned long fogOnInterval = 5000; // 5 seconds, adjust if you like
byte state;
int ledState;
int fogPinState;
void setup() {
pinMode(fogPin, OUTPUT);
pinMode(led, OUTPUT);
pinMode(sensor1PowerPin, OUTPUT);
pinMode(sensor2PowerPin, OUTPUT);
pinMode(sensor3PowerPin, OUTPUT);
digitalWrite(sensor1PowerPin, HIGH);
digitalWrite(sensor2PowerPin, HIGH);
digitalWrite(sensor3PowerPin, HIGH);
fogPinState = LOW;
ledState = LOW;
Serial.begin(115200);
// some blank lines because I like them
for (int j = 0; j < 15; j++) {
Serial.println("");
}
Serial.println(F("halloweenSonicFoggerV2024ed\n"));
state = 0;
Serial.println("off");
}
void loop() {
unsigned long pingInterval = millis();
if (pingInterval - lastPingInterval >= pingTimer) {
lastPingInterval = pingInterval;
for (uint8_t i = 0; i < sonarNum; i++) {
if ((sonar[0].ping_cm() == 0) && (sonar[1].ping_cm() == 0) && (sonar[2].ping_cm() == 0)) {
state = 0;
} else if ((sonar[0].ping_cm() >= 10) || (sonar[1].ping_cm() >= 10) || (sonar[2].ping_cm() >= 10)) {
state = 1;
}
}
}
switch (state) {
case 0:
fogPinState = LOW;
ledState = LOW;
noFog();
break;
case 1:
fogPinState = HIGH;
ledState = HIGH;
deployFog();
break;
default:
fogPinState = LOW;
ledState = LOW;
noFog();
break;
}
}
void deployFog() {
Serial.println("\non");
unsigned long thisFogTimer = millis();
while (millis() - thisFogTimer <= fogOnInterval) {
digitalWrite(fogPin, fogPinState);
digitalWrite(led, ledState);
}
Serial.println("\noff");
state = 0;
}
void noFog() {
digitalWrite(fogPin, fogPinState);
digitalWrite(led, ledState);
}
Nice project. Being on the cheep side I used a PIR sensor replacement for my outside lights. Works directly from the mains.
1 Like
void noFog() {
  digitalWrite(fogPin, LOW);
  digitalWrite(led, LOW);
}
1 Like
cheers, nice catch. The replace all in the 2.3.2 IDE got me again lol.
Wait, I don't know how to do the strikey out thingy in here, what's the issue?
I did it the way I did it as a style preference for future expansion in more complex builds that may involve foggers.
recommended style is:
while (millis() - thisFogTimer >= fogOnInterval)
i know, Halloween last not long enough for overflow occurs
1 Like
Right on.
I prefer the more precise control that HCSR-04 gives me to really create atmospheric effect zones across my property and through the witch museum.


Yeah thanks for mentioning it anyway. If it's preferred, it's preferred.
Code revised and credited with a slight change:
was changed to this
while (millis() - thisFogTimer <= fogOnInterval)
Besides, my haunt does take place over three days if Hallowe'en falls on a Sunday, so good to keep in mind ![]()
Maybe I should run this year's haunt for 50 days now ![]()
Want to turn those lights up to 11? (Note that I purchased and use these in Canada, I'm sure they make versions for all electrical standards though).
These lights are legit. Work right side up or upside down and look awesome:
#include <NewPing.h>

#define maxDistance  400     // Max distance to ping for (cm). Adjust this number as needed up to 400
#define fogOnInterval  5000  // 5 seconds, adjust if you like
const int fogPin = 5;

// use one to three sensors to cover desired range of detection, sketch won't care which
NewPing sonar[sonarNum] = {    // Each sensor's trigger pin, echo pin, and max distance to ping for.
  NewPing(6, 7, maxDistance),  // each of these can be manually adjusted if needed different distances
  NewPing(8, 9, maxDistance),
  NewPing(10, 11, maxDistance)
};

void setup() {
  pinMode(fogPin, OUTPUT);
  pinMode(LED_BUILTIN, OUTPUT);
}

void loop() {
  const unsigned int pingInterval = 100;
  static unsigned long oldMillis = 0;

  if (millis() - oldMillis >= pingInterval) {
    if ( sonar[0].ping_cm() >= 10 || sonar[1].ping_cm() >= 10 || sonar[2].ping_cm() >= 10) {
      digitalWrite(fogPin, HIGH);
      digitalWrite(LED_BUILTIN, HIGH);
      delay(fogOnInterval);
      digitalWrite(fogPin, LOW);
      digitalWrite(LED_BUILTIN, LOW);
    }
    oldMillis = millis() ;
  }
}
powering ultrasonic sensors (or anything else) from a digital pin is a very strange idea, why are you trying to avoid connecting the power pin to the power supply?
are digital pins of Nano Every tolerant to 5V inputs?
will sensors work from 3.3V ?
It works well enough, as noted in the, er, notes.
And the one 5V pin on the Nano Every I used to power the relay coil.
From this page:
https://docs.arduino.cc/hardware/nano-every/#tech-specs
DC Current per I/O Pin 15 mA
I see no problem with just setting the analog pins A0-A2 as GPIOs and HIGH to get the low current 5V I need for the sensors with no extra fuss.
Is it ideal and would I do this in most cases? In a word, no.
But it works here and this project is meant to be as plug and play as possible for anyone who just wants to get their fog machine operating this way for a couple hours a year.
As for your further code revision in post #9, sorry, not for me, not for this project but thanks for sharing.
I like to keep my code as modular as possible to the extent of my ability so it's easy for me to copy-paste bits of code from one project to the next, since so much of what I do in the Arduino hobby is Hallowe'en stuff and therefore there's a lot of overlap.
Nice photos, let us know how it works out after the holiday.
1 Like
This topic was automatically closed 180 days after the last reply. New replies are no longer allowed.