HC-06 Serial Ports Problems

Hi, I have no idea where to ask this, but since I'm using an Arduino compatible hardware I thought you guys could help me

I'm trying to use my laser engraver remotely, using a HC-06, the only problem is that the bluetooth works fine, but the com ports, that are what I need, are not working, the Dev one for output, gives just errors, while the one for input has infinite waiting.
I have no idea who I should ask this to, but please, help me!

You're right and I'm sorry if I sounded rude, but I haven't done much, I used this elementary code to program the HC-06

#include <SoftwareSerial.h>
SoftwareSerial mySerial(10, 11);

void setup() {
  Serial.begin(115200);
  Serial.println("Ready");
  mySerial.begin(115200);
}

void loop() {
  if (mySerial.available()) {
    Serial.write(mySerial.read());
  }
  if (Serial.available()) {
    mySerial.write(Serial.read());
  }
}

And then I wired up the Module to the engraver board using its 5V pin with a voltage divider to reduce it to the 3.3V of the hc-06 and then I wired the GND, TX and RX

Okay, I tried adding the level shifter and changed the divider with a regulator, but still, the results seem unchanged

Martyn Currey's site is a great place to start: Arduino and HC-06 (ZS-040) – Martyn Currey

If you have trouble following those very clear instructions, post again with the details about what went wrong.

Okay, so
Since it looks like I wasn't being very clear, I'm resuming everything that happened

I have an Engraver, it's an Atomstack A5 Pro, it uses a board called LaserBox V1.5, which has at its heart an ATMega328P, since it's compatible with arduino, I thought of making it wireless using a HC-06, because this board it's not just a bluetooth slave, but can also work as a serial port (which is the only thing that can be connected to my software for engraving) I put into it a very simple code that you can see following

#include <SoftwareSerial.h>
SoftwareSerial mySerial(10, 11);

void setup() {
  Serial.begin(115200);
  Serial.println("Ready");
  mySerial.begin(115200);
}

void loop() {
  if (mySerial.available()) {
    Serial.write(mySerial.read());
  }
  if (Serial.available()) {
    mySerial.write(Serial.read());
  }
}

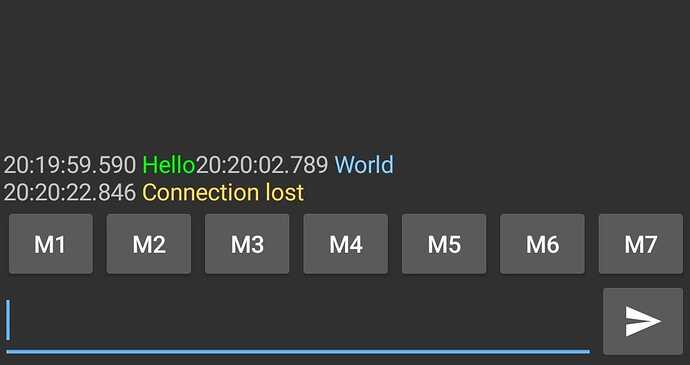
After programming the CH-06, I checked it worked with an app called Bluetooth terminal


(The Green text was received by the serial monitor in Arduino IDE, while the blue one was sent to it).
So the programming of the CH-06 wasn't the problem (thanks for the tutorial anyway)

After I did this, I had to wire the CH-06 to the LaserBox, and even tho there aren't any schematics on the web, with a multimeter you can find that there are some in the aux port, 4 pins dedicated to 5v, GND, TXD AND RXD


I wired it up as follows

Now I tried to pair it to the program for Engraving (LaserGRBL), which, as previously said, works just with com ports, (here shown)
Coms
I used the port 8, since it is the one that manages output ( The baud is set to 115200 because the engraver works at this rate) but it fails to pair and gives me this message in the log instead

SetStatus Machine status [Connecting]
OpenCom Open COM8 @ 115200 baud Ctrl-X (UsbSerial)
SendImmediate Send Immediate Command [0x18]
SetStatus Machine status [Disconnected]

This is the real problem, and I have no idea if it is software or hardware, but I know it's not because of LaserGRBL, bacause I tested multiple laser engraving software that gave the same results
In the real world, labeling on serial port connections is actually ambiguous. On the laser engraver, "TXD" many not mean outgoing characters, it may mean "connect to TX on the other end". You may need to swap the connections.

Use your multimeter to check voltage levels on TXD and RXD with respect to GND. A TX UART serial output, when enabled, will output Vcc steady state (5V or 3.3V as the case may be). RX should be floating, or close to 0V.

Very clever, didn't think about it
But luckly (or unluckly) they were wired up correctly, so, this is not the problem we're searching for

This topic was automatically closed 180 days after the last reply. New replies are no longer allowed.