How to implement pushbuttons into a stopwatch

Hello Everyone,

I am stuck in a situation. I would like to implement 2 pushbuttons in a stopwatch programm, one to "start/pause" de time and another one to "reset" the displays to "zero-zero".

I've been searching in the internet how to do it. Unfortunatelly without success up to now.

In the program below I just put the first two digits in order to summarize here... But my desire is that the stopwatch reach 59 seconds and then returns to "0". However, with the 2 buttons I can manipulate it stoping, starting and reseting.

void setup()
{
  pinMode(2, OUTPUT);
  pinMode(3, OUTPUT);
  pinMode(4, OUTPUT);
  pinMode(5, OUTPUT);
  
  pinMode(6, OUTPUT);
  pinMode(7, OUTPUT);
  pinMode(8, OUTPUT);
  pinMode(9, OUTPUT);
  pinMode(12, INPUT);
}
void loop()
{
  // 00
  digitalWrite(2, LOW);
  digitalWrite(3, LOW);
  digitalWrite(4, LOW);
  digitalWrite(5, LOW);
  
  digitalWrite(6, LOW);
  digitalWrite(7, LOW);
  digitalWrite(8, LOW);
  digitalWrite(9, LOW);
  delay(1000);
  
  // 01
  digitalWrite(2, LOW);
  digitalWrite(3, LOW);
  digitalWrite(4, LOW);
  digitalWrite(5, LOW);
  
  digitalWrite(6, HIGH);
  digitalWrite(7, LOW);
  digitalWrite(8, LOW);
  digitalWrite(9, LOW);
  delay(1000);

Welcome to the forum

Where are you stuck ?

  • Do you know how to read the state of an input ?
  • Have you looked at and tried the Button example in the IDE ?

3 different connections between switches and Arduino inputs.

Connection S3 is recommended.


Read this discussion:

1 Like

Here is a stopwatch example I wrote a while ago. Maybe it will help:

/////////////////////////////////////
//  Stopwatch Example
//
//  Written by: John Wasser
/////////////////////////////////////
const byte StartButtonPin = A1;  // Button wired from pin to GND
const byte StopResetButtonPin = A2; // Button wired from pin to GND
bool StartButtonWasPressed = false;
bool StopResetButtonWasPressed = false;

unsigned long DebounceTimer = 0;
const unsigned DebounceTime = 10;

bool IsRunning = false;
unsigned long ElapsedTime = 0;
unsigned long LastStartTime = 0;

static void ShowTheTime()
{
  static unsigned long lastDisplayTime = 0;
  unsigned long displayTime = ElapsedTime;
  if (IsRunning)
    displayTime += millis() - LastStartTime;

  if (displayTime != lastDisplayTime)
  {
    lastDisplayTime = displayTime;

    // This is where you would put your code to display the time
    Serial.println(displayTime / 1000.0, 3);
  }
}

void setup()
{
  Serial.begin(115200);
  delay(200);

  pinMode(StartButtonPin, INPUT_PULLUP);
  pinMode(StopResetButtonPin, INPUT_PULLUP);
}

void loop()
{
  unsigned long currentTime = millis();

  bool startButtonIsPressed = digitalRead(StartButtonPin) == LOW;
  bool stopResetButtonIsPressed = digitalRead(StopResetButtonPin) == LOW;

  // State Change Detection and debounce
  if (startButtonIsPressed != StartButtonWasPressed &&
      currentTime - DebounceTimer > DebounceTime)
  {
    // Button has changed state
    StartButtonWasPressed = startButtonIsPressed;
    DebounceTimer = currentTime;

    if (startButtonIsPressed)
    {
      // Just Pressed START
      if (!IsRunning)
      {
        // Starting/Restarting the timer
        LastStartTime = currentTime;
        IsRunning = true;
        Serial.println("Started");
      }
      else
      {
        // Pausing the timer
        IsRunning = false; // Paused
        ElapsedTime += currentTime - LastStartTime;
        Serial.println("Paused");
      }
    }
  }

  // State Change Detection and debounce
  if (stopResetButtonIsPressed != StopResetButtonWasPressed &&
      currentTime - DebounceTimer > DebounceTime)
  {
    // Button has changed state
    StopResetButtonWasPressed = stopResetButtonIsPressed;
    DebounceTimer = currentTime;

    if (stopResetButtonIsPressed)
    {
      // Just Pressed STOP/RESET
      if (IsRunning)
      {
        // Pausing the timer
        IsRunning = false; // Paused
        ElapsedTime += currentTime - LastStartTime;
        Serial.println("Stopped");
      }
      else
      {
        // Was not running so reset everything
        ElapsedTime = 0;
        IsRunning = false;
        Serial.println("Reset");
      }
    }
  }

  ShowTheTime();
}

Hello @UKHeliBob , regarding to read the input of a button I guess I can do . The problem is how put it in the middle of the program (in this case, into the loop) and how to control it.

Att.
Fernando

Hi @johnwasser , thanks. It seems to be very difficult for me to implement my program with 7 segments displays into your example.

But I will try to study it further.

Is there some part of "This is where you would put your code to display the time" that you don't understand? The time is in milliseconds. If you want to display seconds, divide by 1000. Split the number of seconds into separate digits and display the digits on your BCD-to-7-segment displays:

  // This is where you would put your code to display the time
  byte seconds = displayTime / 1000;
  byte tensDigit = (seconds / 10) % 10;
  byte unitsDigit = seconds % 10;

  // Tens Digit
  digitalWrite(2, tensDigit & 0x01);  // Low bit
  digitalWrite(3, tensDigit & 0x02);
  digitalWrite(4, tensDigit & 0x04);
  digitalWrite(5, tensDigit & 0x08);  // High bit

  // Units Digit
  digitalWrite(6, unitsDigit & 0x01);  // Low bit
  digitalWrite(7, unitsDigit & 0x02);
  digitalWrite(8, unitsDigit & 0x04);
  digitalWrite(9, unitsDigit & 0x08);  // High bit

Hi @fermatias

welcome to the arduino-forum.

The forum can be a source of great help to learn the details that are needed to make a microcontrollerproject work the way you want it to. My offer is to point to that things that will "teach you fishing" to beeing able to find bugs yourself.

You seem to be a real beginner. So my first question is:

do you want the stopwatch beeing up and running quick and dirty as soon as possible?
or
do you want to learn programming. Which of course will take some time?

EDIT: the picture of your wiring seems to be from Tinker-cad arduino.

As far as I have experienced it most users here don't like tinker-cad Arduino.
because tinker-cad-arduino requires an account.

There is another arduino simulator that works without any account.

It is called wokwi.com

Do you have the real hardware and the microcontroller laying on your table or are you doing pure simulation?

best regards Stefan

Hi @StefanL38 , thank you!

Yes, you're right. I am a real beginner...

I began my studies in the field of electrical/automation this year. This semester, one of the subjects is "digital electronics" and the teacher resquested a final project in order to be approved. Then, the requirements are: "Build a stopwatch with 2 units of 7 segments display by which the time goes from 0 to 59 seconds. Besides, it must have 2x pushbuttons: one to [reset] and another to [pause/start]."

The problem is that we didn't have classes about programming/Arduino yet, and I have about 15 days to build this project.

I have got already the real microcontroller arduino (by the way, I did some basic programs with leds :slight_smile:

Up to now, I can do only exactly what I mentioned by prints in the original post (do a counter from 0 to 59 without buttons handling it).

Furthermore, I want to study and learn programming more and more. However, at this moment I would like just to build this project and at least understand the core functios of the programm.

Thank you for the suggestion of " wokwi.com". I will check it out and use for learning.

Att.
Fernando

Your teacher asked us to give you these links.

1 Like

So how many hours per day do have to learn and test?

Maybe about 2 hours from from Monday to Friday and full time at saturday and sunday.

Anyway... I will try doing it the best as I can.

Who selected the CD4511 ?


Confirm:

  • You are using a common cathode 7 segment display

  • You are using an UNO

Do you have to deliver working hardware in 15 days = Friday 16.12.2022?

Is it a must to use a CD4511 (a BCD to 7 segment decoder)?

there are much more comfortable to use 7 segment displays.
So if you are free to use a different 7segment display I would recommend using a 7-segment display with a TM1637 driver and the library that is written for the TM1637-driver

This will reduce the effort for displaying to

data[0] = display.encodeDigit(thousand);
data[1] = display.encodeDigit(hundred);
data[2] = display.encodeDigit(ten);
data[3] = display.encodeDigit(one);

display.setSegments(data);

anyway it can be done with the CD4511 too.

There are basics you should know before going on creating spaghetti-code.

Please read the first two chapters of this tutorial

Arduino Programming Course

It is easy to understand and has a good mixture between explaining important concepts and example-codes to get you going. So give it a try and report your opinion about this tutorial.

reading time for chapter 1 and chapter 2 is about 20 to 30 minutes. Very well invested 30 minutes.

Your code will be divided into mutliple functions one of the functions will be
"display_a_digit".

Therefore you need to know what functions are and how to write them.
Pretty easy but not that simple that looking at a single example will make you understand.
It takes a little bit more

@fermatias

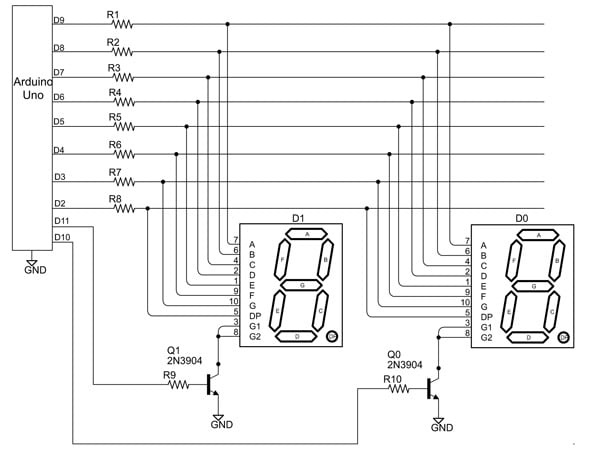
Here is an example of a 2-digit Stop Watch with START and RESET Button. You may study this sketch and the schematics (Fig-1) to get an idea of building a Stop Watch of your own style.

cc7seg2sw2
Figure-1:

Sketch:

byte lupTable[] = {0x3F, 0x06, 0x5B, 0x4F, 0x66, 0x6D, 0x7D, 0x07, 0x7F, 0x6F};
byte ccTable[] = {0x3F, 0x3F};//DP0-DP1 holds cc-code for DP0-DP1
byte decSec = 0;

void setup()
{
  Serial.begin(9600);
  for (byte i = 6; i <= 15; i++)//DPin-8 to 13; A0 to A1
  {
    pinMode(i, OUTPUT);
  }

  pinMode(2, INPUT_PULLUP);  //Start/Pause Button
  pinMode(3, INPUT_PULLUP);   //Reset Button

  while (digitalRead(2) != LOW) //Start StopWatch
  {
    refreshDisplay();
  }
}

void loop()
{
  if (digitalRead(3) == LOW) //reset
  {
    ccTable[0] = 0x3F;   //reset display
    ccTable[1] = 0x3F;
    while (1)
    {
      refreshDisplay();
    }
  }
  unsigned long prMillis = millis();
  while (millis() - prMillis < 1000)
  {
    refreshDisplay();                     //refresh display until 1sec has elapsed
  }
  decSec = decSec + 1;  //increase 1 sec  //increase decSec variable by 1 seconed
  if (decSec == 60)     //check if 60 sec has elapsed
  {
    decSec = 00;
  }
  ccTable[1] = lupTable[decSec % 10];//DP1
  ccTable[0] = lupTable[decSec / 10];//DP0
}

void refreshDisplay()
{

  for (byte i = 0; i <= 1; i++)
  {
    byte y = 0b111111;
    byte x = ccTable[i];
    PORTB = x;
    digitalWrite(6, bitRead(x, 6));
    digitalWrite(7, bitRead(x, 7));
    bitClear(y, i);
    digitalWrite(A0, bitRead(y, 1)); //DP0
    digitalWrite(A1, bitRead(y, 0));//DP1
    //-------------------------
    delay(1);
  }
}
1 Like

So now we have mutliple code-examples and a user who is a real beginner.

What shall this beginner now do?
Taking one of the examples - not really understanding what tricks are coded into it trying to apply it to his own project?

Copy and paste one of the codes that does counting up seconds? Again without understanding it because it uses difficult to understand things like direct port manipulation?

Glühwein !

1 Like

What's about using SevSeg.h Library to avoid direct port manipulation?

#include<SevSeg.h>
SevSeg sevSeg;           //create object sevSeg

int numberToShow = 00;
unsigned long prMillis = 0;

void setup()
{
  pinMode(2, INPUT_PULLUP);
  byte segDPins[] = {8, 9, 10, 11, 12, 13, 6, 7};  //DPin8 = seg-a, …, DPin-7 = seg-p
  byte ccDPins[] = {A0, A1};          //DPin-2 = cc0, DPin-2 = cc1, ...
  sevSeg.begin(COMMON_CATHODE, 2, ccDPins, segDPins, false, false, false, true);
  sevSeg.setNumber(numberToShow, 0, LOW);
  //---------------------------------

  while (digitalRead(2) != LOW)
  {
    sevSeg.refreshDisplay();
  }
}

void loop()
{
  while (millis() - prMillis < 1000)
  {
    sevSeg.refreshDisplay();
  }
  numberToShow++;
  if (numberToShow == 60)
  {
    numberToShow = 0;
  }
  sevSeg.setNumber(numberToShow, 0, LOW);
  prMillis = millis();
}