Newby here, I am going slightly crazy on this. I plug in my Nano RP2040 to my USB port and Device manager sees it. (Windows 10 Home 64 bit PC with all windows updates installed.) Arduino IDE thinks the RP2040 is on Com 7 but it says it is not connected and tells me to pick a different port. The Nano is connected (tested 2 different cables) using the cable I purchased from the Arduino site and the nano lights has the green LED lit. The LED opposite the green one is amber and flashes. The LED next to the reset button changes color: Blue, Green, Red, Purple, Yellow/white, then repeats the sequence. Nothing else is connected to the board. Any advice would be greatly appreciated. George
Try to set Comport to 2, 3, 5
This tells us it’s working properly, but nothing about the connection.
If you unplug, then plug in the Nano, does the COM7 indication go away, then return?
Nothing changes on the Arduino software, but Windows recognizes that the Nano connects and disconnects in the device manager screen.
I thought there was a way in windows to read the actual com port assigned, but I can’t seem to figure that out either.
When I go to the port screen in the ide software, it shows com port 7 grayed out.
If I go to the board selection screen and the nano is unplugged, it shows the nano as a choice, but it shows no port. If I plug in the nano it shows com port 5 available, but I know it cannot be com port 5 because that is assigned to my JMRI model railroad interface, and I verified that that connection does work.
One thing I’m going to try is to disconnect that usb cable for JMRI and see if the nano does connect on com port 5, but I suspect it won’t.
George
The IDE software is only showing com 7 but it says not connected. The port option under tools is grayed out. If I go to the board select option, it shows the nano rp2040 but says no ports shown, even if I check the box that says show all ports.
May I ask why you are looking for a serial port with an RP2040 rather than the mass storage device?
Nano RP2040 Connect User Manual
Board Not Detected
Sometimes the board is not detected even when the board is connected to your computer. This can be solved through the following steps:
1. Connect the board to your computer via USB.
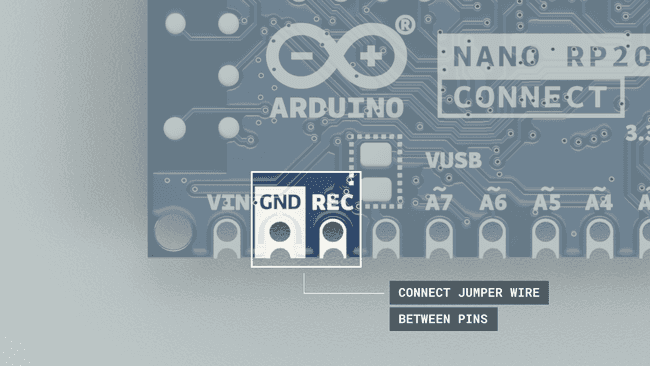
2. Place a jumper wire between the REC and GND pins on the board, then press the reset button.
Place a jumper wire between REC and GND pins.
3. This will open the mass storage device. You can now remove the jumper wire.
4. Upload a basic sketch, such as the blink example to the board (even though it is not visible in the port selection).
5. When it has finished uploading, your board should be visible in the board/port selection, and your board's built-in LED should be blinking. This means it is successful!
I will try what you suggested as far as resetting the rp2040. I am a first timer with Arduino and figured since there is a USB port on the RP2040 that was how you would load a program into it. I am unfamiliar with how to load through the Mass Storage Device.
George
OK interesting doings. Followed your steps above, Nothing changed on my home PC, so for giggles I loaded the IDE software on my work laptop with windows 11. Don't like doing this because they are funny about such things. Anyway, connected the RP2040 into the USB port and it came up as com port 3. Loaded blink first and it loaded 100%, so I went back and loaded the sketch I am trying to work with for the project and it also loaded 100%. Perhaps it doesn't like using com port 7. Tired from this today, so I'll look at it some more tomorrow.
Thanks for the tips. Much appreciated.
George
Hi @georonn.
The term "USB port" is unclear. If by this you mean the USB socket on the board through which it is connected to your computer, then it absolutely is used for the upload.
But if you instead mean the serial port that is created on your computer via that USB connection, then it is only indirectly involved in the upload process. In order to upload an Arduino sketch program to the Nano RP2040 Connect board, the board must be put into a special "boot" mode. @van_der_decken described a way to manually put the board into that mode. However, it would be inconvenient to have to do that every time you want to upload a sketch to the board. For this reason, Arduino IDE has a way to automatically put the board into the boot mode. This is done by sending a special signal to the serial port of the board (which is referred to as the "1200 bps touch").
However, once the board is in boot mode, a serial port is not used in any way for the actual upload of the compiled sketch. When the board is in the boot mode, it presents itself to your computer as a flash drive (the technical term is "USB mass storage device"), not as a serial port, and the compiled sketch program file is simply copied to that drive. After that, the board is rebooted and it goes back into the normal operating mode where it runs the sketch program.
Even though Arduino IDE has this automagical system for putting the board into the boot mode, it is still sometimes necessary to manually put it into boot mode. The reason is that the code that creates the serial port on the board, and recognizes the "1200 bps touch" is running in the background of your sketch program, so it is possible for the sketch code to disable, interfere with, or break the board's ability to produce a serial port and/or to automatically put the board into boot mode. We can always recover the board from that state by manually activating the boot mode prior to starting an upload. Note that the board will not produce a serial port after you manually activate the boot mode. Arduino IDE will still be able to perform the upload even though no serial port is selected.
Railroader, Do you have experience with the code portion of Arduino?
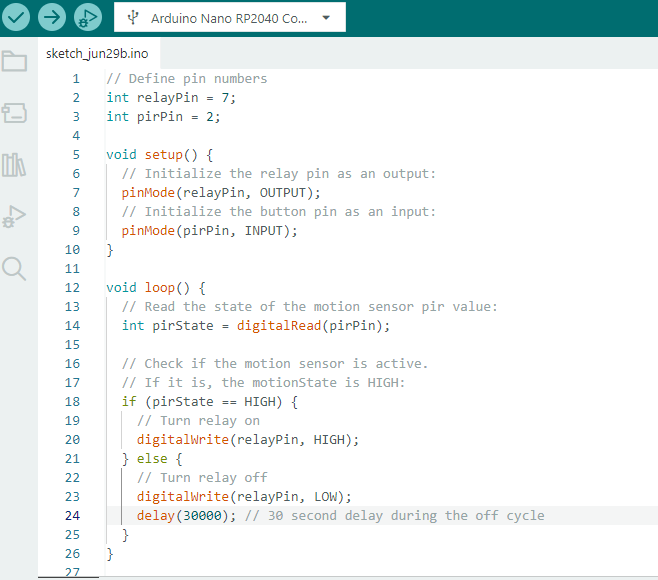
After I got "upload" under control I loaded Blink first, and then loaded my project sketch which is pretty straight forward. Arduino see the signal from a PIR motion sensor and fires a relay module. Initially I ran it without any delay to verify it would fire the relay, which it did, then I added a 30 second delay, which was the original plan to eliminate too many cycles. The relay closure turns on a BLI thunder and Lighting device. At any rate, the relay closure still works but seems to fire randomly instead of when the motion is detected after 30 seconds. I'm guessing there is something wrong in my code.
George
Please read and use the sticky post "How to get the best out of this forum" especially about code tags and schematics.
I've seen so many posts like this I've made a webpage that may help
Happens now and again.
Disconnecting and reconnecting the USB lead can fix it. Having a look at Windows Device Manager while connecting can give you some clues.
Windows can give you an audible notification and/or a popup during connection and "device not recognised" pops up.
It often isn't due to a fault on the board.