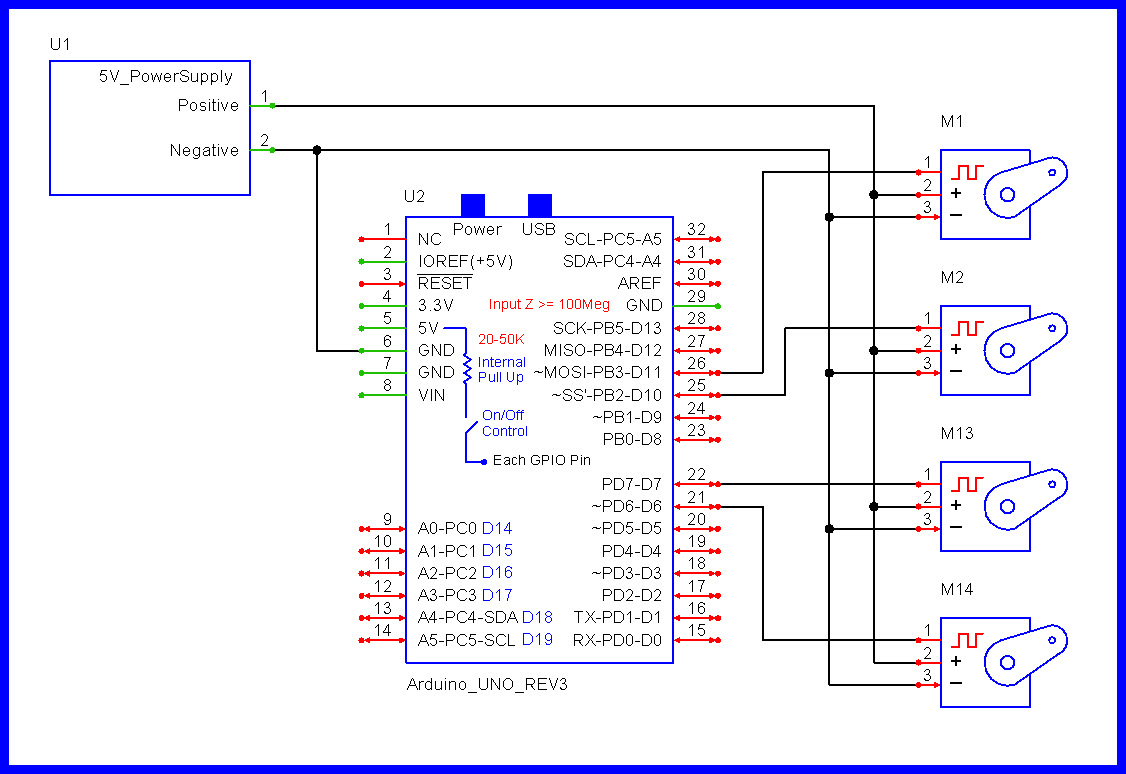
I created this servo program to help debug an issue with my servos in a larger project (turned out one of the servos needed replacing). This sketch lets you easily test multiple servos by adjusting the number of servos, their speed, and the motion angles. It also includes a simple command to set all servos to 90 degrees.
I welcome any feedback, and I hope someone finds this sketch useful.
edit: I added the sizof() to make the sketch for plug and play. This will update the for loop automatic instead of doing it manually. LarryD credited for seeing that.
int numServo = sizeof(servoPin)/ sizeof(servoPin[0]);// adding the number of servos in the for loop
for (int k = 0; k < numServo; k++) { // cycling through each servo pin for testing
#include <Servo.h>

Servo myServo;  // naming the object of the servo

int servoPin[] = { 11, 10, 7, 6 };  // servo pins
int numServo = sizeof(servoPin)/ sizeof(servoPin[0]);// adding the number of servos in the for loop

int motionCycle = 2;  // How many time you want to repeat each cycle for each servo.

//what angle you want to be the highest and lowest. double check the servoAngleHigh is higher than the servoAngleLow or you will create infinite loops;
int servoAngleHigh = 90;
int servoAngleLow = 0;

int servoSpeed = 10;  //the speed of the gears of the servo

void ninetyDegreeSetup() {
  for (int i = 0; i <= 3; i++) {
    myServo.attach(servoPin[i]);
    myServo.write(90);
    delay(50);
  }
}

void setup() {
  Serial.begin(9600);
  ninetyDegreeSetup();
}

void loop() {

  for (int k = 0; k < numServo; k++) {  // cycling through each servo pin for testing

    myServo.attach(servoPin[k]);

    for (int j = 0; j <= motionCycle; j++) {// how many time you have to perform each servo pin motion

      for (int i = servoAngleHigh; i >= servoAngleLow; i--) {
        myServo.write(i);
        delay(servoSpeed);
      }
      for (int i = servoAngleLow; i <= servoAngleHigh; i++) {
        myServo.write(i);
        delay(servoSpeed);
      }
    }
  }
  Serial.println("Type restart or reset to start the loop again or type '90degrees' to put all servos at 90 degrees");
  while (Serial.available() == 0) {  // will stop program unless you type restart or push the reset button

    String response = Serial.readStringUntil('\n');

    response.trim();
    response.replace(" ", "");
    response.toLowerCase();

    if (response == "restart" || response == "reset") {
      Serial.println("Starting loop again..");
      break;
    }
    if (response == "90degrees" || response == "90degree") {  // sets every servo to 90 degress and stop the program
      ninetyDegreeSetup();
    }
  }
}
No, there are 4 servo with only one object being call (myServo). Every time is goes through the loop, you have to update myServo to a different pin. The only blocking is at the end with while loop, but that has an option to restart the loop if you need too or change the angles and speed for additional testing..
You have to update the myServo to the correct pin. I only called one object(myServo). Every time I call myServo.attach(). it is replacing the pin with a different servo pin.
The idea of the sketch is for an user to copy it and update servo pins to match their own schematic. The main reason why I wrote this sketch was to trouble shoot my larger project and that project has a lot more going on. Like said this sketch is just a plug and play to debug or setup any servo to 90 degrees. The sketch is really base on the user schematic. Sorry for the confusing.
The point being, when someone comes across this post later, an accompanying schematic immediately shows interconnections.
This helps new users to see at a glance, the setup being discussed.
I see your point, Larry, but I still respectfully disagree in this context.
The purpose of this sketch is to be universal and self-contained something users can copy, plug in their own servo pins, and use right away to debug hardware. A schematic wouldn't add value here unless it matched someone else's setup exactly.
Also, the logic behind reattaching the same Servo object to multiple pins in sequence is intentional and efficient for this use case. It's clearly commented in the code.
I do appreciate your input and experience, just offering a different perspective for a very specific utility sketch.
If you do an initial position write before attach() you can avoid the jump-to-0-jump-to-whatever that otherwise results
your non-standard changing of pins will be confusing to novices, as well as more accomplished users. Why do unusual things like that, when as near as I can tell, it doesn't save you anything meaningful?
Are you not used to using arrays? This sketch saves a lot of time by setting up the servo pins in an array. It works for any number of servos, whether it’s 1 or 10 without needing to manually define, attach(), and write() to each servo separately.
With the “standard way,” you'd have to write those lines over and over, which becomes repetitive and harder to maintain. This sketch keeps things clean and flexible. It’s meant purely as a "debugging tool", not as a full project. The idea is to have a reusable utility to test or reset servos quickly.
The Arduino Forum is supposed to be a place to help, educate, and inspire users (especially new ones) to learn and build with confidence. Unfortunately, many users have made the forum feel unfriendly and discouraging.
Users like @camsysca and @LarryD are examples of why many users(again, new users) feel hesitant to ask questions or share their projects. Their tone often lacks constructive feedback and instead comes across as dismissive or rude.
The forum’s badge system reveals a troubling trend. The Newbie badge has been awarded to over 400,000 users, but the Member badge, the next level, has only been awarded about 1,400 times. That’s less than 1% retention. This should raise a serious question: Why are so few users sticking around?
The environment created by some users may be a major factor. Pushing so-called “etiquette” in a harsh or condescending way doesn’t help anyone. It only deters participation and growth. No user, especially a new user, should be subjected to a hostile environment.
It’s time for the Arduino community to rethink how we engage with one another. Constructive criticism is valuable, but it must be delivered with respect. Encouragement and guidance should be the norm. If some users consistently fail to meet these standards and contribute to a toxic atmosphere, their access should be reviewed or revoked. Let’s make this a forum where everyone, regardless of experience, feels welcome to ask, learn, and grow, because when the community thrives, we all benefit.
With a high amount of respect I think if someone want´s to post and suggest his own example for something as an standard or guideline for newcomers this example should be reviewed and corrected by higher experienced members of the forum. This prevents that newcomers cannot fully trust on given solutions or suggestions posted by other forum members and to fall into a low level quality forum. I also think the high experienced members are allready known or can be recognized by checking their profile.
You should be greatfull if a high experienced member tries to improve your posted standard solution, you can only learn from it.
Maybe next time you post your solution as an example open for discussion.
if you post this you haveto respect all the feedback and not only the ones you like.
Unfortunately, you've just explained why the Arduino forums are struggling. This is the current state of the community. My sketch and the response from @LarryD highlight exactly why your statement doesn't hold up.
Two experienced users reviewed the sketch and completely missed the logic and context for which it was intended. Instead of offering constructive input, they chose to tear it down or assert their own egos. Comments like these:
Hints:
If you do an initial position write before attach() you can avoid the jump-to-0-jump-to-whatever that otherwise results
your non-standard changing of pins will be confusing to novices, as well as more accomplished users. Why do unusual things like that, when as near as I can tell, it doesn't save you anything meaningful?
This user is being ignored.
Don't treat him too harshly,it would appear he hasn't figured out how to inspect the history of other users yet.Or doesn't think it would have any relevance.
these are not constructive. They don’t offer meaningful insight or suggestions for improving the code. Instead, they come off as dismissive, condescending, or even disrespectful.
There is less than 1% returning users on the forum. That is a serious red flag for any community that claims to support learning and collaboration. The approach you're defending is already in place, and it's not working. If we want this platform to thrive, we need to foster a more welcoming and supportive environment.
You could use an array of servos and just attach them all in setup(). An array of motionCycle constants would allow each to run for a different number of cycles and arrays of servoAngles High and Low would let each run in its own range of angles, and so forth. You can work out the implied details:
  for (int k = 0; k < numServo; k++) {
    for (int j = 0; j < motionCycle[k]; j++) {  // ...

      for (int i = servoAngleHigh[k]; i >= servoAngleLow[k]; i--) {
        myServo[k].write(i);
        delay(servoSpeed[k]);
      }
      for (int i = servoAngleLow[k]; i <= servoAngleHigh[k]; i++) {
        myServo[k].write(i);
        delay(servoSpeed[k]);
      }
    }
  }
Too complicated for a test program? Maybe… I just hack the IDE servo sweep example if I need test code, as I suspect is the habit of many.
Here’s another way to go:
Or make your own using an Arduino. If you stick to the standard interconnecting cables and pins it’s easy to complete remove and test any servo.