I had an idea of making a ship ( or anything ) in a bottle, so googled it and it looks like the only one so far is 3D Printers Can Indeed Make A Ship In A Bottle where the bottle is printed too.
I have spent many hours drawing this high tech engineering drawing on a napkin ( I don't think you can see the wine stains on the scan .)
it takes a little imagination, but basically the lid of the bottle has 2 servos ( X and Y ) attached to it, and a Z avis motor to feed a tube in and out of the bottle.
The thing at the bottom is a half made boat on its side ....
The tube could be 2 coaxial tubes with insulation between them, but joined at the end with a hole for the melted filament comes out. A current flowing through the tubes keeps it hot.
The hole in the bottle lid would be a swivel joint. With air holes around the lid for ventilation ( fan ? )
Thats as far as I got before getting back to a pile of real jobs to get out.
I might be reinventing the wheel here, if not, perhaps it could give you guys with free time a project . If you crowdfund it include me on the team !
PS you could of course have the tube fixed, and move the bottle around it.
Boffin1:
I have spent many hours drawing this high tech engineering drawing on a napkin ( I don't think you can see the wine stains on the scan .)
So how many bottles of wine did you drink, exactly?
I think it would be quite a challenge engineering it with such a long nozzle; the plastic needs to be hottest / least viscous at the very end of the nozzle or it'll jam. Also, to get the ship to stay in place while you're printing it you'd need to stick it to the bottle (use a "raft") and that would uglify it considerably.
With a big enough bottle opening, and a flat bottom, yeah I think it could be done though.
Yes the tube would have to hottest at the tip, which is why I suggested the coaxial tubes with the current flowing through the narrowest bit where they join at the tip, where the hole is.
Think of the old solder gun with a U shaped copper wire flattened at the end to get hot .
I think standard servo's will not give you enough precision.
if the servo has 1° precision and the rod is 20 cm long you get 0.349 cm precision. And don't get me started on servo's and repeatability.
You will have to go for a stepper with reduction to get some decent results.
I thing the heating issue caused by the long rod is an attention point but not a show breaker. I think your proposal is a good starting point.
Moving the bottle in a 3 axes CNC machine solves the long nossel precision problem but cause new problems. IMHO the biggest one will be to have the partially printed object properly fixed to the bottle.
Now I think about it. It is probably better to have the whole printing head and swivel joint in the bottle. The Z axes outside the bottle and use the neck of the bottle as a solid fixing point.
If you think about it, the actual servos/steppers can be a long way from the swivel point at the mouth of the bottle, giving a higher reduction in errors at the business end. ( my paper napkin wasn't very big )
To get maximum printing area the swivel should be at the mouth of the bottle.
I think the base mat can be printed from the same material first, and stuck to the side or bottom of the bottle ( it could be waves on the sea , whatever )
The tubes I see as 3 sections of tubing from radio telescopic antenna, with the middle diameter one replaced by some mica insulation , It could be brazed / soldered at the end, and a hole drilled.
I have a vague notion of using 5 sections of the antenna, with another tube on the outside with an air gap, sensing the tube touching the glass side of the bottle flexing the "proboscis " as a sort of end switch.
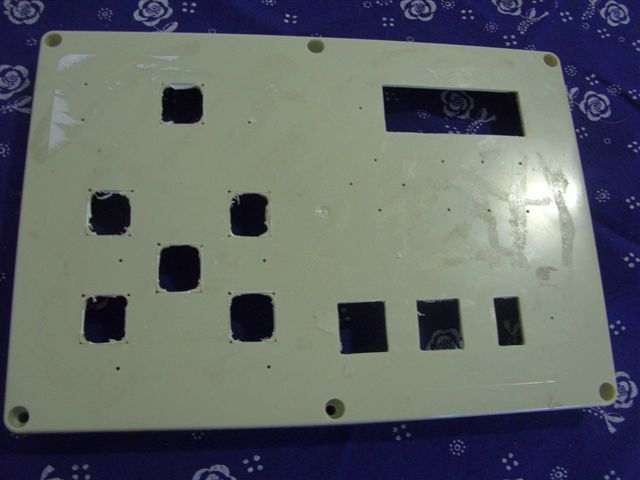
These are all just thoughts as I drill 50 square holes in plastic boxes while all around are enjoying a holiday !
Printing the ship sideways is impossible. Nothing will support the mast when it is printed, neither will a lot of other part. The video has a multiple-material print head, printing clear material as bottle and support, so the black material is always supported.
Hmm, well the sketch shows it sideways, but you're right for support it would be better with the bottle on its side, so there might have to be a bend in the end of the tube, and a limit to the height of the ship.
I don't want to print the bottle, for novelty value ( which is what this ) I want to use a real glass branded bottle.
I drill a tiny hole in each corner of the rectangle, tape 4 straight edges around the shape, score the plastic with a craft knife, drill some bigger holes in the middle, break out the waste , and then file the edges down to the straight edges.
Then start on the next hole ! Until it looks like this
40-some years ago you could buy a square hole drill for wood that had 4 chisels with a drill in the middle. The chisels cut the square and the drill removed the wood in the center.
I have seen this movie of a drill making sqaure holes in metal. Square Hole Drill-bit - YouTube
But I never heard of anyone who had/used one.
Best regards
Jantje
Good idea - but the laser beam will be distorted by the glass bottle. Still, it is a predictable distortion, also one that could be measured by first printing a grid (whioch you destroy and remove) and the software does the anti-distortion. I am skimming over focusiing problems.
Unless the beam comes in like the plastic prong drawn by Boffin1.
GoForSmoke:
40-some years ago you could buy a square hole drill for wood that had 4 chisels with a drill in the middle. The chisels cut the square and the drill removed the wood in the center.
You're describing a "mortising bit" (just the bit) or "mortiser" (full machine). Any woodworking store would have them and the machines are still widely sold. To use a mortising bit with a drill press you'd need a "mortising attachment" (~$100).
Chagrin:
You're describing a "mortising bit" (just the bit) or "mortiser" (full machine). Any woodworking store would have them and the machines are still widely sold. To use a mortising bit with a drill press you'd need a "mortising attachment" (~$100).
Thanks for the mortiser word. (My mother tongue is not English)
A google search and readup led me to this page Make: DIY Projects and Ideas for Makers |
Reminded me that I have a nibler tool and a unibit which seem a good combination for small series (1 or 2 pieces)