Robot cocktail maker and TFT screen

Hi there everyone,

Here’s an interesting one for you guys.

I am in the process of making a robot cocktail maker. The first phase in this is to create the brains behind it. So far have managed to get my touch lCD screen. To work nicely with a relay and plan to use a multi relay setup to open and close a number of valves for the alcohols and juices that will make the cocktail. If you check out the pictures you will see my setup. At the moment I just have two boring buttons that say cocktail one and cocktail 2, but I would like to use images of cocktails as buttons. I tried changing some to code but of course eventually I would run out of space. Does anyone know how I can use images on the SD card at the back as buttons. To get round the small amount of memory that I have on the arduino.


I will post up the code I am using in a reply so you can see where I am up to?

1 Like

This is the code that I am using

// URTouch_ButtonTest 
// Copyright (C)2015 Rinky-Dink Electronics, Henning Karlsen. All right reserved
// web: http://www.RinkyDinkElectronics.com/
//
// This program is a quick demo of how create and use buttons.
//

#include <UTFT.h>
#include <URTouch.h>

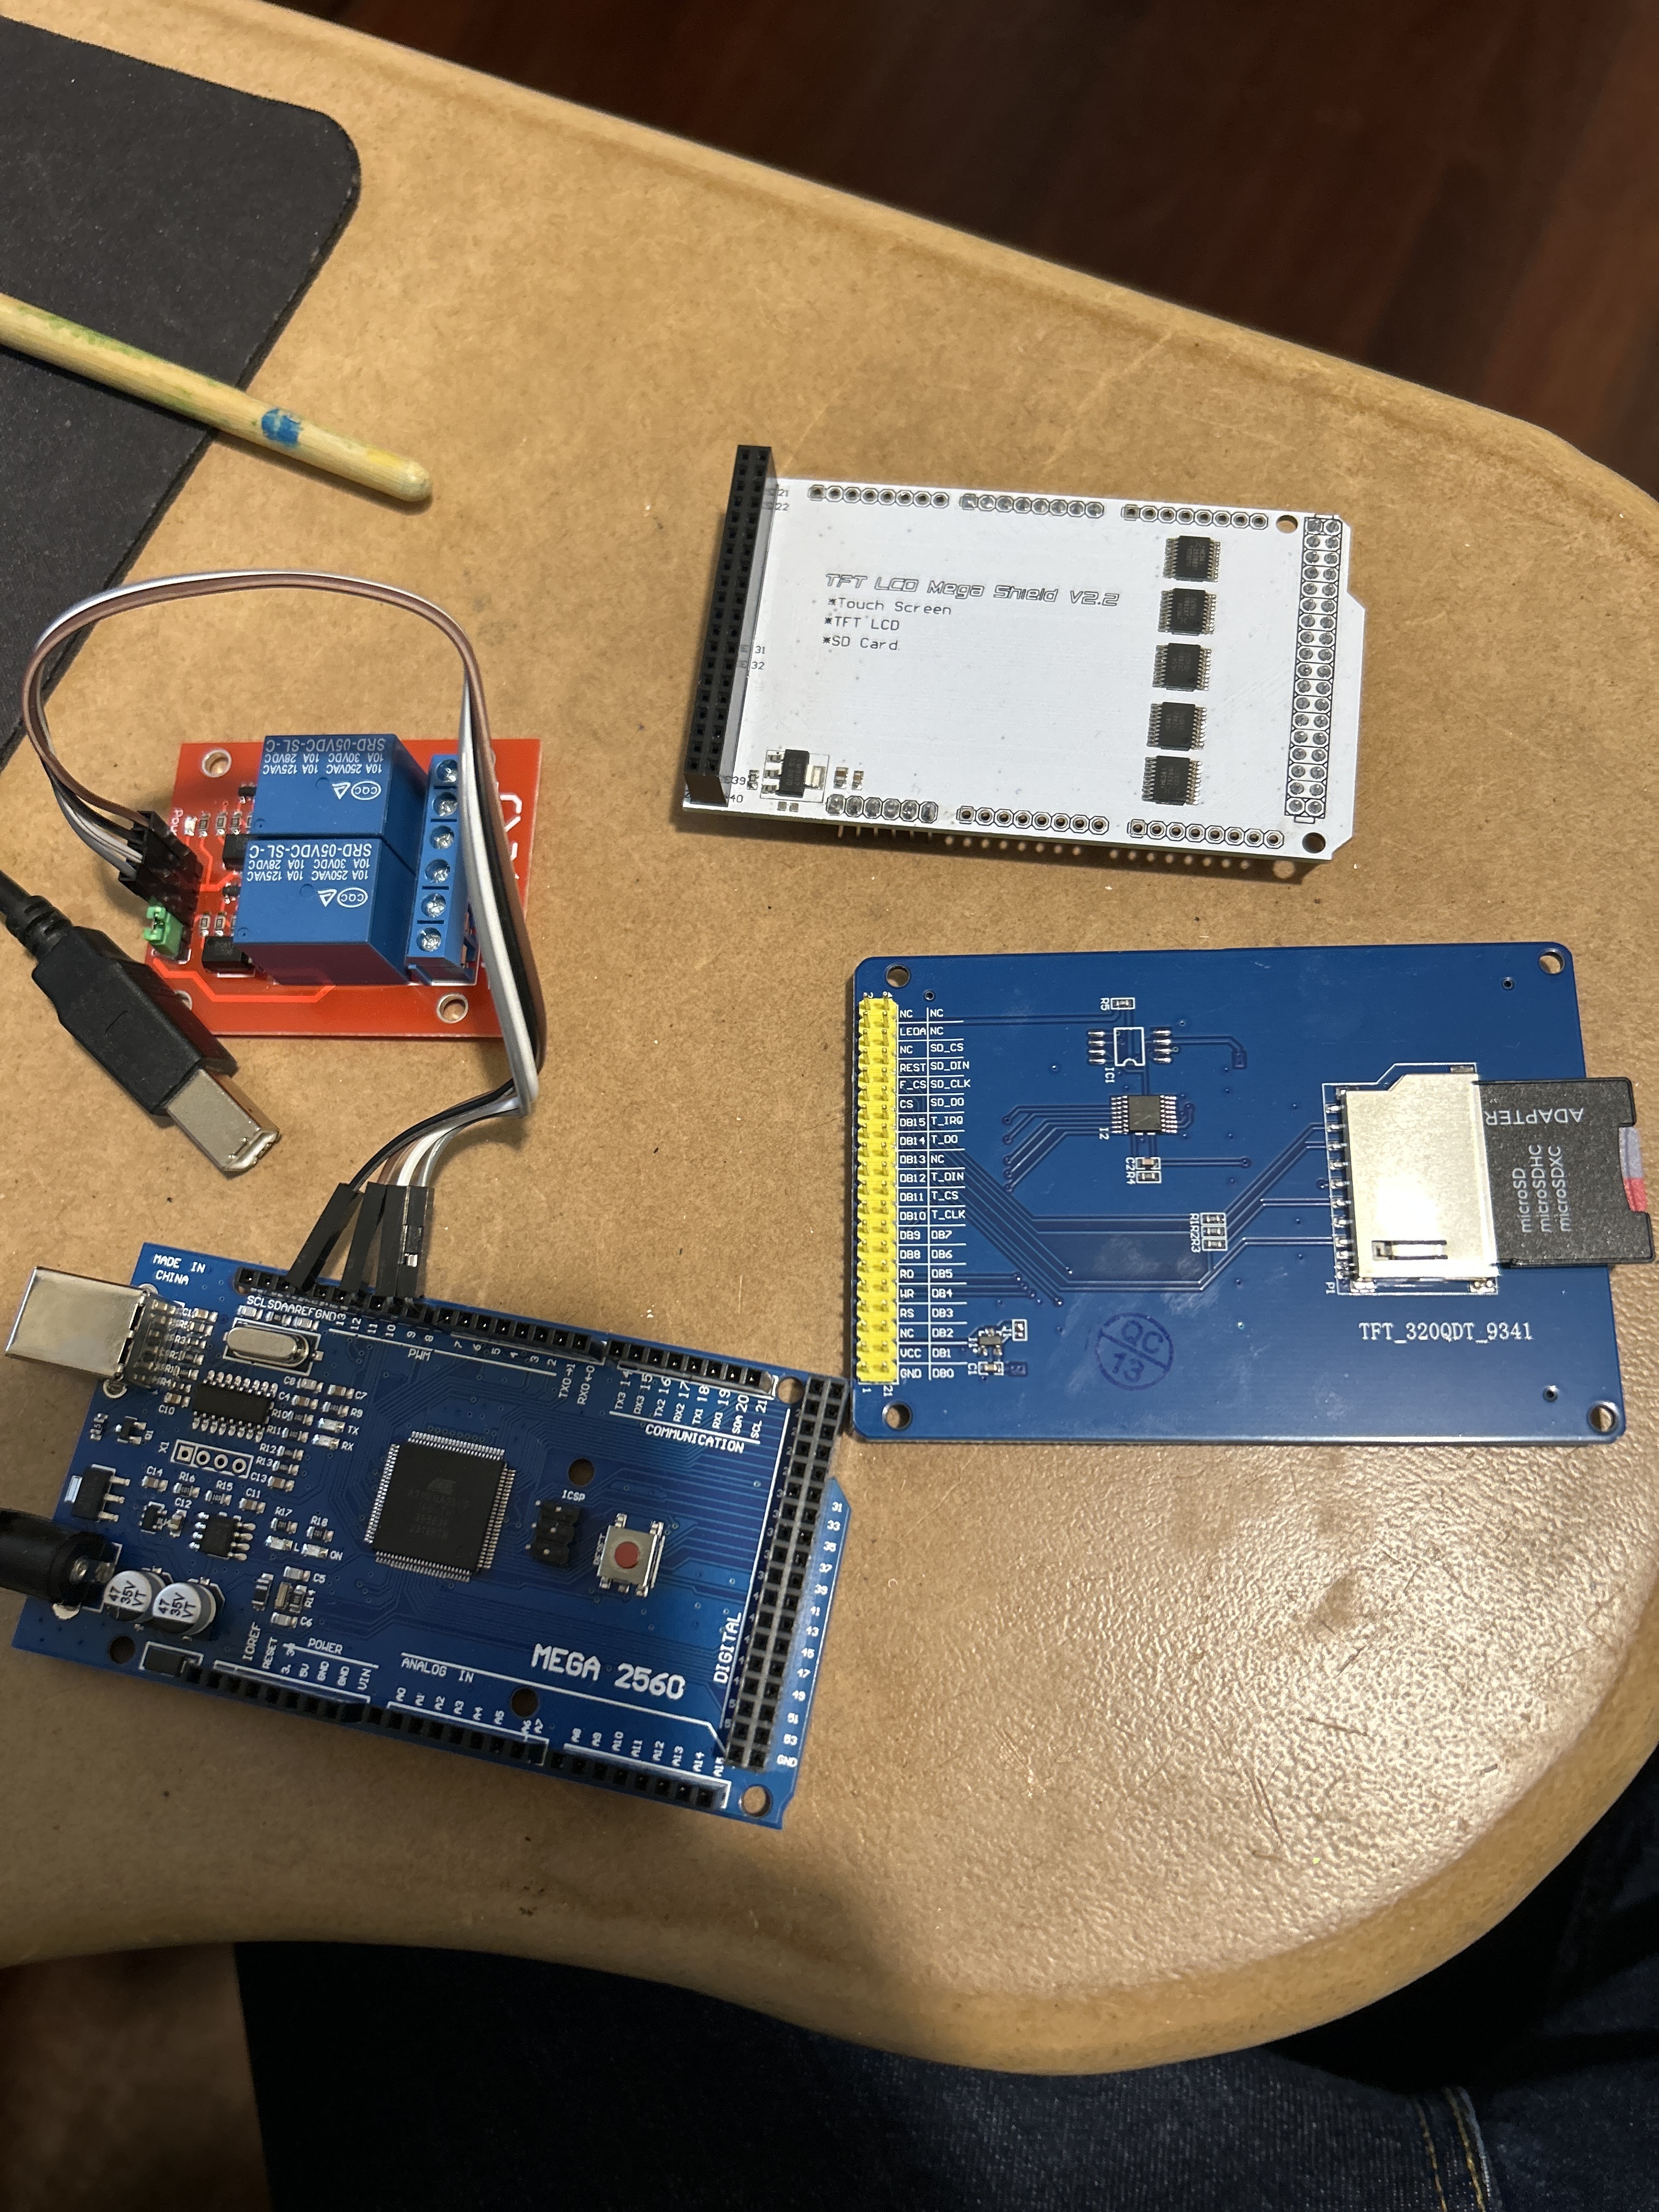
UTFT    myGLCD(ILI9341_16,38,39,40,41);
URTouch  myTouch( 6, 5, 4, 3, 2);


extern uint8_t BigFont[];
int x, y;
int Relay1=8;
int Relay2=9;
int Relay3=10;
int Relay4=12;
int Relay5=13;
int VCC = 11; // Sets pin 11 as a +5 voltage

char stCurrent[20]="";
int stCurrentLen=0;
char stLast[20]="";

// Draw buttons
void drawButtons()
{
  myGLCD.setColor(0, 0, 255);
  myGLCD.fillRoundRect (10, 25, 150, 180);
  myGLCD.setColor(255, 255, 255);
  myGLCD.drawRoundRect (10, 25, 150, 180);
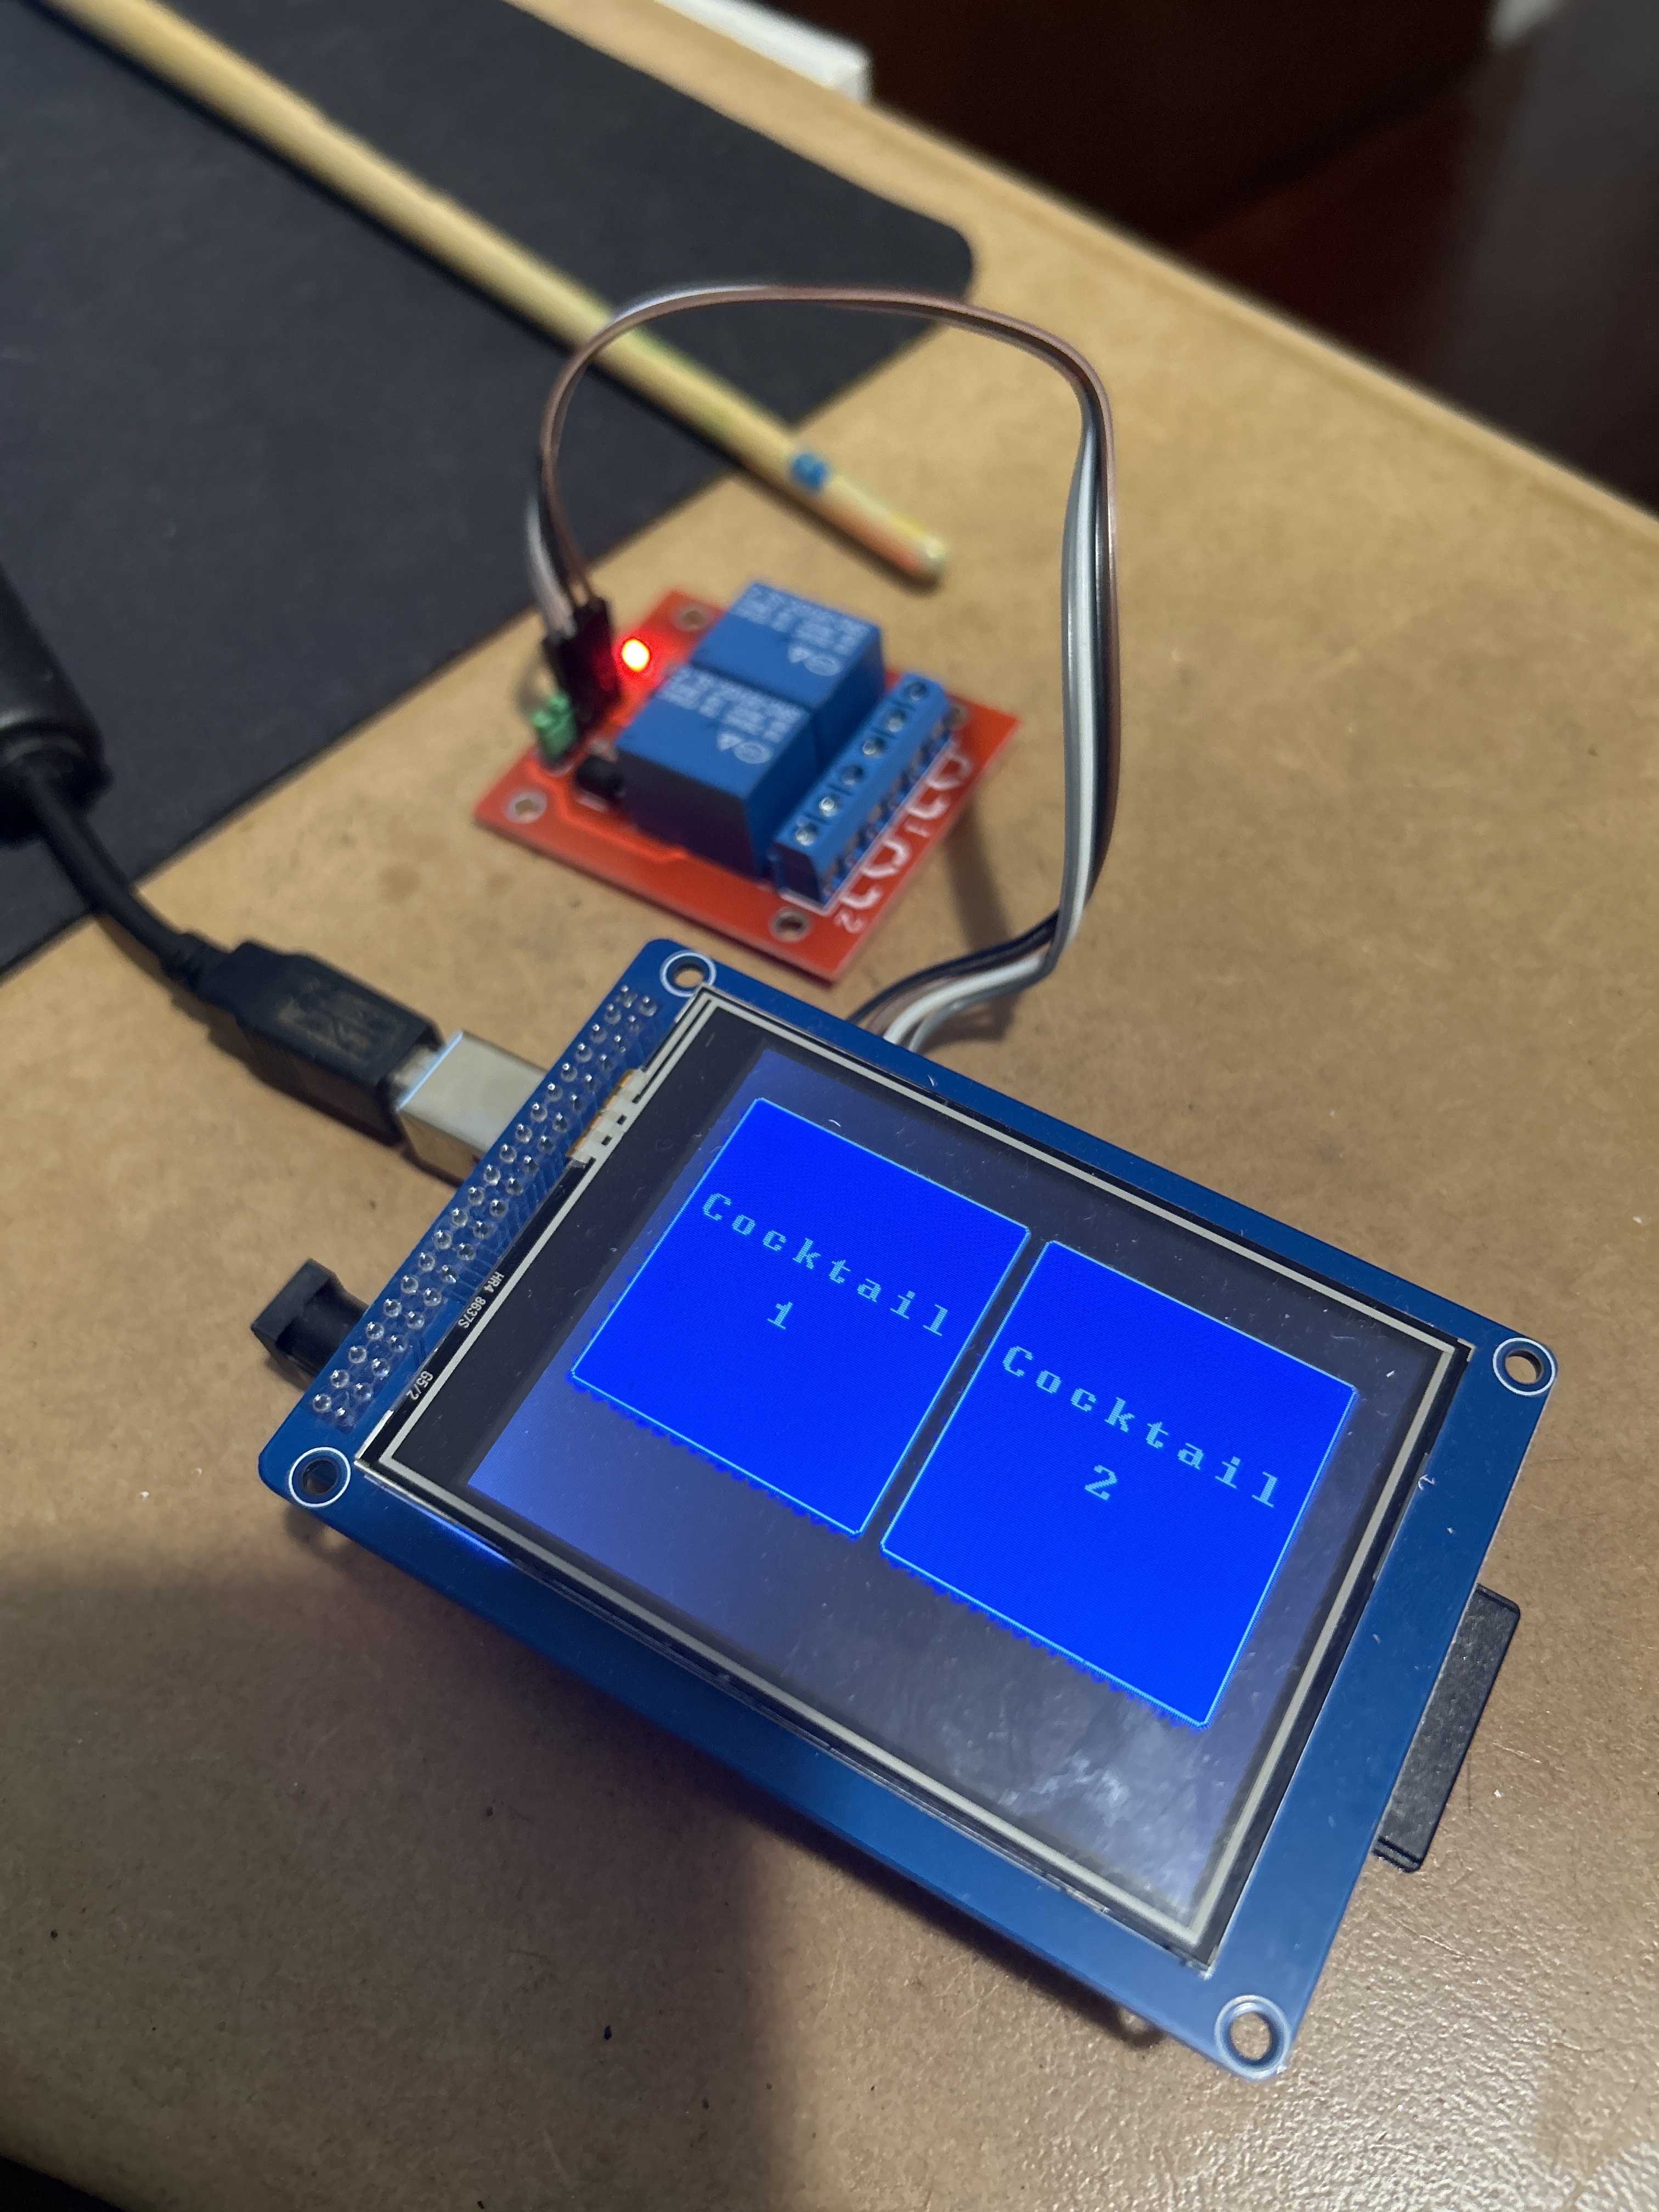
  myGLCD.print("Cocktail", 15, 75);
  myGLCD.print("   1    ", 20, 105);
  myGLCD.setColor(0, 0, 255);
  myGLCD.fillRoundRect (160, 25, 300, 180);
  myGLCD.setColor(255, 255, 255);
  myGLCD.drawRoundRect (160, 25, 300, 180);
  myGLCD.print("Cocktail", 165, 75);
  myGLCD.print("   2    ", 170, 105);
  myGLCD.setBackColor (0, 0, 0);
}

void updateStr(int val)
{

}

void setup()
{
// Initial setup
  myGLCD.InitLCD();
  myGLCD.clrScr();

  myTouch.InitTouch();
  myTouch.setPrecision(PREC_MEDIUM);

  myGLCD.setFont(BigFont);
  myGLCD.setBackColor(0, 0, 255);
  drawButtons(); 

 pinMode(Relay1,OUTPUT);
 pinMode(Relay2,OUTPUT);
 pinMode(Relay3,OUTPUT);
 pinMode(VCC,OUTPUT); // Sets pin 11 as a +5 voltage
 digitalWrite(VCC, HIGH); // Sets pin 11 as a +5 voltage
}

void loop()
{
  while (true)
  {
    if (myTouch.dataAvailable())
    {
      myTouch.read();
      x=myTouch.getX();
      y=myTouch.getY();
      
        if ((x>=10) && (x<=150) && (y>=25) && (y<=205))  // Button: Clear
        {
            myGLCD.setColor(255, 0, 0);
            myGLCD.drawRoundRect (10, 25, 150, 180);
            digitalWrite(Relay1,HIGH);
            digitalWrite(Relay3,HIGH);
            myGLCD.setColor(255, 0, 0);
            myGLCD.print("                  ", CENTER, 192);
            myGLCD.print("Dispensing", CENTER, 192);
            delay(500);
            myGLCD.print("            ", CENTER, 192);
            delay(500);
            myGLCD.print("Dispensing", CENTER, 192);
            delay(500);
            myGLCD.print("            ", CENTER, 192);
            delay(500);
            myGLCD.print("Dispensing", CENTER, 192);
            delay(500);
            myGLCD.print("            ", CENTER, 192);
            delay(500);
            myGLCD.print("Dispensing", CENTER, 192);
            delay(500);
            myGLCD.print("            ", CENTER, 192);
            delay(500);
            myGLCD.print("Dispensing", CENTER, 192);
            delay(500);
            myGLCD.print("            ", CENTER, 192);
            delay(500);
            myGLCD.setColor(0, 255, 0);
            digitalWrite(Relay1,LOW);
            digitalWrite(Relay3,LOW);
            myGLCD.print("Please take drink", CENTER, 192);
            delay(2000);
            myGLCD.print("Enjoy your cocktail", CENTER, 192);
            delay(2000);
            myGLCD.print(" Choose a cocktail ", CENTER, 192);
            myGLCD.setColor(255, 255, 255);
            myGLCD.drawRoundRect (10, 25, 150, 180);
        }
        if ((x>=160) && (x<=300) && (y>=25) && (y<=205))  // Button: Enter
        {
            myGLCD.setColor(255, 0, 0);
            myGLCD.drawRoundRect (160, 25, 300, 180);
            digitalWrite(Relay2,HIGH);
            digitalWrite(Relay3,HIGH);
            myGLCD.setColor(255, 0, 0);
            myGLCD.print("                  ", CENTER, 192);
            myGLCD.print("Dispensing", CENTER, 192);
            delay(500);
            myGLCD.print("            ", CENTER, 192);
            delay(500);
            myGLCD.print("Dispensing", CENTER, 192);
            delay(500);
            myGLCD.print("            ", CENTER, 192);
            delay(500);
            myGLCD.print("Dispensing", CENTER, 192);
            delay(500);
            myGLCD.print("            ", CENTER, 192);
            delay(500);
            myGLCD.print("Dispensing", CENTER, 192);
            delay(500);
            myGLCD.print("            ", CENTER, 192);
            delay(500);
            myGLCD.print("Dispensing", CENTER, 192);
            delay(500);
            myGLCD.print("            ", CENTER, 192);
            delay(500);
            myGLCD.setColor(0, 255, 0);
           digitalWrite(Relay2,LOW);
           digitalWrite(Relay3,LOW);
           myGLCD.print("Please take drink", CENTER, 192);
           delay(2000);
           myGLCD.print("Enjoy your cocktail", CENTER, 192);
           delay(2000);
           myGLCD.print(" Choose a cocktail ", CENTER, 192);  
           myGLCD.setColor(255, 255, 255);
           myGLCD.drawRoundRect (160, 25, 300, 180);
      }
    }
  }
}

The kit is from Ali express
https://www.aliexpress.com/item/1005004918153220.html?spm=a2g0o.productlist.main.1.6c05Q7YNQ7YN10&algo_pvid=4ab9ad62-fc75-418a-bcd3-07caf6a4af05&algo_exp_id=4ab9ad62-fc75-418a-bcd3-07caf6a4af05-0&pdp_npi=4%40dis%21AUD%215.58%215.58%21%21%213.65%213.65%21%402101e83017183615082283849efdc2%2112000031012824850%21sea%21AU%210%21AB&curPageLogUid=am2peg0mrTbq&utparam-url=scene%3Asearch%7Cquery_from%3A

I have all of the RinkyDink librarys installed UTFT, URtouch, UTF_Buttons, UTFT_SdRaw-1.2.4,UTF_SPIFlash and SdFat.

The TFT screen is an ILI9341

There is a drawBitmap() function.

Edit: The challenge you face is bitmaps are very large files,
You may need to divide the bitmap into different sections, like 1/4 of the actual image.

What kinds of issue do you foresee if those images are too big?

If I did us the draw bit map function do you know what code I would need to draw at least one bit map from the SD card and when it was pressed make the frame turn red for example to show that it had been pressed?

If I can get that piece of code I could probably work out the rest.

The challenge is SRAM. The bitmap for the UTFT appears to be 16 bit.
That means every pixel has a 16 bit value. A 64x64 bitmap at 16 bit color is 8Kbytes

Edit: I used this program to convert a jpg image to UTFT format. It's a bitmap with no header.
http://www.rinkydinkelectronics.com/t_imageconverter565.php

That's going to happen anyway unless you work on your coding skills. Learn more about using arrays and loops.

Examples:

int Relay1=8;
int Relay2=9;
int Relay3=10;
int Relay4=12;
int Relay5=13;

becomes

byte Relay[5]={8, 9, 10, 12, 13};

and

            myGLCD.print("                  ", CENTER, 192);
            myGLCD.print("Dispensing", CENTER, 192);
            delay(500);
            myGLCD.print("            ", CENTER, 192);
            delay(500);
            myGLCD.print("Dispensing", CENTER, 192);
            delay(500);
            myGLCD.print("            ", CENTER, 192);
            delay(500);
            myGLCD.print("Dispensing", CENTER, 192);
            delay(500);
            myGLCD.print("            ", CENTER, 192);
            delay(500);
            myGLCD.print("Dispensing", CENTER, 192);
            delay(500);
            myGLCD.print("            ", CENTER, 192);
            delay(500);
            myGLCD.print("Dispensing", CENTER, 192);
            delay(500);
            myGLCD.print("            ", CENTER, 192);
            delay(500);

becomes

            for (byte r=0; r<5; r++) {
              myGLCD.print("Dispensing", CENTER, 192);
              delay(500);
              myGLCD.print("            ", CENTER, 192);
              delay(500);
            }

This breaks the 8K bitmap image file with no header into 4 parts of 2048 bytes. You don't have the SRAM to load it in one pass.

#include <SD.h>

byte tBuf[2048];
File myFile;
int tCount;
int loopCount = 0;

void setup() {
  SD.begin(4);
  myFile = SD.open("test.bmp");

  while(myFile.available()) {
    tCount = myFile.read(tBuf,2048);
    if(tCount == 2048) {
      // display 1/4 cocktail image.  
      switch(loopCount) {
        case 0: // display 1st quarter.
                break;
        case 1: // display 2nd quarter.
                break;
        case 2: // display 3rd quarter.
                break;
        case 3: // display 4th quarter.
                break;
      }
    }
    loopCount+=1;
  }
}

void loop() {
  // put your main code here, to run repeatedly:
}

Edit: I might be able to use a standard bitmap file by bypassing the header. I'll need a little time to figure it out.

Is that Mega an appropriate choice? Consider something with more memory perhaps. A Teensy or an ESP might do it or you could use a Pi for a gargantuan menu of drinks.

Compared to the cost of a few bottles of liquor, a better microprocessor is pretty cheap.

In either case, this will convert a standard bitmap file to a bitmap file with the header removed. The output file is just the pixel color settings. I used a 16 bit color bitmap for the source file.

#include <SD.h>

// The original bitmap with header.
char sourceFile[] = "arduino.bmp";

// the bitmap file with the header removed
char destFile[] = "arduino2.bmp";

byte tBuf[16];
char cBuf[64];
File myFile,newFile;
int tCount;
int loopCount = 0;

void setup() {
  Serial.begin(38400);
  SD.begin(4);
  delay(1000);
  SD.remove(destFile);
  
  myFile = SD.open(sourceFile);
  if(!myFile) {
    Serial.println("Open failed");
  }

  tCount = myFile.read(tBuf,14);
  long startPoint = (long)tBuf[10];
  long thisPoint = startPoint;
  long newPoint = 0;
  
  myFile.seek(startPoint);
  while(myFile.available()) {    
    tCount = myFile.read(tBuf,16);
    myFile.close();

    newFile = SD.open(destFile,FILE_WRITE);
    if(!newFile) {
      Serial.println("Open failed");
    }
    
    newFile.seek(newPoint);
    newFile.write(tBuf,tCount);
    newFile.close();

    newPoint= newPoint + (long)tCount;

    myFile = SD.open(sourceFile);
  
    if(!myFile) {
      Serial.println("Open failed");
    }

    thisPoint = thisPoint + (long)tCount;
     
    myFile.seek(thisPoint);
        
    for(int i=0;i<(tCount);i+=2) {
      unsigned int thisInt = tBuf[i+1];
      thisInt = thisInt << 8;
      thisInt = thisInt | tBuf[i];
      sprintf(cBuf,"%04x",thisInt);
      Serial.print(cBuf);
      Serial.print(" ");
    }
    Serial.println();
    loopCount+=1;
  }  
  myFile.close();  
  Serial.println();
  Serial.println(loopCount);

  newFile = SD.open(destFile);
  if(!newFile) {
    Serial.println("Open failed");
  }
  unsigned long fileSize = newFile.size();
  sprintf(cBuf,"%ld",fileSize);
  Serial.print(cBuf);
  newFile.close();
}

void loop() {
  // put your main code here, to run repeatedly:
}

Hay that's awesome thanks paul. that is a flashing text that flashes when you click a button, in VB you could create a function that would allow me to use that feature. How would you do that here?

Tim, thanks for that I will try that out and provide an update.

Not sure what you mean. A function for flashing something? A function that gets called when a button is pressed?

Really? I'd approach it from the other direction. Start working on the mechanics/plumbing, get that to work as a prototype, and then make the brains for it. The rationale is that the hardware is usually where most of the limitations are, and while figuring out how to actually get the job done (in your case, dosing and mixing some liquids into a vessel), you generally run into quite a number of things the 'brain' needs to take into account. Then when everything works using manual switches etc. for the controls, you can translate all that into a microcontroller program and get it right. Software is infinitely more flexible than hardware, in the end.

Good luck with your project; sounds like fun.

Unfortunately, the UTFT library from Rinky-Dink electronics only supports bitmaps in flash memory. It is possible to write a function in the sketch to draw bitmaps from ram, all the necessary variables internal to the library are declared public, or the library itself can be modified.

It has these 2 functions. I use Gimp to create a 16 bit bitmap in 5-6-5 format.
I'm still testing my conversion code. Looks like you can set the pixel color, then draw the pixel. Repeat as necessary. Not as efficient as I would have hoped.

void UTFT::setColor(word color)
{
	fch=byte(color>>8);
	fcl=byte(color & 0xFF);
}

void UTFT::drawPixel(int x, int y)
{
	cbi(P_CS, B_CS);
	setXY(x, y, x, y);
	setPixel((fch<<8)|fcl);
	sbi(P_CS, B_CS);
	clrXY();
}

Edit: If you could use a ST7735 IC, this function does it in one call. I'm getting one of these.
void Adafruit_ST7735::drawPixel(int16_t x, int16_t y, uint16_t color)

The way I wrote my code is that I repeat the code for flashing up "depsensing" for every recipe. Is there a way to write this as a function I can call after each drink.

I got all the mechanics sorted. 8 peristaltic pumps for feed alcohol and 6 solenoids valves for the additives such as cokes and lemonade. The cokes and lemonade I have a gas distributor feeding from a soda stream CO2 bottle to that produces back pressure to push out the fluid. IT also ensures my lemonades and coke do go flat. for me this was the easy part. Its trying to get the LCD touch screen to opperate properly.

If you do get one can you tell me which one you are getting and send us a link. I have had all sorts of problems with mine. Also do you agree is may be better to get a Pi. ESP or Teensy, I have zero experience with a Pi.

Found a library specifically used to display images from an SD card when using the UTFT library https://www.arduino.cc/reference/en/libraries/utft_sdraw/

Odd that the UTFT library is not in the IDE's library manager, but UTFT_SdRaw is.