Silk screening vs toner transfer PCB

CrossRoads:
You're still left with having unmarked boards (what many consider the silkscreen, all the parts labels (Reference Designators, R1,C1, etc). You also have to add wires to connect top & bottom traces for any vias that were used.
If doing small SMD parts or fine traces, solder mask makes assembly a lot easier. You have to be sooooo careful applying solder without soldermask.

What about this? http://www.youtube.com/watch?v=B0Syj4awcc8

You can get decent results with toner transfer and home brew. See the example images of one of mine. I made a bit of an error with the silkscreen by using my toner transfer laminator (too hot) instead of normal temperature one, but it's still pretty good.

I'll do anything where I need a quick prototype or just a few reasonably simple boards, but I use Elecrow for pro-fab boards at about £10 for 10 off 50x50 or £20 for 10 off 100x100 double sided, any colour solder mask.

I did try to use a home iron for a while... which only convinced me why I wanted a heat laminator. Results with an iron are OK, but I would not call it a consistently good solution. Lot's of variables to help it go wrong.

somanshumehta:
SMD works are all insdustrial and needs professsional training and touch for mastering.
Also,unless you do not design a high speed circuit you are off from many design cconsideration like trace thichness,clad board selection,etch time and its concentraton.
Ultimately it's like a private fun and passion

I'd probably reflow SMD stuff, not do it by hand. Hand seems too tedious. This seems like td make SMD cake as far as pick and place. http://www.youtube.com/watch?v=W-FXD6zQ60g I feel like SMD would just be worth the hassle of producing a board vs through hole just because I wouldn't need a mini drill press and a handful of drill bits. In the end I'm sure ill just buy a pro PCB. I suppose it doesn't matter if I don't need five or ten boards. The time and effort probably will be worth having them manufactured.

I 'used' to do the DIY toner transfer method with an IRON....

but would like more info on what easy to use laminator you guys use? I have read up on them a little.. but always seemed like a bunch of mod's and hacks to get one to work..

curious to hear feedback on your laminator set-ups/mods..etc how hard? ready out of the box?..etc

My current approach is ordering PCBs from china for CHEAP.. (or in a pinch still the DIY toner transfer method, in which I have done double sides DIY boards before)...

and using a solder paste stencil/mask.. and solder paste to add my components..

add in my $17 wal-mart toaster oven for re-flowing.. all done.

I have just added a Silhouette Cameo (vinyl/paper cutter) to my arsenal.. so I can now make my own solder paste masks/stencils.. and stop paying $30 a pop for them!

they turn out great.. better/same quality I have seen from Pololu and ohararp (although the later are pretty good too!)
this is down to 0603 components & QTFP ATmega328P-Au chips..

I have even done (not sure of package name, but SMD accelerometers and amps chips too)

outside of actual PCB's.. I can do everything in-house.. (including PCB's if I want to do the DIY toner transfer method)

DIY pcb.. hand applied some solder paste (no need for stencil on this little junk!) :slight_smile:
popped into toaster oven for a few minutes:

Before I got the Silhouette Cameo..
I would even use paper and an exacto knife to make a paste mask/stencil. (only for small/simple boards of course!)

All these done with same in-house tools (except ordering for PCB's if I needed more than 1), by hand..etc

Spider-Man webshooter pcb's (for prop):

all done in house with toaster oven..

washing and peeling the photo-paper off the pcb's was a turn off for me..
but using a laminator might help for the protoyping of a board and 1-off boards.. (still make stencils for them.. and re-flow them)

if the wait for the pcb's wasnt so long.. I would never look back.. sometimes 3+ weeks is a BUZZ kill though!

lol

link to DIY solder paste stencils made using the Silhouette Cameo cutter if curious:

http://dmstudios.net/misc/cameo_tests/stencils/

This is the cutter?

http://www.hsn.com/products/silhouette-cameo-die-cutting-tool-bundle/7107182?sz=31&sf=CT0206&ac=INCCT0206&cm_mmc=Shopping%20Engine-_-PLA-_-Crafts%20and%20Sewing-_-7107182&channel=Froogle&mr:referralID=0fab055f-dd33-11e2-9dea-001b2166becc

And you are cutting the mylar with it directly?

Hi Robert-

yes, that 'is' the one I have..

although for myself.. I recommend a different kit.. as the 'tools' were only 'meh' to me.. (can use toothpick, exacto..whatever)
so I opted for the kit of the same price on amazon.com came with 2 mats and two blades..1 stock multi-tool..etc

Im not sure what you mean by, am I cutting the mylar directly with it? the Silhouette Cameo does the cutting.. (but no I am not using the stock 'software' if thats what your asking?)

matter of fact.. there are 'two' approaches I have seen/tested..

but to qualify things first..

the Cameo comes with stock software called Silhouette Studio.. you can buy a better version (30-50 bucks depending on coupons/sales around) called Designer Studio..

which allows .svg support (which is nice I guess).. and a few other things I think?..

but you can import images .jpg, .png, .dxf files..etc.. and trace the image(s) you want to cut out.. takes a bit of getting used to.. and tweaking the settings for best cutting results..

that being said.. I'll outline the two approaches I have tried/tested.. (all of this info is already out there, not new here, just my results, same stuff you seen on hackaday..etc, same cutter too)

method 1:

this involves using a custom Eagle script to export your cream layer to a .dxf file (using all straight lines for the pad outlines..thats was the 'key/trick')..

you then -do- use the Silhouette studio to import this .dxf file and cut away..

simple.. HOWEVER.. not the best results.. some slanted pads, not always straight.. depending on the footprints used in the file though, most stencils were still usable (solder paste is somewhat forgiving)

this way is fast and exports directly from Eagle.. easy to use/do..

summary: for anyone of the people 'here' reading this.. they should be able to handle method 2 no problem (especially if "I" did it!) ;).... and there -are- better results to be had..

method 2:
this takes the installation of several other programs/applications..

its more or less a Phython script that that takes your gerbfile file and converts it using a .py script into coords to send to the Cameo.... it more or less re-home/re-aligns the blade after each cut to make them all correct alignment/precise.. takes a long time to make one stencil (originally...read more)

if you are Windows its a bit more...Linux/Mac I guess it much easier by default.. (not sure.. Im a windows sap still!) lol..

anyways.. you'll need to download and install the following:

this is the 'magic script' right here:

download gerber2graphtec from:

matter of fact you can follow my failures and success here on Dangerous Prototypes forum:

it will outline everything way better than i can again.. lol..

once you get everything installed..

there were some NEW updates you'll want to use:

1.) the author made a GUI that makes things MUCH easier..

2.) another member created an 'optimized' .py file to replace the OG one in the gerbertographtec directory...
it makes the stencils cut WAY faster.. minutes rather than hours (which is how long some stencils would take with original script)

just read through it to the end so you can see all the changes and results posted!

tip:
clean you blade before you do a new stencil!!!!
material used matters! (I have used same mylar as Pololu and overhead transparencies!)
making sure the mat is CLEAN (scrape with credit card/library card..etc)
squeegee your mylar/transparency over the sticky mat!!! make sure the cut area is adhered to mat good! (you do NOT want the material to LIFT on a cut with very tight footprint!)

not only is great to do vinyl stickers
masks for glass etching/painting/art
gifts..etc

its a GREAT addition to my in-house work shop!

I have already saved myself in $90-$120 in stencils already!.. and cut a few for my buddies project/pcbs!

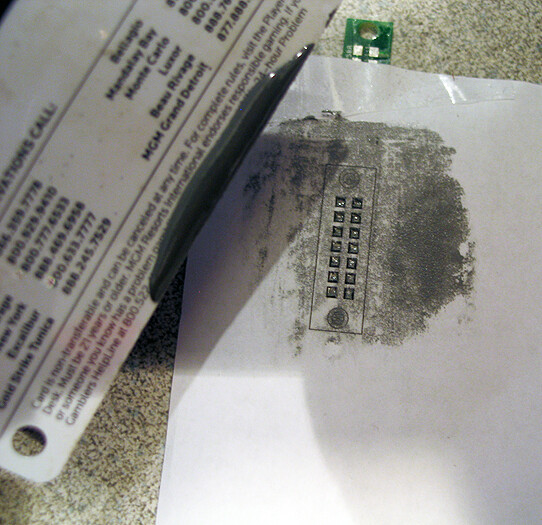
here was a vinyl sticker I made as a test..

grabbed some image on-line.. traced it in the software.. cut it out:

let me know you have any question Robert... be glad to help!..

Thanks Jerry. I might look into getting one of those!

I think they do a great job when using the gerbertographtec script! (look at some of the results posted on the DP forum link)

now if we could only get a US based iteadStudio/Seeed type of pcb house... I'd be all set forever!

seriously though.. a really nice investment...

the machine itself can be had for under $200.00 if you poke around.. (google)

and your local hobby lobby or Michael's will have mats and card stock..etc.

(I got some vinyl from Amazon for pretty cheap, used the PRIME account free 30-day trial, free 2-day and $3.00 next day air! <-- did same with my Cameo got it next day for $3.00...spolied!)

Wait... I don't think I've ever heard of anyone actually using a silkscreeen process to make PCBs at "home." The usual choice is between toner transfer and photo-sensitized copperclad (with the latter having subsets of pre-sensitized boards, liquid-based photoresist, and laminated photoresist. And positive vs negative processes.)