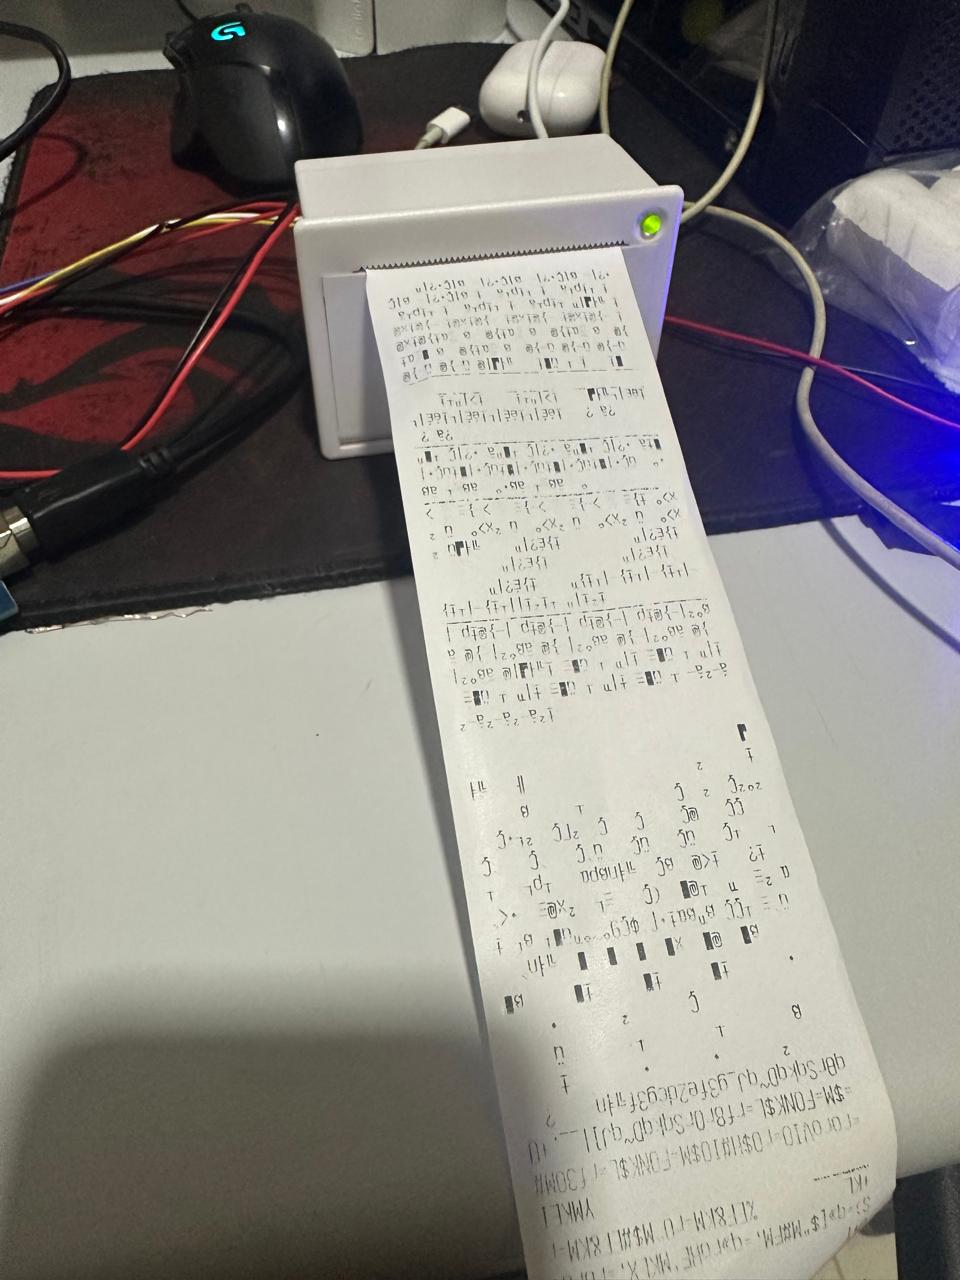
I modified the code like this, and connected it to ports 14 and 15 (RX3,TX3) of the Arduino.
/*------------------------------------------------------------------------
  Example sketch for Adafruit Thermal Printer library for Arduino.
  Demonstrates a few text styles & layouts, bitmap printing, etc.

  IMPORTANT: DECLARATIONS DIFFER FROM PRIOR VERSIONS OF THIS LIBRARY.
  This is to support newer & more board types, especially ones that don't
  support SoftwareSerial (e.g. Arduino Due).  You can pass any Stream
  (e.g. Serial1) to the printer constructor.  See notes below.
  ------------------------------------------------------------------------*/

#include "Adafruit_Thermal.h"
#include "adalogo.h"
#include "adaqrcode.h"

// Here's the new syntax when using SoftwareSerial (e.g. Arduino Uno) ----
// If using hardware serial instead, comment out or remove these lines:

//#include "SoftwareSerial.h"
//#define TX_PIN 6 // Arduino transmit  YELLOW WIRE  labeled RX on printer
//#define RX_PIN 5 // Arduino receive   GREEN WIRE   labeled TX on printer

//SoftwareSerial mySerial(RX_PIN, TX_PIN); // Declare SoftwareSerial obj first
//Adafruit_Thermal printer(&mySerial);     // Pass addr to printer constructor
// Then see setup() function regarding serial & printer begin() calls.

// Here's the syntax for hardware serial (e.g. Arduino Due) --------------
// Un-comment the following line if using hardware serial:

Adafruit_Thermal printer(&Serial3);      // Or Serial2, Serial3, etc.

// -----------------------------------------------------------------------

void setup() {

  // This line is for compatibility with the Adafruit IotP project pack,
  // which uses pin 7 as a spare grounding point.  You only need this if
  // wired up the same way (w/3-pin header into pins 5/6/7):
  pinMode(7, OUTPUT); digitalWrite(7, LOW);

  // NOTE: SOME PRINTERS NEED 9600 BAUD instead of 19200, check test page.
  //mySerial.begin(19200);  // Initialize SoftwareSerial
  Serial3.begin(19200); // Use this instead if using hardware serial
  printer.begin();        // Init printer (same regardless of serial type)

  // The following calls are in setup(), but don't *need* to be.  Use them
  // anywhere!  They're just here so they run one time and are not printed
  // over and over (which would happen if they were in loop() instead).
  // Some functions will feed a line when called, this is normal.

  // Font options
  printer.setFont('B');
  printer.println("FontB");
  printer.println("ABCDEFGHIJKLMNOPQRSTUVWXYZ");
  printer.setFont('A');
  printer.println("FontA (default)");
  printer.println("ABCDEFGHIJKLMNOPQRSTUVWXYZ");

  // Test inverse on & off
  printer.inverseOn();
  printer.println(F("Inverse ON"));
  printer.inverseOff();

  // Test character double-height on & off
  printer.doubleHeightOn();
  printer.println(F("Double Height ON"));
  printer.doubleHeightOff();

  // Set text justification (right, center, left) -- accepts 'L', 'C', 'R'
  printer.justify('R');
  printer.println(F("Right justified"));
  printer.justify('C');
  printer.println(F("Center justified"));
  printer.justify('L');
  printer.println(F("Left justified"));

  // Test more styles
  printer.boldOn();
  printer.println(F("Bold text"));
  printer.boldOff();

  printer.underlineOn();
  printer.println(F("Underlined text"));
  printer.underlineOff();
  printer.println(F("Adafruit!"));
  printer.feed(2);

  printer.sleep();      // Tell printer to sleep
  delay(3000L);         // Sleep for 3 seconds
  printer.wake();       // MUST wake() before printing again, even if reset
  printer.setDefault(); // Restore printer to defaults
}

void loop() {
}
I also reversed the RX and TX connectors to make sure they weren't swapped, in fact when they are swapped the printer doesn't start printing.
I also tried this way :
/*------------------------------------------------------------------------
  Example sketch for Adafruit Thermal Printer library for Arduino.
  Demonstrates a few text styles & layouts, bitmap printing, etc.

  IMPORTANT: DECLARATIONS DIFFER FROM PRIOR VERSIONS OF THIS LIBRARY.
  This is to support newer & more board types, especially ones that don't
  support SoftwareSerial (e.g. Arduino Due).  You can pass any Stream
  (e.g. Serial1) to the printer constructor.  See notes below.
  ------------------------------------------------------------------------*/

#include "Adafruit_Thermal.h"
#include "adalogo.h"
#include "adaqrcode.h"

// Here's the new syntax when using SoftwareSerial (e.g. Arduino Uno) ----
// If using hardware serial instead, comment out or remove these lines:

#include "SoftwareSerial.h"
#define TX_PIN 14 // Arduino transmit  YELLOW WIRE  labeled RX on printer
#define RX_PIN 15 // Arduino receive   GREEN WIRE   labeled TX on printer

SoftwareSerial mySerial(RX_PIN, TX_PIN); // Declare SoftwareSerial obj first
Adafruit_Thermal printer(&mySerial);     // Pass addr to printer constructor
// Then see setup() function regarding serial & printer begin() calls.

// Here's the syntax for hardware serial (e.g. Arduino Due) --------------
// Un-comment the following line if using hardware serial:

//Adafruit_Thermal printer(&Serial1);      // Or Serial2, Serial3, etc.

// -----------------------------------------------------------------------

void setup() {

  // This line is for compatibility with the Adafruit IotP project pack,
  // which uses pin 7 as a spare grounding point.  You only need this if
  // wired up the same way (w/3-pin header into pins 5/6/7):
  pinMode(7, OUTPUT); digitalWrite(7, LOW);

  // NOTE: SOME PRINTERS NEED 9600 BAUD instead of 19200, check test page.
  mySerial.begin(19200);  // Initialize SoftwareSerial
  //Serial1.begin(19200); // Use this instead if using hardware serial
  printer.begin();        // Init printer (same regardless of serial type)

  // The following calls are in setup(), but don't *need* to be.  Use them
  // anywhere!  They're just here so they run one time and are not printed
  // over and over (which would happen if they were in loop() instead).
  // Some functions will feed a line when called, this is normal.

  // Font options
  printer.setFont('B');
  printer.println("FontB");
  printer.println("ABCDEFGHIJKLMNOPQRSTUVWXYZ");
  printer.setFont('A');
  printer.println("FontA (default)");
  printer.println("ABCDEFGHIJKLMNOPQRSTUVWXYZ");

  // Test inverse on & off
  printer.inverseOn();
  printer.println(F("Inverse ON"));
  printer.inverseOff();

  // Test character double-height on & off
  printer.doubleHeightOn();
  printer.println(F("Double Height ON"));
  printer.doubleHeightOff();

  // Set text justification (right, center, left) -- accepts 'L', 'C', 'R'
  printer.justify('R');
  printer.println(F("Right justified"));
  printer.justify('C');
  printer.println(F("Center justified"));
  printer.justify('L');
  printer.println(F("Left justified"));

  // Test more styles
  printer.boldOn();
  printer.println(F("Bold text"));
  printer.boldOff();

  printer.underlineOn();
  printer.println(F("Underlined text"));
  printer.underlineOff();
  printer.println(F("Adafruit!"));
  printer.feed(2);

  printer.sleep();      // Tell printer to sleep
  delay(3000L);         // Sleep for 3 seconds
  printer.wake();       // MUST wake() before printing again, even if reset
  printer.setDefault(); // Restore printer to defaults
}

void loop() {
}