Total noob needs help with LED costume circuitry

I have a lot of questions so I hope I don't annoy anyone! I'm making this costume:

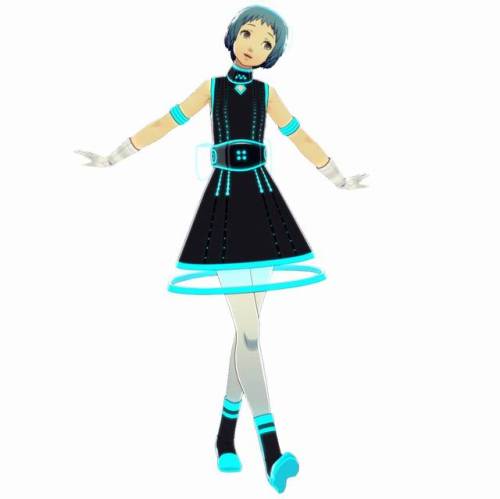
There's lights down the front and back of the dress that are animated, and you can kinda see from this video: - YouTube
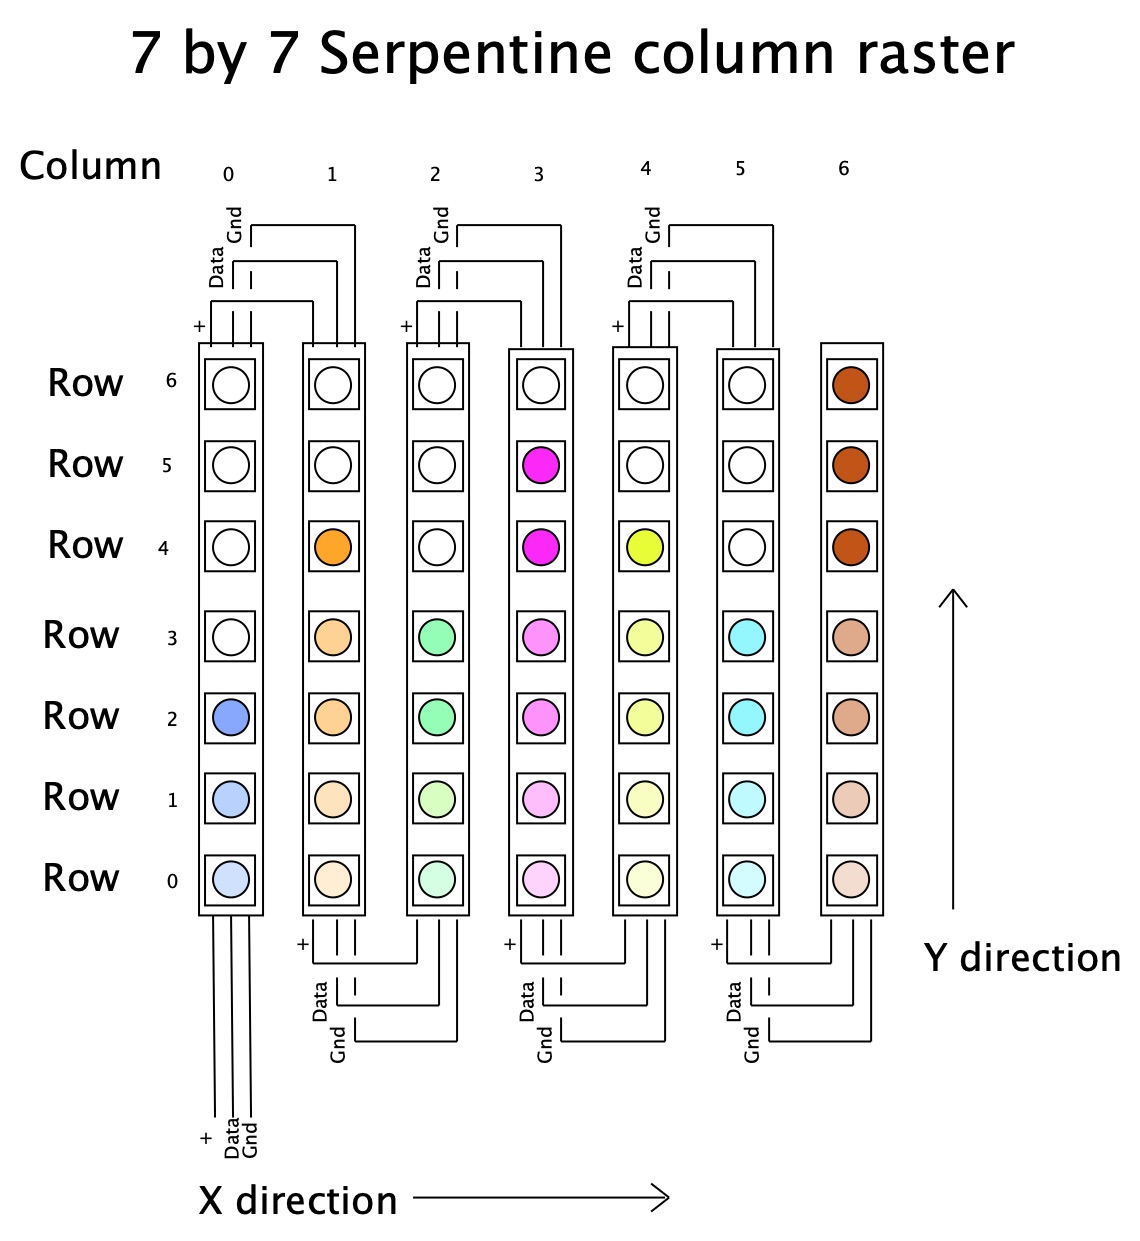
I'm not too worried about the programming part right now because I feel like I can't even test that until I have the circuit ready! I basically want all of the circuits hidden at the waist, under or inside of the belt. Here's some pictures of the tools I have and some diagrams I drew of roughly what I want:


That's a 12v battery pack w 8 aaas and an on/off switch. Not sure what i can do with all those wires on the leds if I have to cut them or something. I have an arduino nano and I wanna know if that's enough for this 180 led project? Although the strips I bought are addressable in sets of 3, rather than individual.

This is a closeup of the strip connectors. As you can see, there's a + which is kinda weird because the leds don't have that symbol on them. I wanna know if I have to put the strips in a certain way? Since the + symbol is flipped on top and bottom...

These are the symbols on the strips. I don't really know what any of it means besides 12V and in other tutorials I see, I never see these kinds of symbols there either.

Finally, here is a drawing of what I more or less want it to look like. All the strips connecting to eachother, except the center two connecting to the batter and controller before connecting back to the other strips.

I was having my dad help me before and he thinks that I can't have the strips animated in the pattern i want if theyre all cut up like this but that doesn't make sense to me. It has to do with the pin it's connected to, right?

If you read all this, thanks so much! I'm at a total loss here...

I have an arduino nano and I wanna know if that's enough for this 180 led project?

Yes.

the strips I bought are addressable in sets of 3, rather than individual.

Yes and that is what will stop you having any pattern you want, you can't cut up these strips into less than three LEDs sections. Basically you have bought the wrong type of LED. You need the WS2812 ( Neopixel ) or the APA102 ( Dot Star ) type of LED. They both need 5V power. A good way is to power them with 3 AA batteries. This will not quite be 5V but will not require a regulator. You are also better using a board with an ATtiny 85 processor in place of a Nano as they are much smaller. I build my own circuits but that is probably too advanced for you yet.

These are the symbols on the strips. I don't really know what any of it means besides 12V and in other tutorials I see, I never see these kinds of symbols there either.

You haven't read any good tutorials then:-
Gnd - Ground, it means the negitave of your power supply.
Din - Data in, which is the signal from your Arduino or from the last LED in the strip.
Dout - Data out, to go to the next LED's data in pin or for the last LED in a strip leave unconnected to anything.

As you can see, there's a + which is kinda weird because the leds don't have that symbol on them.

The + is what you have on your strip as 12V, and on others as 5V.

I wanna know if I have to put the strips in a certain way?

Yes get then wrong and you will damage your strip.

Since the + symbol is flipped on top and bottom

No it is not, it is in the same place. You only see it as flipped because the connector is flipped, + is still the left most pin as you look at the strip from the input connector with the strip hanging down from you.

It has to do with the pin it's connected to, right?

As long as you maintain the chain from data out to data in the software will see them as one chain and they will have individual LED numbers to identify them.

I don't really care that they're only addressable in 3 led sections... I guess the more I'm researching about it, the main thing that bothers me is I'm not sure how to use the led connectors and I can't find any diagrams for using these connectors w ws2811 strips. Where does the + go? To the 12v symbol?

Where does the + go? To the 12v symbol?

Yes I thought I told you that already.

I have never seen those connection strips have you a link to where you bought them from?

I think you need to think carefully about what patterns and animations you want to show, before you decide to use those T-connectors.

You can have only one Dout at each T, the other two must be Din. It does not matter which of the 3 connectors the Dout is connected to. Never connect 2 or 3 Dout together or the strips could be damaged. Connecting 3 Din won't damage but also don't work.

If you do use them, the 2 strips connected to the T with their Din will always show identical patterns to each other, you will loose individual control over those 2 strips.

If you need individual control of each strip, then you can't use T connectors (at least, you can't connect 3 strips together with them, only 2, in which case a straight connector would be neater). For individual control, you must connect strips in a chain. You can connect strips to different Nano pins, if that helps.

Basically those connectors do limit how you can arrange things. The most important thing when using them is to take notice of the arrows on the strip.

The point of two arrows should never be connected together.

But the none pointed end of the strips can be connected together providing that you have a strip with a point at the junction of these two none point ends. When you do that then the two strips that have the none points together will show the same pattern.

The arrows show the flow of data through the strips. You must always have a continuous flow of of data in one direction to access all the points. Not withstanding the case about mirrored patterns I said in the last paragraph.

This diagram might help you:-

Note you do not have to use all three ends on those connectors, using only two is fine.

That diagram does help, thanks. If the connectors are just gonna cause more problems, would it just be better to use wire? I think it will probably be fine if all the douts are one pattern and all the dins are a different pattern, if I'm understanding that correctly. None of the strips are going into the connectors horizontally, if anything, i thought i could connect the connectors to eachother horizontally, either directly or through wires since it doesn't seem like i could connect them directly (And it would kind of screw the design up anyway, since i want all the vertical strips to be about an inch apart) I think maybe later, I can draw another concept for how I could do it and you can tell me if it makes any sense lol

EDIT: Wait, do you mean that the patterns would be mirrored if I connected them like you showed? Or just that the arrows are mirrored. Maybe that's what my dad was trying to say. I need the patterns to be different, so maybe I should try something else if that's the case.

all the douts are one pattern and all the dins are a different pattern

Hmmm... that does not sound like you understand yet.

The Dout and Din connections are labelled like that because the digital data, containing instructions for LEDs to light up with a specific colour and brightness, flows only one way. It flows out of the Arduino pin into a Din connection of a strip. Then it flows out of the Dout connection the end of that strip into the Din connection of another strip. If two Din connections are connected to that Dout connection, they each get an exact copy of the same data, so they light up exactly the same.

Wait, do you mean that the patterns would be mirrored if I connected them like you showed?

Ah, now I think you are starting to get it!

Wait, do you mean that the patterns would be mirrored if I connected them like you showed?

Yes. Left hand most figure the strip going up from the connector has the same pattern as the strip going down from the connector.

Or just that the arrows are mirrored.

No the arrows indicate the direction of the pattern as the LED number increases. These arrows are marked on the strip. they show you where the Din is, which is at the none point end and the Dout is at the point end. While the strips are complete this dosn't much matter but when you cut up the strips and try and join them together the strips must be connected such that you can trace a path through all your LED strips following the direction of the arrows. Anything else and it won't work.

This I think is the best way for you to wire it up:-


You can of course have any number of LEDs in the columns, and any number of rows.

So, I tested it with my dad, and I think there is some complications with the type of LEDs I'm using (ws2811) and the lengths I cut it, so basically there's four strips on the top, each with LEDs and four strips on the bottom, each with 15 LEDS. The pattern goes up to the 15, and then the rest of the 30 LEDs on the longer strips is just static because I guess the program can't handle uneven lengths. He said that I would need to get two arduinos, but there should be a better solution, right? So I think maybe to fix this, I could wire all the top strips together and to one pin, and all the bottom strips together to another pin. Would that work? Or do I really need two arduinos?

EDIT: ok its actually less than 45 but you get the idea lol

so basically there's four strips on the top, each with LEDs and four strips on the bottom, each with 15 LEDS. The pattern goes up to the 15,

I am having trouble visualising that, can you draw a diagram? As 15 is divisible by three you will in effect have five groups of three you can control.

You only need one pin and one Arduino if all the LED strips are chained together correctly.

Like I said:-

the strips must be connected such that you can trace a path through all your LED strips following the direction of the arrows.

In that way every group of three LEDs will have its own place in the chain, that place is the LED number you use in code. Once you have that you can code any pattern you like, don't worry about how you code this yet until you have a diagram showing the position and number of each LED. Then you can concern yourself with how to get the pattern you want on the LEDs you want them on.

he 30 LEDs on the longer strips is just static because I guess the program can't handle uneven lengths.

What program is this? You wriite the code so that it can handle the strips you have.