What you're doing wrong is that you think the Arduino can source enough current.
You need to involve that 12 V battery with lots of amps, not use 5 V and some 20 mA.
Rocket igniters require considerable current. Just as an example:
Estes igniter: Typically requires about 1 amp of current to fire
40 gauge nichrome bridgewire: Requires about 1.5 amps of current for rapid ignition
Conductive dip igniter: Typically requires 1 to 3 amps of current
A common 2N3904 is about a 200 mA (0.2 amp) transistor.
A better approach would be using a logic level mosfet. Something like a FQP30N06L or similar. Estes has plenty of suggestions, the guys making rocket engines. Those igniters are typically between 0.5 and 2.0 Ohms. A Google of "rocket igniter circuit diagram" should give you some examples. Anyway the transistors you mentioned will not handle the igniter current, use a MOSFET.
The TIP122 is a power Darlington so it should work. You will lose a few volts as the saturation voltage is 2-4 volts. Also the base drive voltage is higher than a simple transistor. Connect the emitter directly to the power supply ground and use around 220 - 330 ohms for the resistor between the Arduino pin and the base.
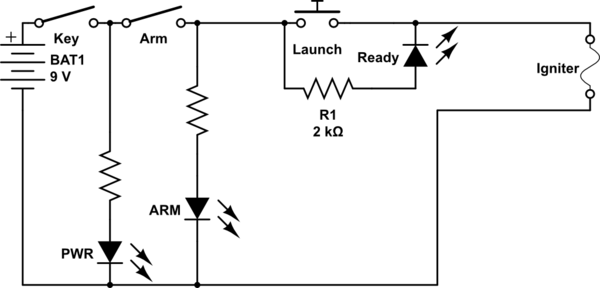
Keep in mind this circuit is very basic but pretty cool. Your battery will be 12 VDC. When the Key Battery switch is activated the PWR ignites a single PWR available LED. Now when the ARM switch is closed the ARM (Ready) LED will illuminate. Note how the Ready LED and R1 are configured. The ready LED and R1 will limit the current to the igniter so it won't ignitr but the glowing Ready LED tells you that the igniter id good completing part of the circuit. Next comes the actual Launch button. When pressed R1 and the READY LED extinguish and are bypassed. Rhe igniter now has full current and igbites.
Depending on how cool you want the two switches aqnd button can be replaced with a few small relays and the launch button replaced with a Logic Level MOSFET as mentioned earlier and the whole countdown and ignition sequence can be run by an Arduino or any uC of your choice. Just a matter of how fancy you want to make things. The cartoon is basic but can be modified to do whatever you want. You could even add a display.
I would also suggest you use relay switching rather than semiconductor for SAFETY if you have to.
Many years ago I did preliminary design for an igniter panel, each time we did a demo to the customer, we had to prove SAFETY!!
I like the concept for kids, great idea.
Tom....
PS.Fireworks are not a plaything.
Here in my state Fireworks are illegal, you need a license, our hospital ER dept are not treating so many burn injuries aroud various celebration times.
Thanks for the tips and feedback. I'm going to go for a relais.
For those raising safety concerns: rest assured: the whole idea is to have the puzzle game/launch console indoors, with a long cable and the fireworks outside (obviously) to seperate kids from explosions.
You need some sort of safety interlock to prevent accidental launches , especially if children are involved . ( eg a key switch and method to separate people from the launch area )
Arduino has no fail safe abilities !!
Not a project I’d recommend ! Imagine the issues if someone’s child gets hurt - your responsibility .