Hello, I use 2 sensors Time of Flight VL53L0X distance (in grove). My program allows to use the 2 at the same time with a kind of manual initialization to differentiate the 2 sensors. The problem is that every time I disconnect the card I have to do this again and it is contradictory to the purpose of my project (which is autonomy). I try a lot of stuff like plugging the sensor into a digital port and bring it back to the I2C but it does not work ... I do not know too much and I have more idea so if someone one to the solution ...
Please, post the image of your sensor and the codes that you have tried. Which Arduino are you using? UNO or NANO or MEGA or DUE?
i use arduino mega
#include "Adafruit_VL53L0X.h"
#include <Wire.h>
#include "rgb_lcd.h"


rgb_lcd lcd;

const int colorR = 0;
const int colorG = 0;
const int colorB = 0;

#define LOX3_ADDRESS 0x29
#define LOX2_ADDRESS 0x30
#define LOX1_ADDRESS 0x31

#define SHT_LOX1 7
#define SHT_LOX2 6

Adafruit_VL53L0X lox1 = Adafruit_VL53L0X();
Adafruit_VL53L0X lox2 = Adafruit_VL53L0X();
Adafruit_VL53L0X lox3 = Adafruit_VL53L0X();

VL53L0X_RangingMeasurementData_t measure1;
VL53L0X_RangingMeasurementData_t measure2;

void setID() {
      lcd.begin(16, 2);

    lcd.setRGB(colorR, colorG, colorB);

    lcd.print("initialisation");

lox1.begin(0x29);
lox2.begin(0x29);
lox3.begin(0x29);

analogWrite (53, 0); //attente de l'utilisateur
delay (1000);
analogWrite (53, 255); //debrancher un des 2
delay(2000);
 lox3.begin(0x31);
 delay (4000);
 analogWrite (53, 0); //rebrancher
 delay (2000);
  lox3.begin(0x30); //definition du 2eme acpteur
  delay(2000);;
  analogWrite (52, 200); //acquisition terminer


  // all reset
  digitalWrite(SHT_LOX1, LOW);
  digitalWrite(SHT_LOX2, LOW);
  delay(10);
  // all unreset
  digitalWrite(SHT_LOX1, HIGH);
  digitalWrite(SHT_LOX2, HIGH);
  delay(10);

  // activating LOX1 and reseting LOX2
  digitalWrite(SHT_LOX1, HIGH);
  digitalWrite(SHT_LOX2, LOW);

  // initing LOX1
  if(!lox1.begin(LOX1_ADDRESS)) {
    Serial.println(F("Failed to boot first VL53L0X"));
    while(1);
  }
  delay(10);

  // activating LOX2
  digitalWrite(SHT_LOX2, HIGH);
  delay(10);

  //initing LOX2
  if(!lox2.begin(LOX2_ADDRESS)) {
    Serial.println(F("Failed to boot second VL53L0X"));
    while(1);
  }
}

void read_dual_sensors() {

       lcd.clear();

  lox1.rangingTest(&measure1, false);
  lox2.rangingTest(&measure2, false);

  Serial.print("capteur 1: ");
  if(measure1.RangeStatus != 4) {
    Serial.print(measure1.RangeMilliMeter-30);
     Serial.print("mm                 ");
  } else {
    Serial.print("trop loin     ");
          lcd.setCursor(1, 1); {
    lcd.print("XX"); }
  }

  Serial.print(" ");


  Serial.print("capteur 2: ");
  if(measure2.RangeStatus != 4) {
    Serial.print(measure2.RangeMilliMeter-30);
    const char CAP2 = (measure2.RangeMilliMeter-30);
   Serial.print("mm");
  } else {
    Serial.print("trop loin");
     lcd.setCursor(1, 1); {
    lcd.print("XX"); }
  }

  Serial.println();
lcd.setCursor(0,0); {
    lcd.print("cap1        cap2");}
    if ((measure1.RangeMilliMeter-30) < 7000){
      lcd.setCursor(1, 1); {
    lcd.print(measure1.RangeMilliMeter-30);
      }
    } else {
          lcd.setCursor(1, 1); {
    lcd.print("out");}

  }
        if ((measure2.RangeMilliMeter-30) < 7000){
  lcd.setCursor(13,1); {
    lcd.print(measure2.RangeMilliMeter-30);
      }
        } else {
          lcd.setCursor(13, 1); {
    lcd.print("out");}

        }

    delay(10);
}

void setup() {
  Serial.begin(9600);
  while (! Serial) { delay(1); }

  pinMode(SHT_LOX1, OUTPUT);
  pinMode(SHT_LOX2, OUTPUT);

  Serial.println("Shutdown pins inited...");

  digitalWrite(SHT_LOX1, LOW);
  digitalWrite(SHT_LOX2, LOW);

  Serial.println("Both in reset mode...(pins are low)");


  Serial.println("Starting...");
  setID();


}

void loop() {

   read_dual_sensors();
   delay(200);
}
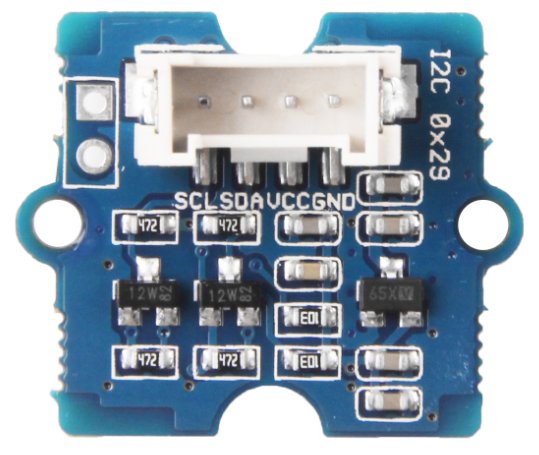
my sensor Grove - Time of Flight Distance Sensor VL53L0X | Seeed Studio Wiki
Also here
AWOL:
Also here
yes because i have create 2 topics: one in french, one in english. i'm french but i can understand the english language.
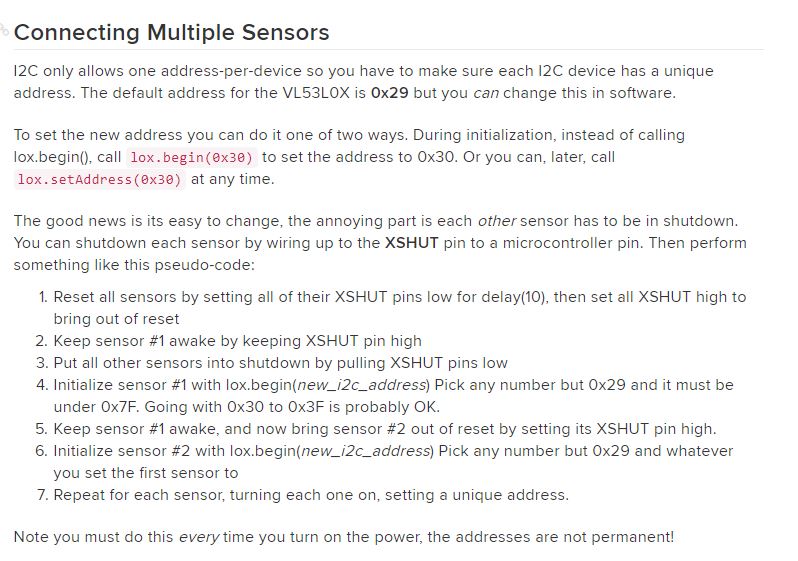
The procedure for setting alternate I2C address is described here. It must be performed every time the device is powered up. You could automate the process by wiring each device’s XSHUT pin to a separate digital output. Then, in setup(), run the sequence in the above link by sequentially activating the XSHUT pins and calling the setAddress() or begin() method.
This is the picture of your sensor which shows that the I2C address is 0x29. If you want to connect more than one such sensor in your project, you have to use I2C Bus multiplexer.
gfvalvo:
The procedure for setting alternate I2C address is described here. It must be performed every time the device is powered up. You could automate the process by wiring each device’s XSHUT pin to a separate digital output. Then, in setup(), run the sequence in the above link by sequentially activating the XSHUT pins and calling the setAddress() or begin() method.
thx for your help.
i can use the 2 sensors, this parts works, but i would like more information about automation.
GolamMostafa:
If you want to connect more than one such sensor in your project, you have to use I2C Bus multiplexer.
As I posted above, there is a procedure for changing the I2C address. No multiplexer required.
gfvalvo:
As I posted above, there is a procedure for changing the I2C address. No multiplexer required.
i would like have more help on this point. I don't use XSHUT, i use GROVE and i have already try but I can not do it... i need more information for use it pls.
I don't know what GROVE is. The procedure is detailed quite clearly at the site I linked. Have you read it?
yes i have read,
I had misunderstood sorry