Hello,
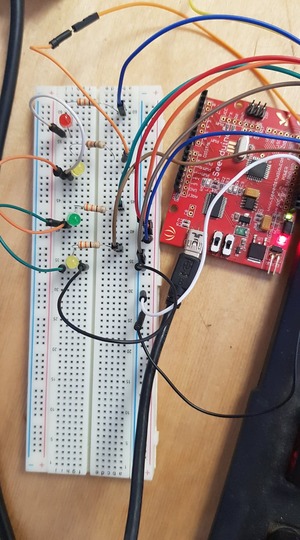
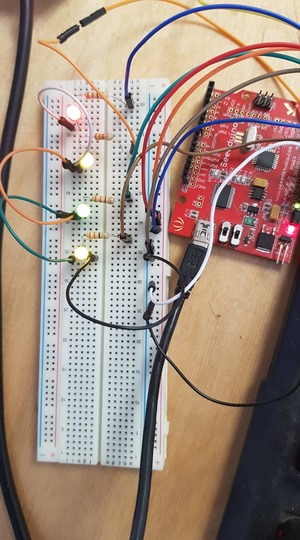
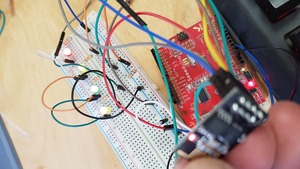
I am trying to maximize the use of the ESP-01 by enabling it to control 4 relays using its normal GPIO pins 0 and 2, but additionally convert its RX and TX pins as two extra GPIO pins. I researched online and i found some specific code which i included into my final sketch: esp8266 - How to I make the Tx and Rx pins on an ESP-8266-01 into GPIO pins? - Arduino Stack Exchange
I commented out all the serial.print lines to make sure they were not interfering. But none of the relays are working. I am wondering if i need to pull certain pins HIGH in the void setup() function?
/*
 * ESP-01 WiFi relays controller via local network
 * version 1.2
 * Testing RX and TX as extra GPIO pins
 */

#include <ESP8266WiFi.h>

const char* ssid = "****"; // enter Service Set Identifier
const char* password = "*****";  // enter WiFi network password

int relayPin1 = 0; // GPIO0 of ESP-01
int relayPin2 = 1; // GPIO1 of ESP-01 (TX)
int relayPin3 = 2; // GPIO2 of ESP-01
int relayPin4 = 3; // GPIO3 of ESP-01 (RX)

int relay1_status = 0;  // status of relay 1 initialised to 0 or OFF
int relay2_status = 0;  // status of relay 2 initialised to 0 or OFF
int relay3_status = 0;  // status of relay 3 initialised to 0 or OFF
int relay4_status = 0;  // status of relay 4 initialised to 0 or OFF

WiFiServer ESPserver(80); //Service Port

void setup()
{
//********** CHANGE PIN FUNCTION  TO GPIO **********
//GPIO 1 (TX) swap the pin to a GPIO.
pinMode(1, FUNCTION_3);
//GPIO 3 (RX) swap the pin to a GPIO.
pinMode(3, FUNCTION_3);
//**************************************************

//Serial.begin(115200); //Default Baud Rate for ESP-01
pinMode(relayPin1, OUTPUT);  // Connect relay 1 to ESP-01's GPIO 0
pinMode(relayPin2, OUTPUT);  // Connect relay 2 to ESP-01's GPIO 1
pinMode(relayPin3, OUTPUT);  // Connect relay 3 to ESP-01's GPIO 2
pinMode(relayPin4, OUTPUT);  // Connect relay 4 to ESP-01's GPIO 3

digitalWrite(relayPin1, LOW);  // set initial status to LOW
digitalWrite(relayPin2, LOW);  // set initial status to LOW
digitalWrite(relayPin3, LOW);  // set initial status to LOW
digitalWrite(relayPin4, LOW);  // set initial status to LOW

/*Serial.println();
Serial.println();
Serial.print("Connecting to WiFi: ");
Serial.println(ssid);
*/
WiFi.begin(ssid, password);
delay(5000);

// The following 5 lines of code assign static IP address to ESP-01. Otherwise, comment out to get automatic IP.
  IPAddress ip(192,168,8,233);
  IPAddress gateway(192,168,1,1);
  IPAddress subnet(255,255,255,0);
  WiFi.config(ip, gateway, subnet);
  delay(5000);

while (WiFi.status() != WL_CONNECTED)
{
  delay(100);
  //Serial.print("*");
}
//Serial.println("");
//Serial.println("WiFi connected");

// Start the server
ESPserver.begin();
//Serial.println("Server started");

// Print the IP address
/*
Serial.print("The URL to control ESP-01: ");
Serial.print("http://");
Serial.println(WiFi.localIP());
Serial.println("");
*/
}

void loop()
{
// Check if a client has connected
WiFiClient client = ESPserver.available();
if (!client)
{
  return;
}

// Wait until the client sends some data
//Serial.println("Client connected");
while(!client.available())
{
  delay(1);
}

// Read the first line of the request
String request = client.readStringUntil('\r');
//Serial.println(request);
client.flush();

// Match the request
if (request.indexOf("/RELAY1ON") != -1)
{
  //Serial.println("Relay 1 is ON");
  digitalWrite(relayPin1, HIGH);
  relay1_status = 1; // ON
}
else if (request.indexOf("/RELAY1OFF") != -1)
{
  //Serial.println("Relay 1 is OFF");
  digitalWrite(relayPin1, LOW);
  relay1_status = 0; // OFF
}
else if (request.indexOf("/RELAY2ON") != -1)
{
  //Serial.println("Relay 2 is ON");
  digitalWrite(relayPin2, HIGH);
  relay2_status = 1; // ON
}
else if (request.indexOf("/RELAY2OFF") != -1)
{
  //Serial.println("Relay 2 is OFF");
  digitalWrite(relayPin2, LOW);
  relay2_status = 0; // OFF
}
else if (request.indexOf("/RELAY3ON") != -1)
{
  //Serial.println("Relay 3 is ON");
  digitalWrite(relayPin3, HIGH);
  relay3_status = 1; // ON
}
else if (request.indexOf("/RELAY3OFF") != -1)
{
  //Serial.println("Relay 3 is OFF");
  digitalWrite(relayPin3, LOW);
  relay3_status = 0; // OFF
}
else if (request.indexOf("/RELAY4ON") != -1)
{
  //Serial.println("Relay 4 is ON");
  digitalWrite(relayPin4, HIGH);
  relay4_status = 1; // ON
}
else if (request.indexOf("/RELAY4OFF") != -1)
{
  //Serial.println("Relay 4 is OFF");
  digitalWrite(relayPin4, LOW);
  relay4_status = 0; // OFF
}
else
{
  //Serial.println("Invalid request");
  relay1_status = 2; // Invalid request
  relay2_status = 2; // Invalid request
  relay3_status = 2; // Invalid request
  relay4_status = 2; // Invalid request
  //client.stop();
  //Serial.println("Client disconnected");
  //Serial.println();
  //return;
}

// Send a standard http response header
client.println("HTTP/1.1 200 OK");  // start the web response that is sent to the web browser
// The 200 OK is a HTTP response code and in this case is 200 which means the request is OK
client.println("Content-Type: text/html");  // tell the browser that the response content type is text/html
client.println("Connection: close");
// the connection will be closed after completion of the response
client.println(); // need to have a space here after http response header
client.println("<!DOCTYPE HTML>");  // HTML web site template
client.println("<html lang=\"en\">");
client.println("<head>");
client.println("<meta charset=\"utf-8\">");
client.println("<title>ESP-01 WiFi relay controller</title>");
client.println("</head>");
client.println("<body>");

// Prints text in web browser
client.println("<h3>ESP-01 WiFi relay controller</h3>");

client.print("<p><b>Relay 1 (GPIO 0):</b> ");
client.println("<a href='/RELAY1ON' target='_self'>ON</a>");
client.println("<a href='/RELAY1OFF' target='_self'>OFF</a></p>");
client.print("<p>Status of relay 1: ");
if (relay1_status == 1)
{
  client.println("<font color=\"red\"><b>ON</b></font></p>");
}
else if (relay1_status == 0)
{
  client.println("<font color=\"blue\"><b>OFF</b></font></p>");
}
else if (relay1_status == 2)
{
  client.println("Invalid request</p>");
}

client.print("<p><b>Relay 2 (GPIO 1 / TX):</b> ");
client.println("<a href='/RELAY2ON' target='_self'>ON</a>");
client.println("<a href='/RELAY2OFF' target='_self'>OFF</a></p>");
client.print("<p>Status of relay 2: ");
if (relay2_status == 1)
{
  client.println("<font color=\"red\"><b>ON</b></font></p>");
}
else if (relay2_status == 0)
{
  client.println("<font color=\"blue\"><b>OFF</b></font></p>");
}
else if (relay2_status == 2)
{
  client.println("Invalid request</p>");
}

client.print("<p><b>Relay 3 (GPIO 2):</b> ");
client.println("<a href='/RELAY3ON' target='_self'>ON</a>");
client.println("<a href='/RELAY3OFF' target='_self'>OFF</a></p>");
client.print("<p>Status of relay 3: ");
if (relay3_status == 1)
{
  client.println("<font color=\"red\"><b>ON</b></font></p>");
}
else if (relay3_status == 0)
{
  client.println("<font color=\"blue\"><b>OFF</b></font></p>");
}
else if (relay3_status == 2)
{
  client.println("Invalid request</p>");
}

client.print("<p><b>Relay 4 (GPIO 3 / RX):</b> ");
client.println("<a href='/RELAY4ON' target='_self'>ON</a>");
client.println("<a href='/RELAY4OFF' target='_self'>OFF</a></p>");
client.print("<p>Status of relay 4: ");
if (relay4_status == 1)
{
  client.println("<font color=\"red\"><b>ON</b></font></p>");
}
else if (relay4_status == 0)
{
  client.println("<font color=\"blue\"><b>OFF</b></font></p>");
}
else if (relay4_status == 2)
{
  client.println("Invalid request</p>");
}

client.println("</body>");
client.println("</html>");

// give the web browser time to receive the data
delay(1);

// close the connection:
//Serial.println("Client disconnected");
//Serial.println();
}
I also found this link while searching for a solution: https://www.roboremo.com/simple-wifi-rc-car.html although i'm not sure if it is applicable. According to that web page, the GPIO0 and GPIO2 must be pulled up and a 1N4148 diode must be added??