hi all im a newbie so dont get mad lol. i want to run a stepper motor that only moves backward and forwards for 5 seconds via an ir remote control using a 12v supply to motors as there nema 17s as i need the torque and i understand that i need them to run of 12 volts via stepper modules being a4988 does anyone have a wiring diagram for such a thing as ive searched everywhere for this and cant find anything similar . many thanks mojo
Try searching the driver board web site.
1 Like
Sorry I do not have one but I used DuckDuckGo with "a4988" as the term and this is the first thing I got: https://www.allegromicro.com/~/media/Files/Datasheets/A4988-Datasheet.ashx
Perhaps you need to start with something easier, like the blink sketch. Also maybe start reading an electrical theory book.
You did not. Search on the four terms you mentioned and you will find endless links.
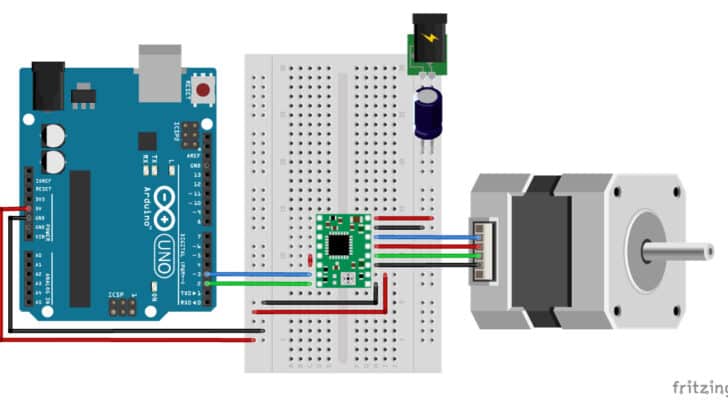
edit: It has come to my attention this image does not have "IR Remote"... I wrongly assumed the the A4988 was the issue... I also do not like the "solderless breadboard" with a motor. I should have used the second link in the search (rather than the first link) to show IR Remote with motor controller and stepper.
... And... this link was just to show that the internet DOES have parts of the request, and even the whole bundle. I am certain if I did some picking and choosing anyone could find a drop-in-replacement for hardware and code. That is why I said "No, you did not search."
1 Like
You just need to know how to ask the right question! If you don't understand electronics and Arduino well this project is very complex!
I did a search for how to connect your components and got this
To control a NEMA 17 stepper motor using an A4988 motor driver and an Arduino, you can write a simple program to make the motor rotate forward for five seconds and then reverse for another five seconds.
Wiring the Components
Here's a typical wiring setup:
- A4988 to Arduino:
DIRto Arduino pin2(Direction control)STEPto Arduino pin3(Step control)ENto ArduinoGND(Enable pin, low enables the driver)MS1,MS2,MS3toGNDorVCCdepending on the microstepping mode (we'll use full steps, so connect them toGND)VDDandGNDto Arduino5VandGND(to power the logic circuit)VMOTandGNDto an external power supply (e.g., 12V for powering the motor)
- Stepper Motor to A4988:
- Connect the motor's four wires to the
2B,2A,1A, and1Bterminals on the A4988.
- Connect the motor's four wires to the
Then I asked how to connect the IR remote to that and got this;
To control the NEMA 17 stepper motor using an A4988 motor driver and start the motor with an IR remote, you can use the IRremote library to detect button presses from the remote. Here's how you can modify the code to achieve that:
- Install the
IRremotelibrary if you haven't already by going to Sketch > Include Library > Manage Libraries in the Arduino IDE and searching for "IRremote" by shirriff. - Connect the IR receiver to your Arduino (e.g., signal pin to
PIN 11, VCC to5V, and GND to GND).
#include <IRremote.h>

// Pin definitions
const int dirPin = 2;
const int stepPin = 3;
const int enablePin = 4;
const int irReceiverPin = 11; // IR receiver pin

// Variables
int motorSpeed = 500; // Microseconds per step
bool movingForward = true; // Direction of the motor

IRrecv irrecv(irReceiverPin);
decode_results results;

void setup() {
  pinMode(dirPin, OUTPUT);
  pinMode(stepPin, OUTPUT);
  pinMode(enablePin, OUTPUT);

  // Enable the motor driver
  digitalWrite(enablePin, LOW);

  // Start the IR receiver
  irrecv.enableIRIn();
}

void loop() {
  if (irrecv.decode(&results)) {
    // Check if a specific button is pressed (adjust the HEX value as per your remote)
    if (results.value == 0xFFA25D) { // Example: Button "Power" on some remotes
      moveStepper();
    }
    irrecv.resume(); // Receive the next value
  }
}

void moveStepper() {
  // Move forward for 5 seconds
  digitalWrite(dirPin, HIGH); // Set direction forward
  unsigned long startTime = millis();
  while (millis() - startTime < 5000) {
    digitalWrite(stepPin, HIGH);
    delayMicroseconds(motorSpeed);
    digitalWrite(stepPin, LOW);
    delayMicroseconds(motorSpeed);
  }

  // Move backward for 5 seconds
  digitalWrite(dirPin, LOW); // Set direction backward
  startTime = millis();
  while (millis() - startTime < 5000) {
    digitalWrite(stepPin, HIGH);
    delayMicroseconds(motorSpeed);
    digitalWrite(stepPin, LOW);
    delayMicroseconds(motorSpeed);
  }
}
yeah i have all that mate thanks though
hi mate thanks ive been going through all the tutorials etc and im getting there slowly lol but i have this little project that i need to do so thats why i am asking for a wiring diagram image would be so much easier
i certainly have searched and quite a bit mate. i aprreciate your diagram i have seen loads of them but not seen one that includes a ir remote sensor , a4988 and uno altogther
brilliant mate thanks . yeah ive been searching like mad lol. im not new to electronics either just this arduino thing is new to me lol but im learning fast
worked an absolute treat mate thankyou.
1 Like
I'm new to electronics have "a lot" to learn, but been using Arduino a long while to make scenic props with light sound and animation. I also need to get used to typing again for some reason I've forgot how to capitalize, spell, and use punctuation. I'm blaming it on texting!
hi mate its cool ive got it sorted ive watched that tutorial also thats for a 5 volt stepper motor not a 12v but ive managed to get it working perfect after some help from someone on here and its all good .
pmsl im the same mate the amount of times ive not put in capitals etc its unreal lol. but its all good now now i need to learn to put six stepper motors together and build the code but i think after a day of tutorials once again im confident ill get it .
Right-sized power supply and motor driver adjustment are imperative.
Here's a simulation that might be useful or useless... only five steppers, though.
thanks for some more info mate much aprecciated . yeqah everything ive seen seems to only go to 5 and not 6 motors . im not fussed about smicro steps all i need is each one to move forwad 5 second then move back 5 seconds individually ive ordered a few more components so will have a go and update everyone on here as your advice has been amazing .
The simulation uses arrays. Add your sixth stepPin and dirPin to the arrays and you should be ready for the timing bit and hardware.
Two methods to consider;
- blocking code (start the motor forward,
delay(5000), send the motor reverse),
or the method of choice, millis();(start the motor forward, compare start time to current time, if over 5 seconds, reverse and repeat 5 seconds timing).- There are also external timers (jumper-programmable timers that raise or lower a DIO pin)
This topic was automatically closed 180 days after the last reply. New replies are no longer allowed.