I need help from smart people out there!!!!!!!
I need someone to explain how the tasks below are done in TinkerCad.
1.1) Connect "Tilt Sensor 4-pin" and an LED with suitable resistors. If the tilt sensor is triggered, the LED must be switched on until the arduino is reset or switched off. The tilt sensor will be closed when it is upright, and break the circuit if it is triggered/tilted.
1.2) Extend the task by connecting the "ambient light sensor", tmp36 and 2 LEDs with suitable resistors. If the temperature sensor reads over 25 degrees, an LED must be switched on. The sensors must be connected to analogue inputs.
If the light sensor is exposed to strong light, it must switch on the last LED. You can choose the limit value yourself here.
If the sensors are triggered, the LED must be switched on until the arduino is reset or switched off.
1.3) Implement a reset button that resets the lights.
1.4) Implement the "LCD 16 x 2" display. This should show the number of times the sensor has been triggered (can count both from low to high and high to low), highest temperature read off, lowest temperature read off and highest light value read off. This must hold the values until the reset button is pressed.
Tip: use setCursor() to structure the information in an orderly way. LiquidCrystal - Arduino Reference
Task 2 - Temperature regulation
The task must be completed in TinkerCad, and code and screenshots must be included in the report.
Connect a 10k potentiometer, temperature sensor and a 16x2 display.
The potentiometer and the temperature sensor must be connected to analogue inputs.
Then connect an npn transistor as a switch for a resistance of 110 ohms. (on part 2, this must lie next to the temperature sensor).
The potentiometer must be used to set a temperature. If the read temperature is lower than the set temperature, current must be passed through a resistance of 110 ohms. this is done by using a transistor as a switch. Both the set temperature and the actual temperature must be shown on the display. A multimeter can be connected across the resistor to see that it is working as it should. Then connect a transistor, this should be connected to a motor, which should turn on when the temperature is higher than what is set with the potentiometer.
Task 3 - Follow the light
Connect 5 "ambient light sensors" with suitable resistors. These should be placed in a semi-circle. Connect a servo. The servo is limited to 180 degree rotation.
The servo must point towards and follow light, this can be achieved by the servo pointing in the direction of the light sensor with the highest value.
(this task makes more sense when connected physically.)
tip: The values from the sensors should be put in an array and looped through.
When adjusting the resistance, you should check that you get a reading of approximately 1000 at full brightness, and that the readings are relatively linear.
(Se picture:
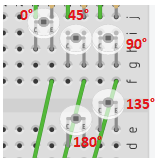
)
Task 4 - Alarm clock
4.1) Connect the "LCD 16 x 2" display, a 10k potentiometer to an analog input and a button to a digital input.
You will build a clock on this subtask, the potentiometer and the button can be used to set the clock.
The potentiometer should be used to show numbers between 0-9 on the display when setting the clock, the button should be used to select the displayed number, and move on to the next position on the display. When the hour and minute are set, the colon should flash between the hour and minute.
4.2) Connect two buttons and a piezo. One button must be used to be able to set an alarm together with the potentiometer and button from the previous subtask. The other button should be used to switch the alarm off and on. When the alarm is active, this should be shown on the display. When the alarm is triggered, the piezo must make a sound until the alarm is deactivated.
tip: modolo (%) divides a certain number and returns the remainder. This is useful when using millis();