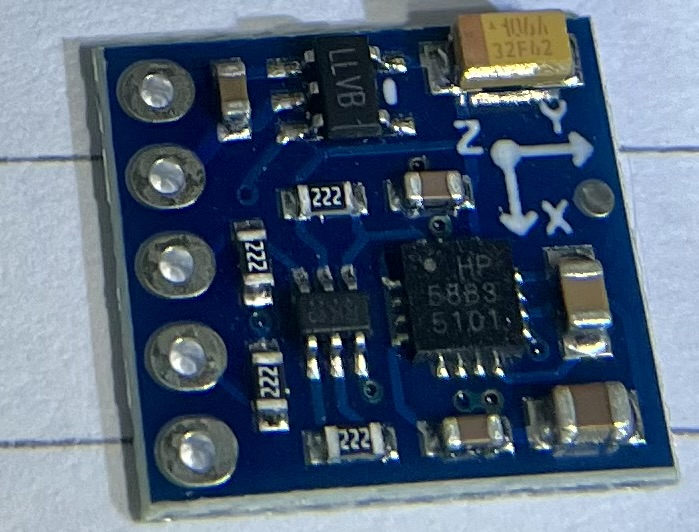
I have been purchasing the GY-270 magnetometer board for years now, orginally the chip was a HMC5883L (address 0x1e) which became obsolete and then becoming a QMC5883L (address 0x0D) IC id: HA5883 which worked fine for our purposes but now those chips have now become a HP 5883 IC at address 0x2C. Unfortunately thats where it ends, the I2C detects it at that address and when I look at the data at that address it is as follows: Found address: 44 (0x2C) Reading from address 0x2C: 0x0: 128 0x1: 0 0x2: 0 0x3: 0 0x4: 0 0x5: 0 0x6: 0 0x7: 0 0x8: 0 0x9: 24 0xA: 0 0xB: 0 0xC: 0 0xD: 0 0xE: 96 0xF: 0 Which is nothing like the old chips. Holding a magnet near the chip does absolutely nothing and no values change. X -128 Y - 0 Z - 0. Is every single board now a fake or do we have to create a new library for this. Feeling very unhappy as purchase these at large quantity. ![]() Anyone else experience this.
Anyone else experience this.
Buy modern parts from reputable sellers that support their products. Quality is guaranteed, and the performance will be much, much better than those factory floor sweepings.
Suggestions:
1 Like
I have the same HP5833 5101 address 0x2c, I haven't gotten it to work.
has anybody found a solution for this?
The solution is posted in response #2.
3 Likes
Hello, I had this issue recently but it turns out the board probably uses the QMC5883P chip which is made by these guys. Here is the data sheet and an example program.
#include <Wire.h>

// QMC5883P的I2C地址
const int QMC5883P_ADDR = 0x2C;

// 控制寄存器地址
const int MODE_REG = 0x0A;
const int CONFIG_REG = 0x0B;

// 数据输出寄存器地址
const int X_LSB_REG = 0x01;
const int X_MSB_REG = 0x02;
const int Y_LSB_REG = 0x03;
const int Y_MSB_REG = 0x04;
const int Z_LSB_REG = 0x05;
const int Z_MSB_REG = 0x06;

// 状态寄存器地址
const int STATUS_REG = 0x09;

// 初始化QMC5883P
void initQMC5883P() {
  Wire.begin();
  // 设置为连续测量模式,数据输出速率为200Hz,量程为±8G
  Wire.beginTransmission(QMC5883P_ADDR);
  Wire.write(MODE_REG);
  Wire.write(0xCF); // 0xCF: 连续模式, 200Hz数据输出速率
  Wire.endTransmission();

  Wire.beginTransmission(QMC5883P_ADDR);
  Wire.write(CONFIG_REG);
  Wire.write(0x08); // 0x08: 设置Set/Reset模式为开启,量程为±8G
  Wire.endTransmission();
}

// 读取QMC5883P的原始数据
void readQMC5883PData(int16_t& x, int16_t& y, int16_t& z) {
  Wire.beginTransmission(QMC5883P_ADDR);
  Wire.write(X_LSB_REG);
  Wire.endTransmission(false);
  Wire.requestFrom(QMC5883P_ADDR, 6);

  if (Wire.available() == 6) {
    byte x_lsb = Wire.read();
    byte x_msb = Wire.read();
    byte y_lsb = Wire.read();
    byte y_msb = Wire.read();
    byte z_lsb = Wire.read();
    byte z_msb = Wire.read();

    x = (x_msb << 8) | x_lsb;
    y = (y_msb << 8) | y_lsb;
    z = (z_msb << 8) | z_lsb;
  }
}

void setup() {
  Serial.begin(9600);
  initQMC5883P();
}

void loop() {
  int16_t x, y, z;
  readQMC5883PData(x, y, z);

  Serial.print("X: ");
  Serial.print(x);
  Serial.print("\tY: ");
  Serial.print(y);
  Serial.print("\tZ: ");
  Serial.println(z);

  delay(100);
}
i wrote a small libary for the QMC5883P and it works fineQMC5883P Driver for Arduino
Thanks, this does work with ESP32, what would you need to change to make it work with Arduino Nano too?