Communication between Arduino Yun & ESP8266-12E(NodeMCU)

Hello,

I'm compleatly new in the arduino game. I want to connect an arduino yun and a ESP8266-12E so that i can read sensor values from the ESP8266 and send the information to the arduino yun and read it out on the computer.

I have no idea where to start. Does anyone have any idea of where and how i should start?

Thank you all in advance.

Project: ESP8266 will acquire temperature signal from LM35 sensor; the signal will appear on Serial Monitor (SM1) of ESP and then be transferred to Arduino UNO (YUN) using Software UART Port (SUART Port); the UNO (YUN) will collect the signal and then the signal (temperature value) will appear on the Serial Monitor (SM2) of UNO (YUN). (I am using UNO in place of YUN as I don't own Arduino YUN.)

Let us start --

1. Let us connect LM35 sensor with ESP8266 as per following diagram.
espMega2xLM35.png
Figure-1: Connection diagram of Lm35 sensor with ESP8266

2. Connect ESp8266 Bors with the PC using the USB Cable.

3. Check that the PC detected the USB Cable.
Start --> Device Manager --->Ports ---> silicon Labs CP210x USB to UART Bridge (COM11)

4. Now, install the ESP8266 Board
(1) Open an IDE with a blank sketch.
(2) File ---> Preferences
(3) Enter the following text in this box: Additional Boards Manager URLs:
http://arduino.esp8266.com/stable/package_esp8266com_index.json

(4) Click on OK Box.
(5) Tool ---> Boad: ---> Boards Manager... (click)

Follow Menu to install the board or the board will be automatically installed. After installation, you will see a window like the following:


Figure-2:

(6) Click on OK box and then click on Close Box.

(7) Tool ---> Board: ---> NodeMCU 1.0 (ESP-12 Module) and click

4. Upload the following sketch in the ESP8266

void setup()
{
  Serial.begin(115200);
}

void loop()
{
  float myTemp = (float)100 * (3.3 / 1023.0) * analogRead(A0);
  Serial.println(myTemp, 2);
  delay(1000);
}

5. Open the Serial Monitor (SM) at 115200 Bd and check the SM shows room temperature,
smesp.png
Figure-3:

Be sure that you have finished all the above steps.

... to be continued depending on your progress.

espMega2xLM35.png

smesp.png

Hello, thank you for the information. I have successfully compleated the above steps. What should i do now? :slight_smile:

Now, you know the operation of ESP8266 NodeMCU. Please, post the screenshot of the Serial Monitor of ESP8266 that shows temperature values being logged from LM35 sensor.

Do you have an UNO Board? If yes, I shall show how to send temperature signal being acquired by ESP8266 to UNO and then on its Serial Monitor. After that, you will given some tasks to solve for which you will have the opportunity to navigate Forum and web for possible solution hints if problem.

Here is the output. Im not using a temperature sensor thats why the integers are so high. I also removed the float and directly prints the analog output.

I have an Arduino Yun so not an arduino UNO but it should not be that different.'

Thank you for helping me

Why is your screen not showing temperature like 32.76 and similar? What are these figures 164, 165...?

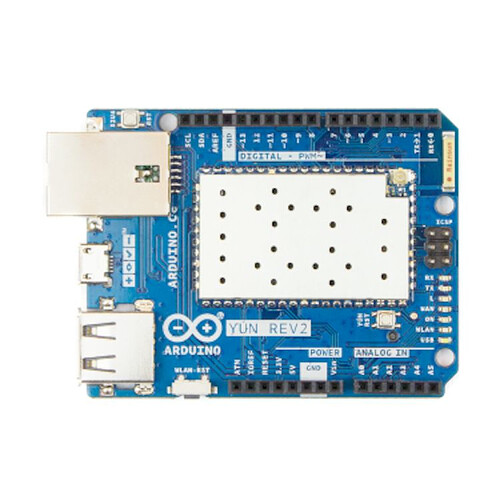
Please, post a picture of Arduino YUN.

Like i said, im not using a temperature sensor. Im using a Pressure Transducer Sensor. But it should not matter what sensor information i read out i guess.

I will post a picture of the arduino Yún and the Sensor im using as well as the NodeMCU.

What is the next step to be able to send the information to the arduino from the esp8266 through wifi? :slight_smile:

Pressure-Transducer-Sensor.jpg

Now, you are thinking to communicate over internet:

WiFi of ESP ---> internet -----> Ethernet Shield ----> UNO

I don't have much experience in this area; I hope someone with working experience in this field will come forward to guide you.

Okay, thank you very much anyways! :slight_smile:

norbackh:
Okay, thank you very much anyways! :slight_smile:

Always be hopeful!

Let us try to learn something about ESP8266 WiFi by practicing this tutorial.

1. Connect the following LED1-R1 and LED2-R2 networks with GPIO-5 and GPIO-4 of ESP8266.
wifi1x.png
Figure-1:

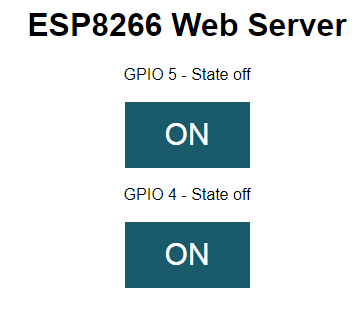
2. The following sketch of Step-3 (taken from net) when uploaded (do not upload now) in the ESP8266 will configure the ESP8266 to serve a web page (Fig-2) which can be accessed from any computer through a browser at this IP address: xxx.xxx.xxx.xxx to be known shortly from the Serial Monitor of the NodeMCU. There are two soft buttons in the web page from which the ON/OFF states of LED1 and LED2 of Fig-1 can be controlled.
wifi1WebPage.png
Figure-2: Web page to be delivered by ESP8266 server

3. The sketch

/*********
  Rui Santos
  Complete project details at https://randomnerdtutorials.com  
*********/

// Load Wi-Fi library
#include <ESP8266WiFi.h>

// Replace with your network credentials
const char* ssid     = "SiamWifi";      //"REPLACE_WITH_YOUR_SSID";
const char* password = "siam1234";//"REPLACE_WITH_YOUR_PASSWORD";

// Set web server port number to 80
WiFiServer server(80);

// Variable to store the HTTP request
String header;

// Auxiliar variables to store the current output state
String output5State = "off";
String output4State = "off";

// Assign output variables to GPIO pins
const int output5 = 5;
const int output4 = 4;

// Current time
unsigned long currentTime = millis();
// Previous time
unsigned long previousTime = 0; 
// Define timeout time in milliseconds (example: 2000ms = 2s)
const long timeoutTime = 2000;

void setup() {
  Serial.begin(115200);
  // Initialize the output variables as outputs
  pinMode(output5, OUTPUT);
  pinMode(output4, OUTPUT);
  // Set outputs to LOW
  digitalWrite(output5, LOW);
  digitalWrite(output4, LOW);

  // Connect to Wi-Fi network with SSID and password
  Serial.print("Connecting to ");
  Serial.println(ssid);
  WiFi.begin(ssid, password);
  while (WiFi.status() != WL_CONNECTED) {
    delay(500);
    Serial.print(".");
  }
  // Print local IP address and start web server
  Serial.println("");
  Serial.println("WiFi connected.");
  Serial.println("IP address: ");
  Serial.println(WiFi.localIP());
  server.begin();
}

void loop(){
  WiFiClient client = server.available();   // Listen for incoming clients

  if (client) {                             // If a new client connects,
    Serial.println("New Client.");          // print a message out in the serial port
    String currentLine = "";                // make a String to hold incoming data from the client
    currentTime = millis();
    previousTime = currentTime;
    while (client.connected() && currentTime - previousTime <= timeoutTime) { // loop while the client's connected
      currentTime = millis();         
      if (client.available()) {             // if there's bytes to read from the client,
        char c = client.read();             // read a byte, then
        Serial.write(c);                    // print it out the serial monitor
        header += c;
        if (c == '\n') {                    // if the byte is a newline character
          // if the current line is blank, you got two newline characters in a row.
          // that's the end of the client HTTP request, so send a response:
          if (currentLine.length() == 0) {
            // HTTP headers always start with a response code (e.g. HTTP/1.1 200 OK)
            // and a content-type so the client knows what's coming, then a blank line:
            client.println("HTTP/1.1 200 OK");
            client.println("Content-type:text/html");
            client.println("Connection: close");
            client.println();
            
            // turns the GPIOs on and off
            if (header.indexOf("GET /5/on") >= 0) {
              Serial.println("GPIO 5 on");
              output5State = "on";
              digitalWrite(output5, HIGH);
            } else if (header.indexOf("GET /5/off") >= 0) {
              Serial.println("GPIO 5 off");
              output5State = "off";
              digitalWrite(output5, LOW);
            } else if (header.indexOf("GET /4/on") >= 0) {
              Serial.println("GPIO 4 on");
              output4State = "on";
              digitalWrite(output4, HIGH);
            } else if (header.indexOf("GET /4/off") >= 0) {
              Serial.println("GPIO 4 off");
              output4State = "off";
              digitalWrite(output4, LOW);
            }
            
            // Display the HTML web page
            client.println("<!DOCTYPE html><html>");
            client.println("<head><meta name=\"viewport\" content=\"width=device-width, initial-scale=1\">");
            client.println("<link rel=\"icon\" href=\"data:,\">");
            // CSS to style the on/off buttons 
            // Feel free to change the background-color and font-size attributes to fit your preferences
            client.println("<style>html { font-family: Helvetica; display: inline-block; margin: 0px auto; text-align: center;}");
            client.println(".button { background-color: #195B6A; border: none; color: white; padding: 16px 40px;");
            client.println("text-decoration: none; font-size: 30px; margin: 2px; cursor: pointer;}");
            client.println(".button2 {background-color: #77878A;}</style></head>");
            
            // Web Page Heading
            client.println("<body><h1>ESP8266 Web Server</h1>");
            
            // Display current state, and ON/OFF buttons for GPIO 5  
            client.println("<p>GPIO 5 - State " + output5State + "</p>");
            // If the output5State is off, it displays the ON button       
            if (output5State=="off") {
              client.println("<p><a href=\"/5/on\"><button class=\"button\">ON</button></a></p>");
            } else {
              client.println("<p><a href=\"/5/off\"><button class=\"button button2\">OFF</button></a></p>");
            } 
               
            // Display current state, and ON/OFF buttons for GPIO 4  
            client.println("<p>GPIO 4 - State " + output4State + "</p>");
            // If the output4State is off, it displays the ON button       
            if (output4State=="off") {
              client.println("<p><a href=\"/4/on\"><button class=\"button\">ON</button></a></p>");
            } else {
              client.println("<p><a href=\"/4/off\"><button class=\"button button2\">OFF</button></a></p>");
            }
            client.println("</body></html>");
            
            // The HTTP response ends with another blank line
            client.println();
            // Break out of the while loop
            break;
          } else { // if you got a newline, then clear currentLine
            currentLine = "";
          }
        } else if (c != '\r') {  // if you got anything else but a carriage return character,
          currentLine += c;      // add it to the end of the currentLine
        }
      }
    }
    // Clear the header variable
    header = "";
    // Close the connection
    client.stop();
    Serial.println("Client disconnected.");
    Serial.println("");
  }
}

(1) In the sketch enter the name of your WiFi Network in the place of "SiamWifi" of the following line; where, SiamWifi is the name of my WiFi network (the router).

const char* ssid     = "SiamWifi";

const char* password = "siam1234";//"REPLACE_WITH_YOUR_PASSWORD";

(2) In the sketch enter the name of your WiFi Password in the place of "siam1234" of the following line; where, siam1234 is my password for my WiFi Network.

const char* password = "siam1234";

(3) Upload the skech. Open the Serial Monitor (SM) at 115200 Bd. Press RST button on ESP8266. The following message will shortly appear on the SM.
wifi1IP.png
Figure-3:

(2) Record the IP number from Fig-3. This is the IP address of the Web Server of ESP8266.

(3) Launch a browser from PC or Mobile at the above IP address; you see the web page of Fig-2. Control the LEDs from the Web page.

(4) Report if you could make it work.

wifi1WebPage.png

wifi1IP.png

wifi1x.png

It worked perfectly. What can we try now? :slight_smile:

Please, post photo of your ESP, Serial Monitor that shows IP No, and photo of web page hosted by ESP. Connect LED3 with ESP and accordingly add codes in the sketch to control ON/OFF states of LED3. Post the new sketch.

I played around with the code, therefor it has two more buttons on the webpage. The internal IP is 172.20.10.8 for the esp8266.

So when i enter "172.20.10.8/4/on" the first LED turns on and so on.

This is your setup -- looks good!

Let us now build a Temperature-Humidity Monitoring System using ESP8266-Dht11-Internet.
1. Connect Dht11 Temp-Humidity sensor with ESP8266 as per following diagram:
Vcc (Dht11) -----> 3.3V (ESP)
DATA (Dht11) ---> D0 (GPIO16)
GND (Dht11) ----> GND (ESP)

2. Upload the following sketch (taken from net; but Dht11 program is different)

/*********
  Rui Santos
  Complete project details at https://randomnerdtutorials.com/esp8266-dht11dht22-temperature-and-humidity-web-server-with-arduino-ide/
*********/

// Import required libraries
#include <Arduino.h>
#include <ESP8266WiFi.h>
#include <Hash.h>
#include <ESPAsyncTCP.h>
#include <ESPAsyncWebServer.h>
#include <Adafruit_Sensor.h>

#include <SimpleDHT.h>
int pinDHT11 = 16;  //Humidity DATA line at A0-pin of UNO
SimpleDHT11 dht11;  //object is created from class

// read without samples.
byte t=0;//emperature = 0;
byte h=0;//humidity = 0;
int err = SimpleDHTErrSuccess;

     //   #include <DHT.h>

// Replace with your network credentials
const char* ssid = "SiamWifi";//"REPLACE_WITH_YOUR_SSID";
const char* password = "siam1234";//"REPLACE_WITH_YOUR_PASSWORD";

   //     #define DHTPIN 16     // Digital pin connected to the DHT sensor

// Uncomment the type of sensor in use:
     //  #define DHTTYPE    DHT11     // DHT 11
//#define DHTTYPE    DHT22     // DHT 22 (AM2302)
//#define DHTTYPE    DHT21     // DHT 21 (AM2301)

  //      DHT dht(DHTPIN, DHTTYPE);

// current temperature & humidity, updated in loop()
    //    float t = 0.0;
      //  float h = 0.0;

// Create AsyncWebServer object on port 80
AsyncWebServer server(80);

// Generally, you should use "unsigned long" for variables that hold time
// The value will quickly become too large for an int to store
unsigned long previousMillis = 0;    // will store last time DHT was updated

// Updates DHT readings every 10 seconds
const long interval = 10000;

const char index_html[] PROGMEM = R"rawliteral(
<!DOCTYPE HTML><html>
<head>
  <meta name="viewport" content="width=device-width, initial-scale=1">
  <link rel="stylesheet" href="https://use.fontawesome.com/releases/v5.7.2/css/all.css" integrity="sha384-fnmOCqbTlWIlj8LyTjo7mOUStjsKC4pOpQbqyi7RrhN7udi9RwhKkMHpvLbHG9Sr" crossorigin="anonymous">
  <style>
    html {
     font-family: Arial;
     display: inline-block;
     margin: 0px auto;
     text-align: center;
    }
    h2 { font-size: 3.0rem; }
    p { font-size: 3.0rem; }
    .units { font-size: 1.2rem; }
    .dht-labels{
      font-size: 1.5rem;
      vertical-align:middle;
      padding-bottom: 15px;
    }
  </style>
</head>
<body>
  <h2>ESP8266 DHT Server</h2>
  <p>
    <i class="fas fa-thermometer-half" style="color:#059e8a;"></i> 
    <span class="dht-labels">Temperature</span> 
    <span id="temperature">%TEMPERATURE%</span>
    <sup class="units">&deg;C</sup>
  </p>
  <p>
    <i class="fas fa-tint" style="color:#00add6;"></i> 
    <span class="dht-labels">Humidity</span>
    <span id="humidity">%HUMIDITY%</span>
    <sup class="units">%</sup>
  </p>
</body>
<script>
setInterval(function ( ) {
  var xhttp = new XMLHttpRequest();
  xhttp.onreadystatechange = function() {
    if (this.readyState == 4 && this.status == 200) {
      document.getElementById("temperature").innerHTML = this.responseText;
    }
  };
  xhttp.open("GET", "/temperature", true);
  xhttp.send();
}, 10000 ) ;

setInterval(function ( ) {
  var xhttp = new XMLHttpRequest();
  xhttp.onreadystatechange = function() {
    if (this.readyState == 4 && this.status == 200) {
      document.getElementById("humidity").innerHTML = this.responseText;
    }
  };
  xhttp.open("GET", "/humidity", true);
  xhttp.send();
}, 10000 ) ;
</script>
</html>)rawliteral";

// Replaces placeholder with DHT values
String processor(const String& var) {
  //Serial.println(var);
  if (var == "TEMPERATURE") {
    return String(t);
  }
  else if (var == "HUMIDITY") {
    return String(h);
  }
  return String();
}

void setup() {
  // Serial port for debugging purposes
  Serial.begin(115200);
//  dht.begin();

  // Connect to Wi-Fi
  WiFi.begin(ssid, password);
  Serial.println("Connecting to WiFi");
  while (WiFi.status() != WL_CONNECTED) {
    delay(1000);
    Serial.println(".");
  }

  // Print ESP8266 Local IP Address
  Serial.println(WiFi.localIP());

  // Route for root / web page
  server.on("/", HTTP_GET, [](AsyncWebServerRequest * request) {
    request->send_P(200, "text/html", index_html, processor);
  });
  server.on("/temperature", HTTP_GET, [](AsyncWebServerRequest * request) {
    request->send_P(200, "text/plain", String(t).c_str());
  });
  server.on("/humidity", HTTP_GET, [](AsyncWebServerRequest * request) {
    request->send_P(200, "text/plain", String(h).c_str());
  });

  // Start server
  server.begin();
}

/*
void loop() {
  unsigned long currentMillis = millis();
  if (currentMillis - previousMillis >= interval) {
    // save the last time you updated the DHT values
    previousMillis = currentMillis;
    // Read temperature as Celsius (the default)
    float newT = dht.readTemperature();
    // Read temperature as Fahrenheit (isFahrenheit = true)
    //float newT = dht.readTemperature(true);
    // if temperature read failed, don't change t value
    if (isnan(newT)) {
      Serial.println("Failed to read from DHT sensor!");
    }
    else {
      t = newT;
      Serial.println(t);
    }
    // Read Humidity
    float newH = dht.readHumidity();
    // if humidity read failed, don't change h value
    if (isnan(newH)) {
      Serial.println("Failed to read from DHT sensor!");
    }
    else {
      h = newH;
      Serial.println(h);
    }
  }
}

*/

/*
#include <SimpleDHT.h>
int pinDHT11 = 16;  //Humidity DATA line at A0-pin of UNO
SimpleDHT11 dht11;  //object is created from class

// read without samples.
byte temperature = 0;
byte humidity = 0;
int err = SimpleDHTErrSuccess;

void setup()
{
  Serial.begin(115200);
}*/
void loop()
{
  dht11.read(pinDHT11, &t, &h, NULL);

  Serial.print("Humidity: "); Serial.print((int)h); Serial.println(" %");
  Serial.print("Temperature: "); Serial.print((int)t); Serial.println(" degC");
  Serial.println("==============================");
 
  delay(2000);
}

3. The web Page
espdhtser.png

espdhtser.png