Dremeling motor controllers for tiny robots

I know it is not a good idea to dremel away parts of PCBs in general.
Reason I try/do this is for creating really tiny robots:
Tiny MicroPython robots (the PCB IS the robot platform)
I have completed 3 tiny robots sofar, and two others are in the works.
Just to give an idea, this is my Tiny2040bot:

Top left in below photo you see three Tiny2040 modules, based on Raspberry RP2040 MCU.
I used Dremel successfully to reduce from 22.9×18.2mm to 19.5×14.9mm, still functioning:
https://forums.raspberrypi.com/viewtopic.php?t=324698

Below are crazy small ESP8285 modules (compatible to ESP8266), I learned yesterday how to flash them and turned the right ESP-M2 module into wireless AP, with MicroPython REPL access through browser WebREPL (only GND+VCC connected finally).
The left is only 10x11x2mm, but needs external antenna, which I plan to bend for smallest robot:
https://forums.raspberrypi.com/viewtopic.php?t=324698#p1945049
I used ESP-01 with WifiToSerial.ino example for wirless MicroPython REPL of Tiny2040 and Raspberry Pico, and as standalone MicroPython MCU with wireless REPL in my Toycarbot.

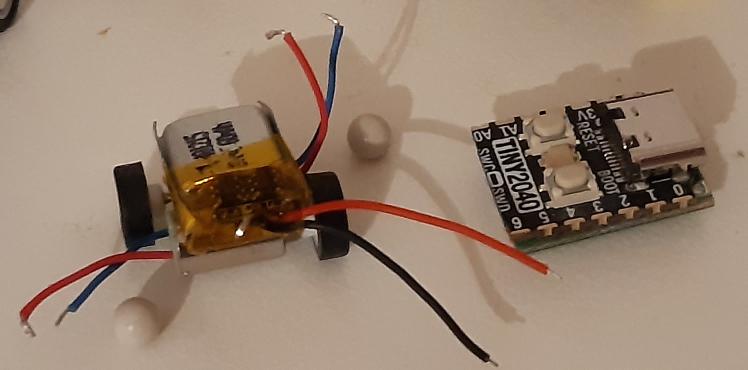
I tested the 25mAh 401015 lipo being capable of driving solar toy car I use the motor from as basis for my robots, 4.5×10.5×15.9mm !

Right are two motors and wheels I extracted from solar toy car. The toy car uses gear train, here I superglued the 8mm diameter wheels onto motor shafts of 6mm diameter 10mm long micro motors, with total length of 16mm.

Right top are two 0.8"x0.5" Pololu DRV8835 motor controllers, and a 0.7"x0.4" Pololu DRV8835. I did remove the bottom two rows with Dremel because I wanted not to use the AISEN/BISEN/S̅L̅P̅/ F̅L̅T̅ pins. I had tested the module working before, but after the modification none of the 4 output pins showed anything. At least I was able to reduce the left DRV8835 with Dremel to 19.1x12.7mm still working:

Are there any other motor controller modules for driving micro motors with smaller than 17.7x10.2mm PCB size?

Why not design your own PCBs ?

Why not design your own PCBs ?

Good question, the answer is that I am really a software guy, and build stuff only for writing the software for it. Now looking at the TI DRV8833 datasheet 8.2 Typical Application section, only 3 capacitors and one resistor are needed externally ... but the lead pitches are 0,5 or 0,65mm for the TSSOP package, impossible to solder for me.
I know I could design my own PCB and get it send from China for few $s, but never had done so.

I was happy to successfully solder 0.2mm diameter cables to 1.6mm pitch ESP-M2 module yesterday, and the 1.1mm pitch of the tiny ESP-01F module will be a real challenge to me:
https://forums.raspberrypi.com/viewtopic.php?t=324698#p1945072

Are there any other motor controller modules for driving micro motors with smaller than 17.7x10.2mm PCB size?

Why not design your own PCBs ?

I just ordered HTTSOP-16 DRV8833 modules on aliexpress, ordered enough for delivery date 12/30/21and not 3/4/22:
https://de.aliexpress.com/item/1005003196692661.html
Modules are only millimeters in both directions given that height is 1.2mm maximally. Even with soldering capacitors and resistors around, size should be less than 10x10mm:

Even if pitch will be 0.5mm, I remembered that I once did solder a cable to 0.5mm pitch connector pin successfully. I did that using a Raspberry camera showing a very big magnification image of the connectors on HDMI display. It was a bit strange to solder left of keyboard while having to look straight on the display to see the details. Very hot soldering iron was only 5mm distant to my fingers ...
https://www.esp32.com/viewtopic.php?f=19&t=11126#p45445

Besides the HTSSOP modules without PCB, I found no way sofar for a motor controller module with less than 17.7mm in length (0.7"x0.4" Pololu DRV8835, or 17.7x10.2mm).

I was lucky to find the 3rd form of DRV8833 controller board. At first sight the 18.5x16mm sound too much, but this module easily allows to Dremel unneeded material on both sides away. I could have Dremeled away another millimeter, but I stopped when having gotten a 16x16mm module. That module will hopefully be part of 16mm side cube robot (not the "big" 1inch side sumo robots):

The EEP pin is for sleep mode, and LOW by default, disabling the board. Either EEP needs to be set HIGH, or the unconnected J2 pads on backside need to be soldered together (I have tested both to work). I did solder male header to one module only because of the problems until I learned how EEP/J2 work. I did buy few modules on German ebay for 4$/pc, and they arrived in 2 days. I did order many more on aliexpress for 0.79$/pc, and the product page there has the technical details:

More than 10x cheaper than the Pololu DRV8833 and DRV8835 modules.

P.S:
These modules have inverted logic, putting 25% duty PWM signal on IN1 results in 0.75*VCC on OUT1.

I did buy several small lipos, and the 401215 60mAh lipo took the cake -- it is only 14.6×10.85×3.95mm:
https://forums.raspberrypi.com/viewtopic.php?t=324698&p=1947318#p1946998

With that dimensions the lipo is superglued directly onto the 6mm diameter motors, between the 8mm diameter 3mm wide wheels — plan is now for 19.7×14.8×18.9mm w×l×h RP2040 robot (right: dremeled Tinier2040 sits on top of dremeled as well Pololu DRV8833 motor contoller):

I could have Dremeled away another millimeter, but I stopped when having gotten a 16x16mm module.

I worked with the new quadratic controller in direction of 16mm side cube robot. Not with a Pico MCU, because even Tinier2040 is just too long with 19.5mm. Even among the many ESP8285 MCUs I showed previously in this thread, 16x16mm allows for only the ESP-01F with 10x11x2mm plus external antenna. I have ordered some ESP32-C3-M1 modules some time ago, and for those I would probably relax 16mm by 0.6mm (they are 16.6×13.2mm):
Meet ESP-C3-M1 and ESP-C3-M1-I ultra small ESP32-C3 mini modules (Sponsored)

So for now ESP-01F is my only option — and I have to learn how to solder 0.2mm enameled copper wires to only 1.1mm spaced neighboring castellated pins.

I did a lot with supergluing Lego pieces, and cutting what I did not need with Dremel in the past. My sons said I do too much subtractive work with the Dremel, should work more additive with 3D printer. Two weekends ago I got crash course in Freecad from my older son, last weekend from my younger son crash course in 3D print workflow (export STL, use cura slicer to generate gcode, use octoprint to print), and use of his 3D printer in our basement. Yesterday I did print my 1st newly constructed item without any help alone:
https://twitter.com/HermannSW/status/1468622786532892678

I would not have thought that the path to productive use is so short, today I 3Dprinted my first connecting piece for a real tiny robot base.

I did superglue both 6mm diameter 10mm long motors directly together until now. But given that length from directly onto motor shaft superglued wheel outside to end of motor is 16mm, minimally 19.5mm wide base can be constructed that way, because wheels have 8mm diameter.

For 16mm width robot base, motors must have a 1.5mm distance. And so I created Freecad sketch for the 1.5mm distance, did pad that sketch 4mm and printed it:

Then I did superglue onto the motors, and finally superglued the 16x16mm motor driver I described before in this thread (which I dremeled further to 16x15.4mm today to match base dimensions) onto the base. The 10µF capacitor looks up 0.6mm higher above motor driver PCB than the DRV8833 IC. That is the reason for the 0.6mm in my 3Dprinted part. I just did a drop of superglue onto the IC, and on the capacitor, and then pressed motor controller into place (superglued IC onto 3Dprinted part, capacitor on one of the motors):

So what was the result dimension wise? Instead of calculating, I did measure that, did put motor+controller base onto ruler, and vernier caliper said 12.95mm high. Then I did measure ruler alone, and vernier caliper said 2.75mm. So the motor+controller base is only 10.2mm (!) high, and now I have a 16x15.5x10.2mm robot base:

This topic was automatically closed 180 days after the last reply. New replies are no longer allowed.