I have a couple of questions which perhaps someone might be able to help answer.
My goal is to insert some LEDs into a model car with programming to determine on/off routine.
1. Smallest Board
I have an Arduino Nano which I have used for a few small projects.
I am looking now however for a much smaller Arduino/Arduino-compatible (I hope it is OK to ask for that here) board so I can insert it in a very small model car.
Ideally it would be around 2cm x 1cm or smaller. Obviously I am not sure if these exist.
I have found references online to the smallest Arduinos which seem to be too large. I have also found references to the Femtoduino and Bareduino Nano.
So, does anyone know what boards I could use?
2. USB
Related to the above somewhat, I came across a Bareduino with USB and another without USB. If one has a without-USB board how does one transfer a programming file to the board?
3. Smallest battery
What are the smallest (sized) batteries that one can use (I am only looking to power 2 tiny LEDs)?
Not sure if one can use the small flatish batteries you would find in a watch for example.
The board size depends mainly on the number of I/O connections. Can you solder wires to the controller pins of an ATmega in MLF case? If so, you can use such an ATmega or ATtiny controller on your own board. Uploading sketches to such a board is another story...
Doesn't your model car include a battery, that can be used to power such an controller as well?
20x10mm is pushing the envelope a bit further. Unfortunately, the above boards all seem to be 5V. Two 1.5V cells or 3V cell could be used if you have an 8MHz clock. LEDs would work at 1.5V.
Below about 1.8V, you need an MCU with a boost converter, preferably onboard, Atmel have some in their range.
You set an interesting challenge, but probably difficult to meet with off the shelf modules. If you wanted to create your own, it would be an interesting project. Would entail some custom hardware and probably custom Arduino core.
An Attiny (or indeed any Atmega chip) can be programmed using ICSP with an Uno as the programming interface. It is very straightforward. This tutorial explains it.
The best combination of small size and capability that I have come across is the Attiny 1634 - but it is not available in a DIP package. However if you are careful with soldering it is quite practical to use the SOIC version. I don't have the capability to use smaller surface-mount components myself. Many of the other Attinys are available in DIP packages.
If space is really at a premium you can use any of these microprocessors without any PCB.
I use a 1S LiPo cell to power things. HobbyKing sells a wide range of them. Just be careful not to under-discharge them or over-charge them.
It sounds like you don't need much IO. An ATtiny85 should be enough. Have you looked into a Trinket or Digispark board? I haven't used either, but they'll be hard to beat in size.
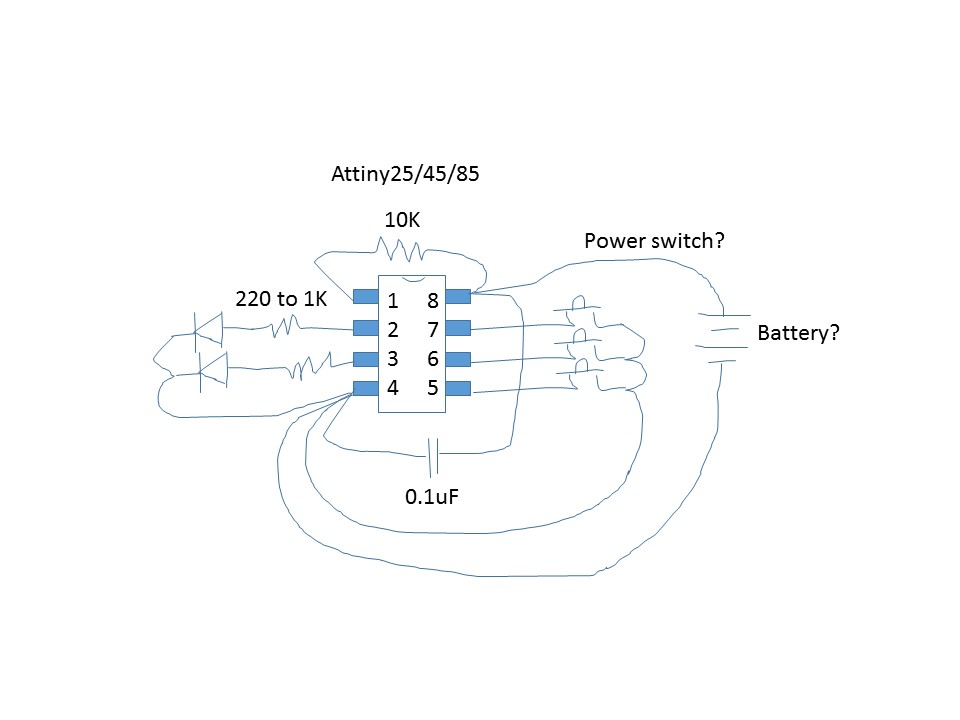
You can do similar for an 8-pin Attiny24/45/85, or just wire up the parts on the back of the chip.
Put the part into solderless breadboard to make connections to a Programmer. Set the fuses for internal oscillator.
Once programmed, connect Power/Gnd, add a 0.1uF cap between those pins, a 10k from Reset to Vcc, and then your two LEDs with current limit resistor using pins 2 & 3. That leaves 5/6/7 unencumbered for further programming with a Programmer. Connect your switches to 5/6/7 as needed to connect the pin(s) to Gnd when pressed, and use internal pullup resistor.
The Programmer will need to connect to 1,4,5,6,7,8. Reset, Gnd, MOSI, MISO, SCK, Power.
How much room do you have height-wise? Enough for a DIP part in a socket? Then you could wire to the socket and not have to worry about damaging the part with poor soldering technique. The resistor/LED can be mounted to the car and just wires fed to the socket, same with the buttons. The 10K also. Just the 0.1uF needs to be connected right at the socket.
Thank you so much for taking the time to reply to my questions, the varying suggestions are very helpful and have given me quite a lot to consider (still reading up on some background hence the delay in this reply).
I have segmented this post to make it a little simpler to read.
The model
The lighting effect I am looking to achieve is this (video).
To shed some light this is the size of the model we’re talking about.
There are two areas where electronics can fit. Just under the roof there is a small space, not fully uniform due to a curvature but it is approx. 30mm L x 16mm W. Depth is no more than 3mm.
The roof will however need to accommodate the LEDs legs and wiring so I suspect that may be all that can go there. I may be able to squeeze in the resistors there too.
The other available area is to the back of the car, it’s a larger area but would need to fit the battery and everything else (microprocessor, switch, maybe resistors).
This area is about 3cm in total length and has varying depths (2cm L x 0.6cm D and 1cm L x 1.2cm D)
Suggestions
From reading all the suggestions as size constraints is the determining factor here it seems that a standalone Attiny processor with no PCB and any other non-essential components on a typical Arduino might be the best approach.
The DIP socket suggestion seems a good way to avoid soldering issues – I am not sure what the risk is but I am a beginner with the soldering too so I suppose it could be high. Does anyone know what the smallest DIP socket-Attiny combo is, are the Attiny24/45/85 all the same physical size? (I couldn’t find their dimensions listed online but the only difference seems to be memory)
Robin2’s suggestion of the Attiny 1634 with SOIC format is of interest although if the soldering poses too high a risk perhaps I should avoid. Does anyone know if there is some sort of socket housing for SOIC formats which might remove this issue?
Do I need to use ICSP to upload to the Attiny – this looks a little bit of a challenge. Is @Robin2 ’s suggested link as simple a way as any
I read that one can buy Attinys with the Arduino bootloader already pre-loaded. Does this make sense to simplify the task or will I have had to do the difficult bit already for the ICSP above?
A few other questions on my mind..
Battery model – any idea of particularly small Lipo batteries. I see the Attiny works with 2.7-5.5V.
LEDs – I found reference to nano and pico LEDs for blue light. Does anyone know where these can be purchased online? I didn’t see them on the HobbyKing site.
What are the symbols connected to pins 5/6/7 representing are in @CrossRoads schematic can someone confirm?
Again thanks for all the help. Really appreciated.
minibuilder:
Battery model – any idea of particularly small Lipo batteries. I see the Attiny works with 2.7-5.5V.
Quadcoptor or other small RC device battery. I recently bought this 80 mAh one (hasn't even been delivered yet) to try in a project of my own. The dimensions look like it'll fit.
LEDs – I found reference to nano and pico LEDs for blue light. Does anyone know where these can be purchased online? I didn’t see them on the HobbyKing site.
Those aren't conventional names for LED packages. What "reference"?
What are the symbols connected to pins 5/6/7 representing are in @CrossRoads schematic can someone confirm?
Button switches. If you don't need them, ignore them. Also, there's probably nothing special about exactly which pins the LEDs and buttons are attached to. If you aren't using one of the special functions (like interrupt, PWM, things like that), all the GPIO are interchangeable so you can swap them around into a more convenient arrangement.
You won't find a socket for a SOIC chip because they are intended for surface mounting. You might be able to buy a PCB that you can mount it to but that will make the whole thing bigger - too big for your needs.
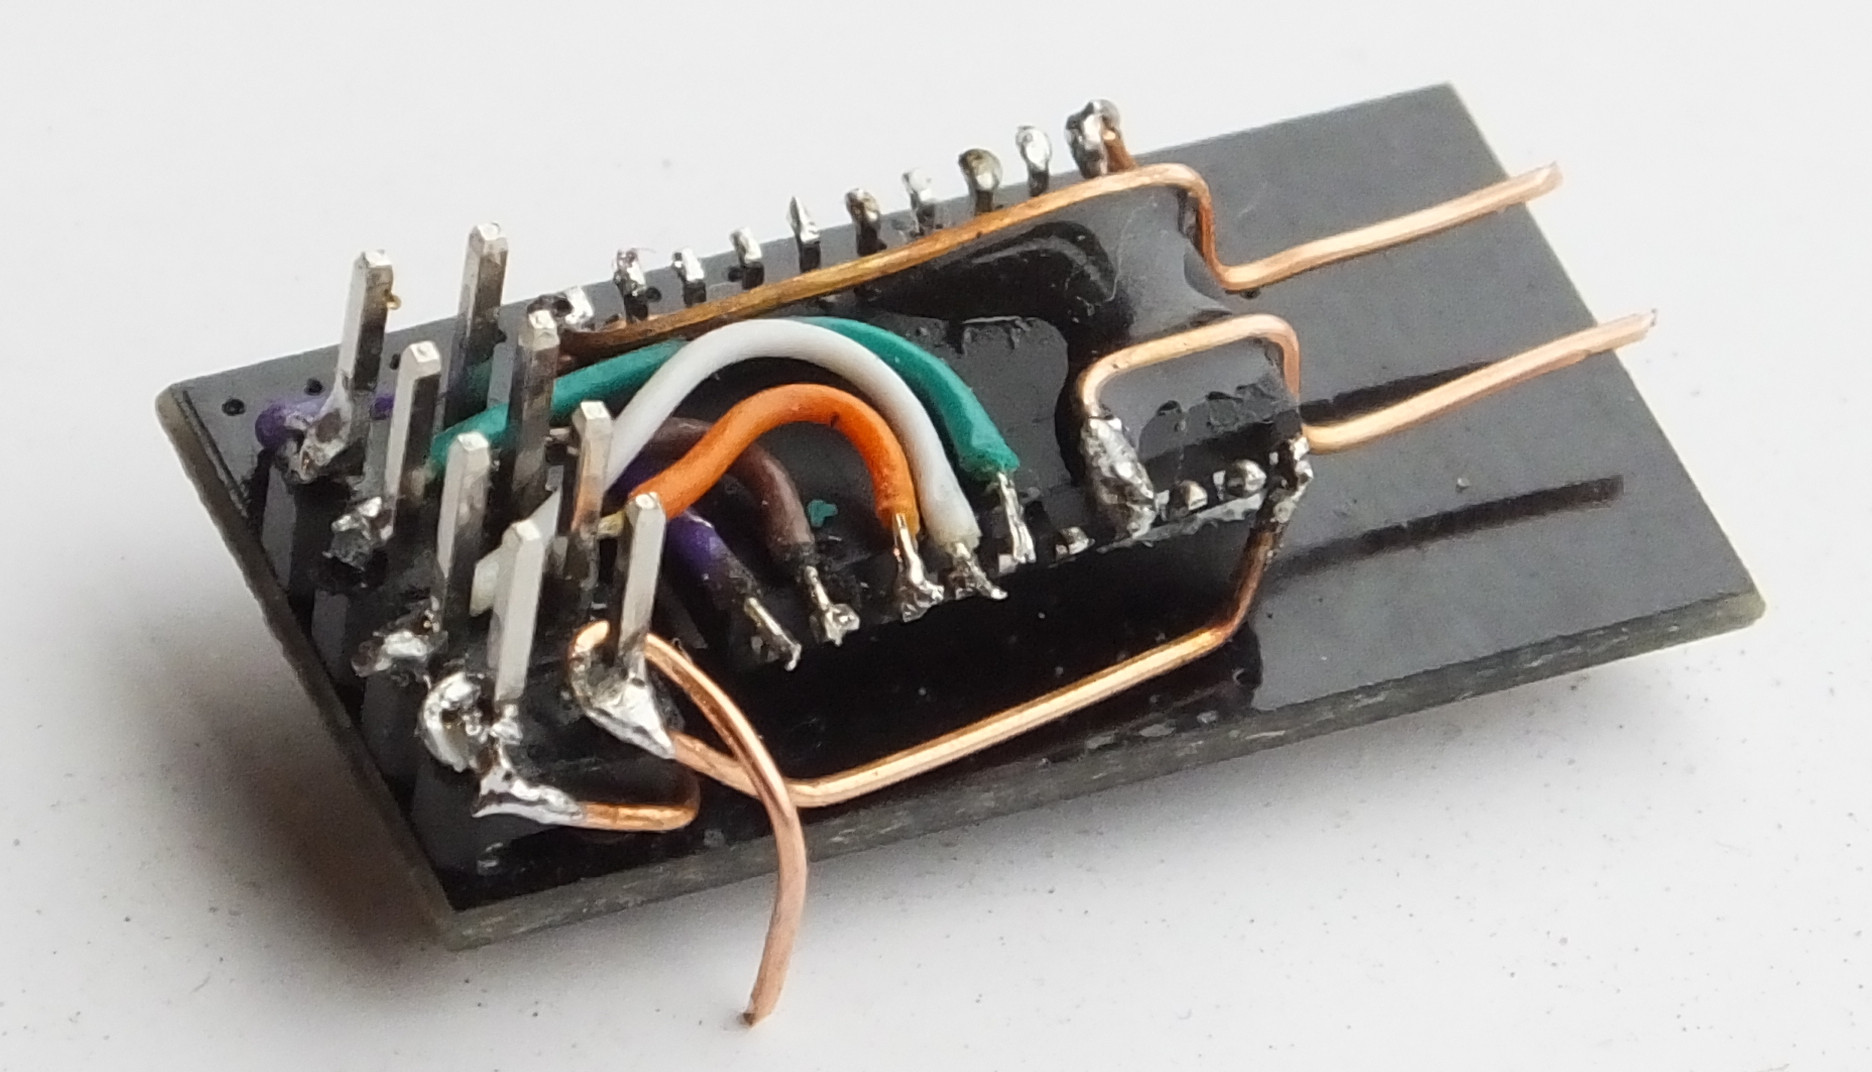
Using a socket with a DIP chip will double the height of the chip. I suggest you don't bother with a socket. But a few spare chips and practice your soldering. Get a fine tip for your soldering iron. These pictures show how I attached an Atmega 328 to an nRF24L01+ wireless module for a model train controller. It's not stylish, but it works.
For a more recent version I have used an Attiny 1634.
If you download the Atmel datasheet for any of the chips it will give you very detailed dimensions.
I don't think you need the capability of the Attiny 1634. The Attiny 45 and 85 are available in SOIC form as well as DIP form. Just make sure they have enough I/O pins for what you want.
I don't see any advantage of using a bootloader on an Attiny - it just consumes memory that you could better use for your project.
I don't know where you live but component suppliers like RS Components and Farnell and Rapid Online will have a huge range of LEDs
That's only because you're using a coin cell battery which can't generate large output currents. A 15C LiPo battery like the one I linked will not be safe like that.
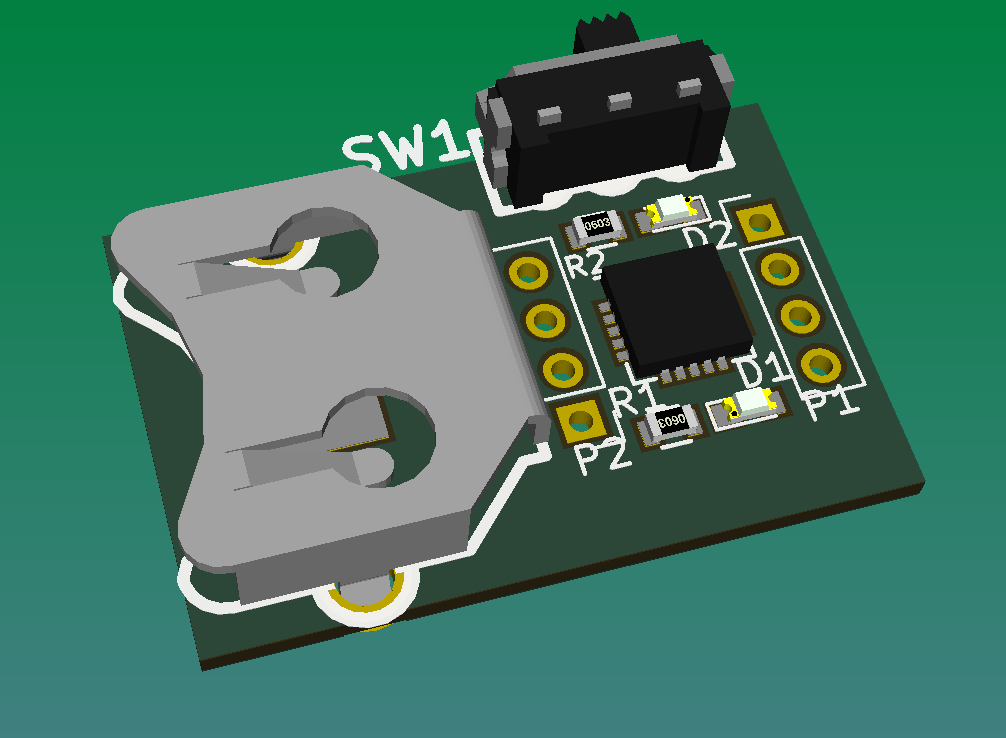
I can find a smaller switch, the battery is 3V CR1220, there is a smaller CR1025 (10x2.5mm) with less capacity of course.
I order PCBs with a min order of 10, so I would cut them in half to get a separate battery holder and CPU part.
Turns out 0.6mm PCB is expensive, so I would use 0.8 mm.
I made a small switch for an N-Gauge model loco from two segments of brass tube. Push a small piece of brass rod into them to make the connection. You could do this with 1mm ID brass tube (1.5mm OD) and some 1mm brass rod.
Thanks everyone for the additional input, it is really helpful.
So I'll need to think about some of these suggestions.
I am leaning towards the Attiny DIP chip and soldering straight to the legs (thanks @Robin2).
Jiggy-Ninja:
Those aren't conventional names for LED packages. What "reference"?
That explains it. No wonder I could not find someone else selling them (they were a store's product name).
Robin2:
I made a small switch for an N-Gauge model loco from two segments of brass tube.
That is a good idea, I will certainly keep this in mind when at that stage.
bobcousins:
..the battery is 3V CR1220, there is a smaller CR1025 (10x2.5mm) with less capacity of course.
I order PCBs with a min order of 10, so I would cut them in half to get a separate battery holder and CPU part.
So rather than manually connecting wires to the battery you can get a small batter holder/housing unit for a coin battery?
@Jiggy-Ninja, I looked into the Lipo battery you mentioned. Is the white part in the photo plastic - looks like it could be flexible, like a label but maybe it is not. Not sure if a it is bigger than a small coin battery.
Robin2:
I don't see any advantage of using a bootloader on an Attiny - it just consumes memory that you could better use for your project.
I don't know where you live but component suppliers like RS Components and Farnell and Rapid Online will have a huge range of LEDs
So you do not need bootloader to load an Arduino programme? I was under the impression you did but perhaps the code is standard progamming? If so, why would one want bootloader pre-installed?
Thanks for the supplier names. I'm based in Ireland so just checking RS Components and Farnell they seem to have a presence here and I can probably order online in any case.
I spent some time looking at the LEDs they have listed, 3mm (T1) was the smallest I could find, which might well do, but if you have heard of smaller for sale around here I'd be interested in their name?
minibuilder:
I spent some time looking at the LEDs they have listed, 3mm (T1) was the smallest I could find, which might well do, but if you have heard of smaller for sale around here I'd be interested in their name?
I had a look into "model makers leds" and the names micro/nano/pico etc refer to various types of SMD leds (aka chip LEds) prewired with fine wire, sometimes with resistors, some are mounted on flex PCBs. Basically they are expensive ways to buy LEDs, but save the hassle of some fine soldering work.
On RS, you can select on "Surface Mount" RS - Surface Mount LEDs. Typical sizes are 1206, 0805, 0603. 1206 means 0.12" by 0.06" (approx 3x1.5mm).
Ebay can also be a good source for these types of things, I noticed there are some prewired LEDs available.
I also found some products designed for Lego, such as http://lifelites.com/products/3539, but the dimensions still seem a little big for your requirement.
All the products I found are designed for fixed or simple flashing, so there seems to be a gap in the market for more advanced functions, so I think I will go ahead with my "picoduino" project. The names picoduino, femtoduino and even zeptoduino already seem to be in use, so I will have to think of something else.
minibuilder:
If so, why would one want bootloader pre-installed?
A very good question.
If you don't use the bootloader then you need a "programmer board" which would have required a newcomer to Arduinos to buy two boards to get started. It would not present any problem sharing the programmer between several Arduino boards but people would be likely to want all of the boards to have their own ability to communicate with the PC. And if you already have the USB-TTL stuff on the Arduino board you might as well use it for programming thus avoiding the need for a separate programming board.
On the other hand, if you already have the capability (both physical and mental) to upload programs using ICSP the usefulness of the bootloader is a lot less obvious.
"On the other hand, if you already have the capability (both physical and mental) to upload programs using ICSP the usefulness of the bootloader is a lot less obvious."
ICSP does not provide a path for debugging via Serial.print statements, for that you need a serial connection. The bootloader uses the same serial connection. Having one cable connected up during debugging frees up the 3 pins for other project uses. I see that as one big benefit.
CrossRoads:
ICSP does not provide a path for debugging via Serial.print statements, for that you need a serial connection. The bootloader uses the same serial connection. Having one cable connected up during debugging frees up the 3 pins for other project uses. I see that as one big benefit.
Very true. I was not trying to suggest otherwise, but maybe I was too brief.