I want to gradually increase voltage and current using analogWrite method of any output pin.
Ranging from 0 to 255, I can see voltage if increasing but current is 40ma. But my requirement is to get more current around 100 or 200ma while increasing voltage to 3.3v.
Thanks for your quick reply, I am new to electronics and have less knowledge but i have to control a coil which generates magnetic fields gradually using analogWrite from 0 to 255.
But while using arduino, magnetic fields are not enough but if i use 3v batteries without using arduino my coil generates enough magnetic fields.
How about simply driving a low-side mosfet switch from a PWM with the coil between the mosfet and +5V or +3V? In case of 3V you'll need a DC-DC converter or a linear regulator to bring 5V down to 3V.
Since it's a simple coil the voltage probably doesn't matter; you can compensate for a different voltage by adjusting the PWM duty cycle on the driving pin.
Which immediately brings the question: how are you going to limit the current through L1? The green plot is the current through L1 with peaks topping out at 1.4A with this choice of components. Can your coil handle this? Is your software going to be fool-proof enough to not let the pin remain high for long enough to burn out the coil and/or the mosfet used?
As you can see from the above response we need to know about your hardware - specifically in this case which arduino board you are using, and details about the coil.
Main objective is to create a clock from volt meter. But due to unavailability of 3v or 5v analog voltmeter in the market, i have to create one.
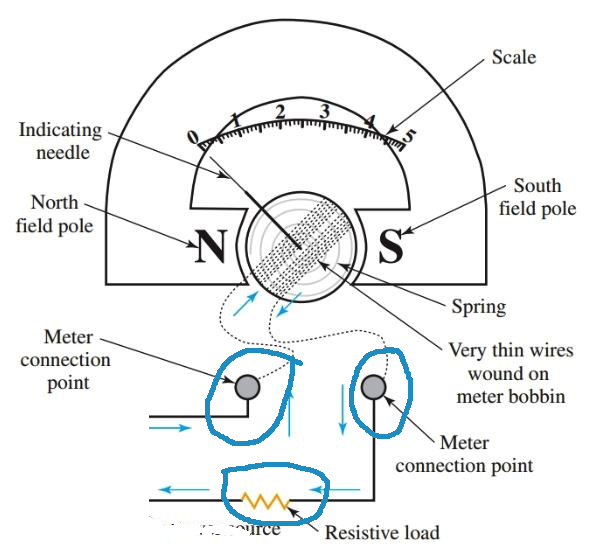
I am using Arduino UNO, and i made a custom coil of 150 turns of copper wire of 40 gauge to create a 3 to 5v DC analog volt meter with a small magnet. I can see my custom voltmeter works perfectly with external power sources but with arduino, it moves pointer but not good enough. i think due to low current from output pin.
However, i am going to check pwm also for more knowledge.
If with arduino or with any other hardware, somehow able to supply 100 to 400ma current with 3.3v then i think I can proceed.
I am increasing voltage from 0 to 3.3v using analogWrite method of my program. So at 0 my custom voltmeter pointer remains a 0 but at 3.3v the pointer is not moving to highest due to low current. However, when i use 3v batteries it works perfectly. I am sorry, providing such abstract information as per my best knowledge of electronics.
use any analog meter, open it you will see the wires from coil connect 50k resistor in series with coil, apply 5V and look how much the pointer is moved, than adjust the resistor value.
@79galinakorczak this is good advice. For starters, it prevents the somewhat doubtful situation of needing several hundred milliamps to drive a simple needle gauge. That might have been acceptable in 1830, but it's kind of awkward today.
Well, you asked for a solution that will allow a magnetic field to be generated in your coil, so that's what it does. It's a pulsed field in fact, but combined with the mechanical construction and the right PWM frequency and duty cycle I expect you could make the needle (that I understand is somehow magnetically connected to the coil) turn to a predetermined position and remain fairly stable there with not too much jittering about.
If you want an Arduino-controlled DC voltage output, you'll either have to drive an RC circuit with PWM or use a proper DAC (or a DAC pin if your Arduino has one; see reply of @killzone_kid).
So let's get this straight - do you need a fairly high-current (few hundred mA) PWM output, or do you need a DC voltage?
I don’t think the OP knows the difference or can make such a decision. But it makes little, all he wants it to do is to just point to a specified number. Either solution will do that.
Yes.
You could use a transistor ( a bipolar transistor to the pedantic ) but a MOSFET is the better choice, because it doesn’t get as hot.
PWM will also keep the temperature down compared to an analogue voltage. The mechanical inertia will stop it wobbling, if not you simply up the PWM frequency.