Hi everyone, I've been trying to figure this out for over a year and I can't figure it out, I need help.
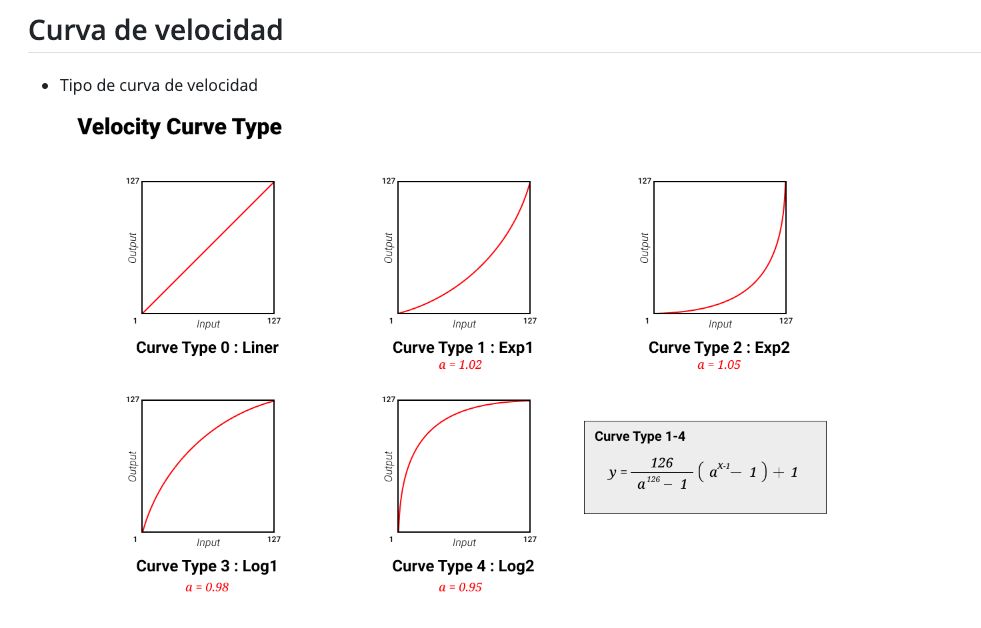
A couple of years ago a friend made me an Arduino for a drum but I wanted to make a modification and I don't know how to modify the code, the modification would be to be able to change the velocity curve (Linear, Log1, Log2, Exp...) using a position potentiometer like midi keyboards do, it won't let me upload my project.
https://registry.platformio.org/libraries/ryokosaka/Hello%20Drum
Hi @miguiocampomusic. Please add a reply here on this forum thread to tell us which Arduino development tool you are using:
I ask because I would like to give you the appropriate instructions.
Thanks for the clarification. I'm going to ask you to provide some additional information that might help us to identify the problem.
 This procedure is not intended to solve the problem. The purpose is to gather more information.
Please do this:
- Attempt an upload, just as you did before when you encountered the problem.
- Wait for the process to fail.
- There should be an error notification at the bottom right corner of the Arduino IDE window. Click the "COPY ERROR MESSAGES" button on that notification.
- Open a forum reply here by clicking the "Reply" button.
- Click the
<CODE/> icon on the post composer toolbar.
This will add the forum's code block markup (```) to your reply to make sure the error messages are correctly formatted.
- Press the Ctrl+V keyboard shortcut (Command+V for macOS users).
This will paste the copied output into the code block.
- Move the cursor outside of the code block before you add any additional text to your reply.
- Click the "Reply" button to post the output.
In case the output is longer than the forum software will allow to be added to a post, you can instead save it to a .txt file and then attach that file to a reply here.
Click here for attachment instructions
- Open any text editor program.
- Paste the copied output into the text editor.
- Save the file in
.txt format.
- Open a forum reply here by clicking the "Reply" button.
- Click the "Upload" icon (
 ) on the post composer toolbar:
The "Open" dialog will open.
- Select the
.txt file you saved from the "Open" dialog.
- Click the "Open" button.
The dialog will close.
- Click the "Reply" button to publish the post.
Alternatively, instead of using the "Upload" icon on the post composer toolbar as described in steps (5) - (7) above, you can simply drag and drop the .txt file onto the post composer field to attach it.
#include <EEPROM.h>
#include <USB-MIDI.h>
USBMIDI_CREATE_DEFAULT_INSTANCE();
#include <hellodrum.h>
#include <Arduino.h>
#include <U8x8lib.h>
#include <Arduino.h>
#ifdef U8X8_HAVE_HW_SPI
#include <SPI.h>
#endif
char cstr [16];//To convert int to char
U8X8_SH1106_128X64_NONAME_HW_I2C u8x8(U8X8_PIN_NONE);


int eeAddress = 0;
int eAddress = 0;
int Address = 0;
long valor;
int val;
int x=0;
int encoder0PinA = 8;
int encoder0PinB = 9;
int encoder1Pina = 7;
int encoder1Pinb = 6;
int encoder2PinA = 4;
int encoder2PinB = 5;

int encoder0Pos = 0;
int encoder1Pos = 0;
int encoder2Pos = 0;
int encoder0PinALast = LOW;
int encoder1PinALast = LOW;
int encoder2PinALast = LOW;
int n = LOW;
int n1 = LOW;
 int n2 = LOW;
 //Please name your piezo.
 //The piezo named snare is connected to the A0 pin
 HelloDrum snare(0);

 //Setting
 byte SNARE[6] = {
   80, //sensitivity
   10, //threshold
   10, //scantime
   40, //masktime
   36, //note
   0   //curve type
 };

 void setup()
 {
   EEPROM.get(3, encoder0Pos);
 EEPROM.get(6, encoder1Pos);
  EEPROM.get(9, encoder2Pos);
  // EEPROM.get(eeAddress, x);
   MIDI.begin(10);
  u8x8.setFlipMode(1);

     u8x8.begin();
 pinMode (encoder0PinA, INPUT);
 pinMode (encoder0PinB, INPUT);
  pinMode (encoder1Pina, INPUT);
  pinMode (encoder1Pinb, INPUT);
     pinMode (encoder2PinA, INPUT);
 pinMode (encoder2PinB, INPUT);
     snare.setCurve(SNARE[5]); //Set velocity curve


  Serial.begin(115200);
 u8x8.setFont(u8x8_font_px437wyse700a_2x2_r);

  u8x8.drawString(5,11,"MOB");

 }

 void loop()
 {
    u8x8.setFlipMode(1);
   n = digitalRead(encoder0PinA);
  if ((encoder0PinALast == LOW) && (n == LOW)) {
    if (digitalRead(encoder0PinB) == LOW) {
      encoder0Pos--;
     if (encoder0Pos>0){

    }else {
    encoder0Pos=0;
    }
     u8x8.clear();
    } else {

      encoder0Pos++;
    if (encoder0Pos<100){


    }else {

    encoder0Pos=100;
    }
    u8x8.clear();;
     }
   u8x8.setFont(u8x8_font_px437wyse700a_2x2_r);

  u8x8.drawString(4,8,"NOTA");
  u8x8.setCursor(39,11);
  u8x8.print(encoder0Pos);
   EEPROM.write(3, encoder0Pos);
 }

                            //Sensibilidad

  n1 = digitalRead(encoder1Pina);
  if ((encoder1PinALast == LOW) && (n1 == LOW)) {
    if (digitalRead(encoder1Pinb) == LOW) {
      encoder1Pos--;
     if (encoder1Pos>0){

    }else {
    encoder1Pos=0;
    }
    u8x8.clear();
    } else {

      encoder1Pos++;
    if (encoder1Pos<100){


    }else {

    encoder1Pos=100;
    }
    u8x8.clear();
     }
   u8x8.setFont(u8x8_font_px437wyse700a_2x2_r);

  u8x8.drawString(4,8,"SEN.");
  u8x8.setCursor(39,11);
  u8x8.print(encoder1Pos);
  EEPROM.write(6, encoder1Pos);
 }
  //                                     UMBRAL
 n2 = digitalRead(encoder2PinA);
  if ((encoder2PinALast == LOW) && (n2 == LOW)) {
    if (digitalRead(encoder2PinB) == LOW) {
      encoder2Pos--;
     if (encoder2Pos>0){

    }else {
    encoder2Pos=0;
    }
     u8x8.clear();
    } else {

      encoder2Pos++;
    if (encoder2Pos<100){


    }else {

    encoder2Pos=100;
    }
    u8x8.clear();;
     }
   u8x8.setFont(u8x8_font_px437wyse700a_2x2_r);

  u8x8.drawString(2,8,"UMBRAL");
  u8x8.setCursor(39,11);
  u8x8.print(encoder2Pos);
    EEPROM.write(9, encoder2Pos);
 }

  byte SNARE[6] = {
    encoder1Pos, //sensitivity
    5, //threshold
    3, //scantime
    encoder2Pos, //masktime
    encoder0Pos, //note
    0   //curve type
};


     //Sensing
     snare.singlePiezo(SNARE[0], SNARE[1], SNARE[2], SNARE[3]);

     //Sending MIDI signals
     if (snare.hit == true) {
         MIDI.sendNoteOn(SNARE[4], snare.velocity, 10);  //(note, velocity, channel)
         MIDI.sendNoteOff(SNARE[4], 0, 10);
     //Serial.print ("SNARE[4");
     }

 }
The potentiometer on the left is the one that regulates the threshold, what I want is to replace it with a position for the speed curve and that on the screen it shows the type of curve and that the threshold always remains at 100
It looks very nice!
Please provide the information I requested in post #4.
I think I already did it, it's post 5
No, post #5 is your sketch code. That is useful information, but it is not the information I requested.
Please carefully follow the instructions I provided in post #4.
I don't understand steps 1, 2 and 3
It seems that the problem is that you haven't learned the basic usage of the Arduino IDE application.
Please try this:
- Connect the drum to your computer with a USB cable.
- Open the Arduino sketch for your drum's MIDI interface in Arduino IDE.
- Select the appropriate board from the Tools > Board menu in Arduino IDE.
- Select the port of your board from Arduino IDE's Tools > Port menu.
- Select Sketch > Upload from the Arduino IDE menus.
- Wait for the upload to finish.
Now please add a reply here to tell us whether you saw an "Upload error: ..." notification at the bottom right corner of the IDE window:
or if you instead see a "Done uploading." notification there:
If you have any questions or problems while following those instructions, just provide a detailed description in a reply here and we'll provide further assistance.
Oh okay, I'll do it on Friday, I don't have the drum at home so I can plug it in.
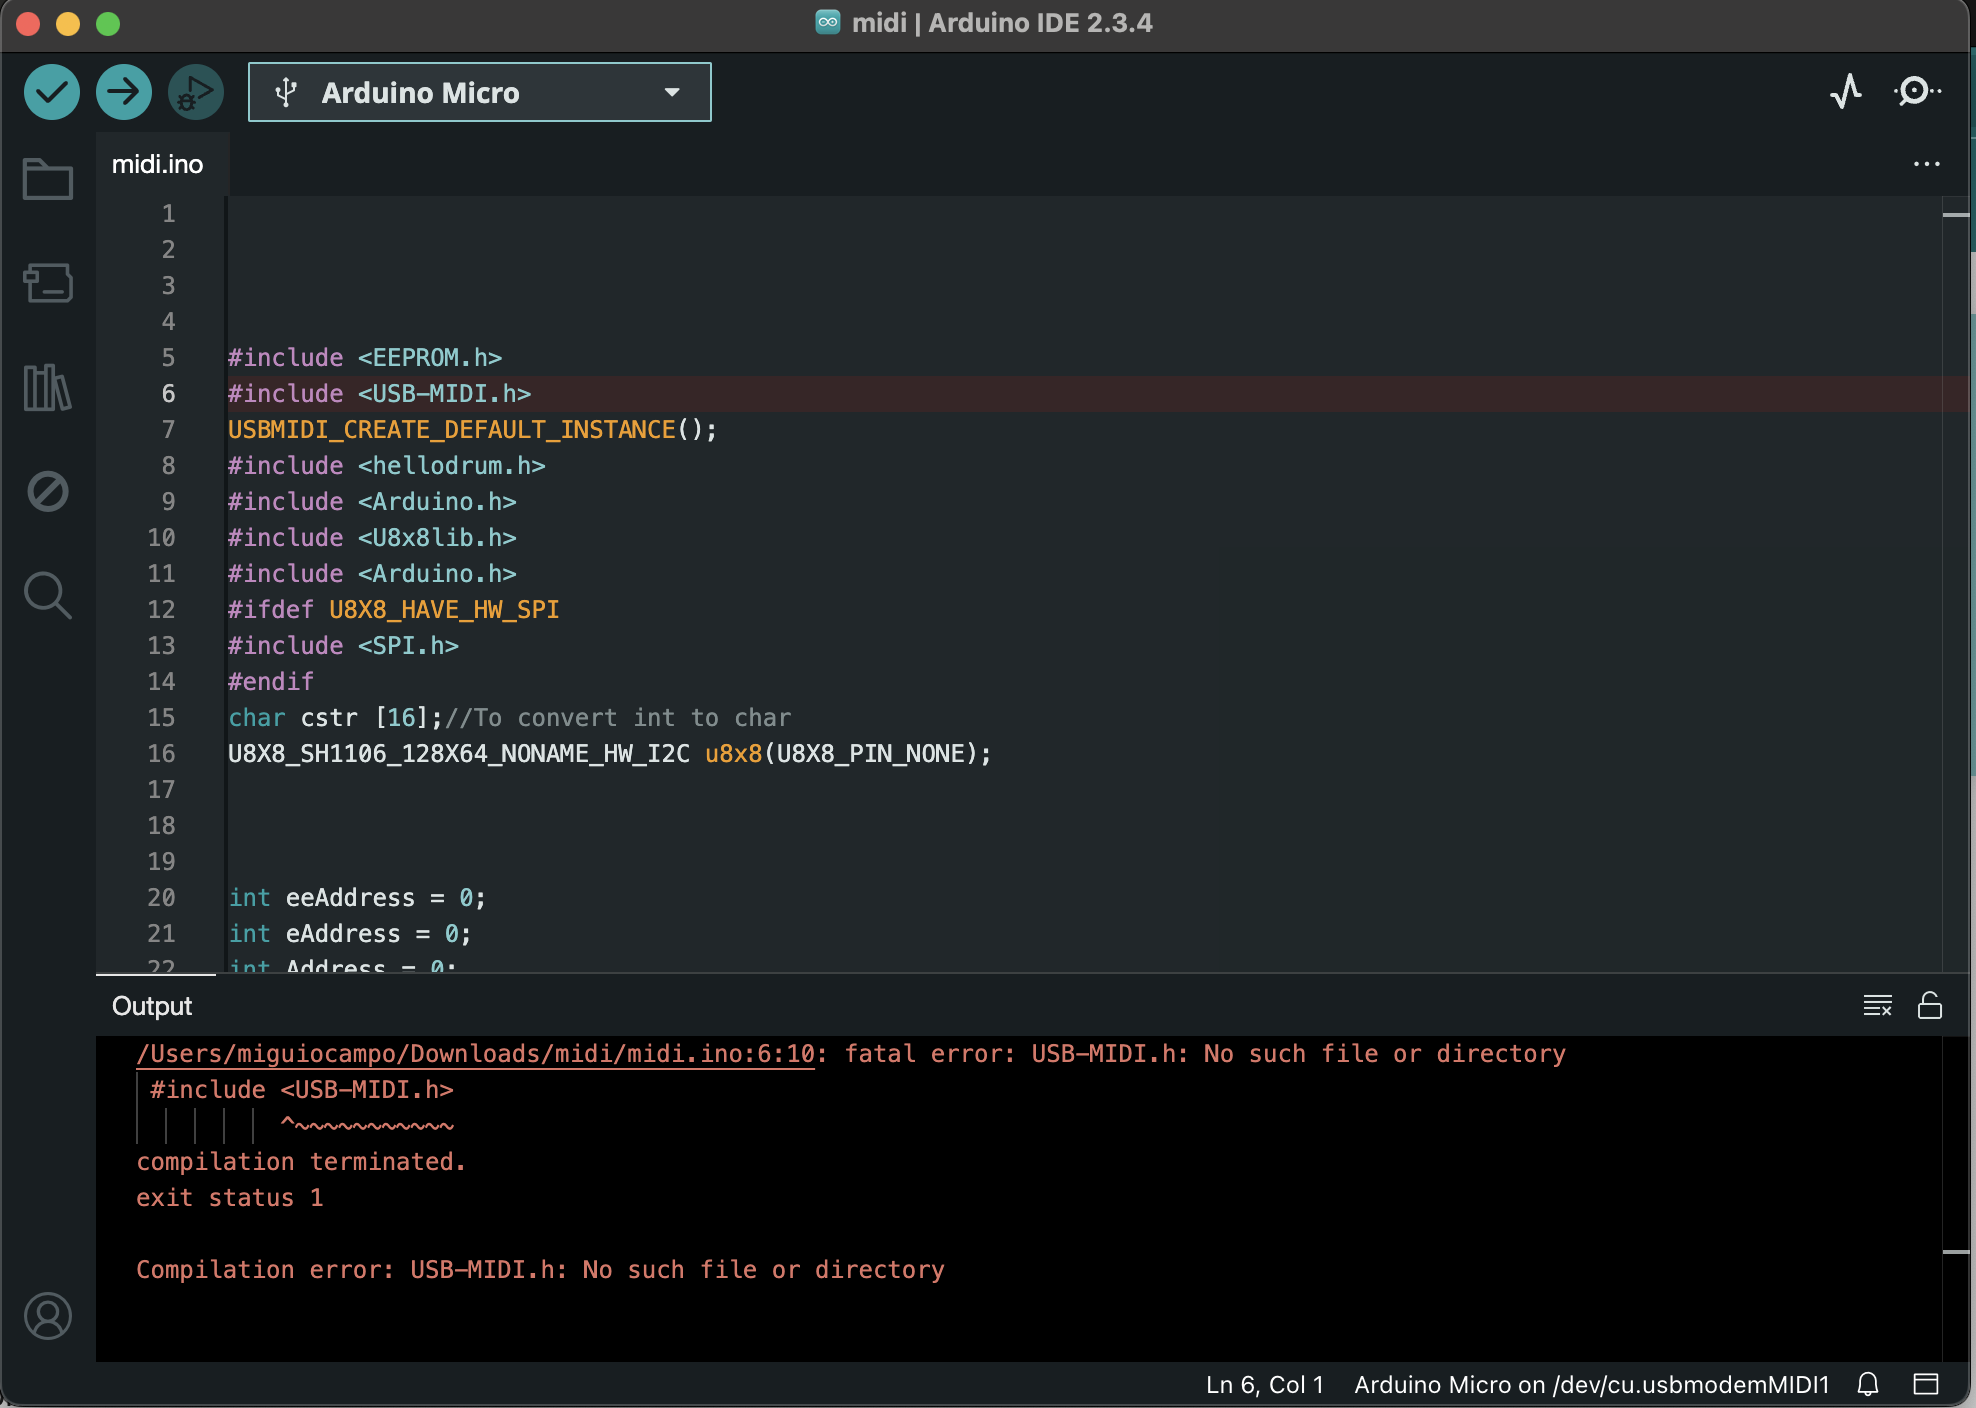
/Users/miguiocampo/Downloads/midi/midi.ino:6:10: fatal error: USB-MIDI.h: No such file or directory
 #include <USB-MIDI.h>
          ^~~~~~~~~~~~
compilation terminated.
exit status 1

Compilation error: USB-MIDI.h: No such file or directory
Did you install the MIDI-USB library?
The library it is telling you it can't find.