I'm trying to use the MCP4018 5k digital potentiometer breakout board to control the voltage applied to a LED.
I tried to characterize the LED as no datasheet is provided, but the only useful finding was that it is possible to drive the LED with voltage from 2.8V to about 4.8V. The value of 3W was though never achieved, but this is not crucial.
The picture below shows the connections between Arduino, the breakout board and the load. As you can see the breakout exploits the i2c connection to digitally control the resistance value of the pot.
What I witness is an undesired and huge voltage drop: when I set the wiper to the maximum value (i.e., equal to the voltage applied to pin A <-> 3.3V), the voltage instead drops to 2.6V, not powering enough the LED to emit the maximum brightness. Instead, if I connect the LED directly to pin A, the voltage drop does not occur and the LED behavior is correct.
As the maximum output current of pin A and pin W is the same from datasheet (25mA), I cannot figure out where this additional resistance is. It seems from DS that the wiper has a resistance of 75 Ω, but I reckon it shouldn't be sufficient to drop the voltage like that.
I'm searching for the simplest solution with this single component, even if I'm quite persuaded to design a proper op-amp to amplify the wiper signal. Any help would be very appreciated, it seems I lack of some basic knowledge here and this thing is driving me crazy... Consider that the final goal should be to control multiple leds (4 to 6) with a single digipot.
Try powering the LED with an external power supply, I have a feeling it is bigger then the 5mm LED in your wiring diagram. What is happening I believe you are killing the 3V3 regulator, 3W is just under an amp, the regulator can supply about 150mA. Here is some tips to help:
Gil's Crispy Critter Rules, they apply to processor hardware:
Rule #1. A Power Supply the Arduino is NOT!
Rule #2. Never Connect Anything Inductive to an Arduino!
Rule #3 Don't connecting or disconnecting wires with power on.
Rule #4 Do not apply power to any pin unless you know what you are doing.
LaryD's Corollary's
Coro #1 when first starting out, add a 220R resistor in series with both Input and Output pins.
Coro #2 buy a DMM (Digital Multi-meter) to measure voltages, currents and resistance. Violating these rules tends to make crispy critters out of Arduinos.
Hint: It is best to keep the wires under 25cm/10" for good performance.
What is happening I believe you are killing the 3V3 regulator
Do you mean the Arduino regulator?
Secondly, I've already connected a variable power supply to the LED to characterize and what I found is that, given 3.3V, the resulting current drained by the LED is about 0.73 A at maximum brightness (i.e., about 2.5W). You can find the LED I'm using by clicking here.
I know these LEDs are not the best choice, but for now I've to work something out with this one...
Yes! I believe you have a major misconception on how LEDs work. They are current controlled devices, not voltage controlled devices. Your experimenting is in reality just controlling current. The part is rated at 3.4V, that is in the link you supplied.
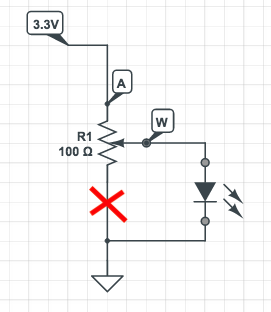
I'm not sure if this is what you want, but I think that you have connected the led and the pot wrong.
Now It's like this, if I'm not wrong:
The led is in parallel with the second part of the potentiometer.
But the potentiometer should come first (only two legs), limiting the current, and then the led.
Besides that, if the led drops 3.4V, you can't power it properly with 3.3V minus the voltage drop of the pontentiometer, it will be too dim.
And better use a separated power source for the led.
You should draw an schematic, decide how to connect and power it, and do the calculations for the current. For the max and min resistance of the pot. And maybe add a series resistor for the case when the pot is close to zero, to limit the maximum current.
Yes. The LED is a 3W LED and the forward voltage is 3.5V. It means that with good brightness it will drop a voltage of 3.5V. It does NOT mean that you have to put that voltage, but you have control the current.
3W / 3.5V => 0.857mA. This is too much current for the Arduino pins, so you need another power source for the led. And would be better a 5V source. With 3.3V it will work, but not at full bright.
However, I guess I cannot use the MCP 4018 breakout as variable resistor since the input current on the wiper pin is restricted to 2.5 mA. I managed to manually dimmer the LED brightness via 10K potentiometer but that was just to comfort me
I'll try to better dimension my entire system and then go for a PWM LED driver (such as the TI TPS92512) starting from a battery voltage of 24V.
Ok, but you don't need 24V. You can use a simple small DC barrel jack transformer of 5V or 10V. Or three AA batteries.
To control the LED with Arduino you could use also a power transistor or mosfet, with the PWM pin of the Arduino. Check this link for example:
I think that the 3rd example is what you want to do, more or less:
I think that the 3rd example is what you want to do
That was exactly what I've been looking for, thanks. Since I want to pilot more than one LED with the same PWM signal, could I clone the TIP120-resistor-LED connections in parallel on pin 9?
Ok, but you don't need 24V
Yes, I can see that. The system, though, is powered by onship transformer (tipically at 24V) or a 24V battery when standalone. The idea is to supply the system with that voltage and then use step-down converter to provide lower voltages (i.e., the Arduino supply). What do you think about that?
Yes, I think that you should use a switching buck converter to reduce the voltage. And also a relative high power PWM LED driver. Otherwise for e.g. 6 LED (18W), with the transistor and some resistor you will waste a lot of power and they will easily get hot.
Sorry for the late reply, and thank you so much for your help.
high power PWM LED driver
Could you suggest me one? My first attempt will be to drive 4x 3W LEDs, each driven by a dedicated PWM signal. I reckon that TI AS1170 could do the trick but for two separate PWM-driven LEDS; could TI TPS92512 or TPS922055 be enough to drive the 4 LEDs?
some resistor
Would it be a good practice to add a high value (i.e., 10K) resistor between the negative pole of the supply and the GND of Arduino?
I think it would be easier with something like this:
Or similar, there are others. You can search for "Arduino LED driver" module.
You have to understand how circuits work. Calculate for your concrete circuit what will be voltage drop, the current and the power of that resistor if you do that. And what you want to achieve with that.