My Oled display is not working

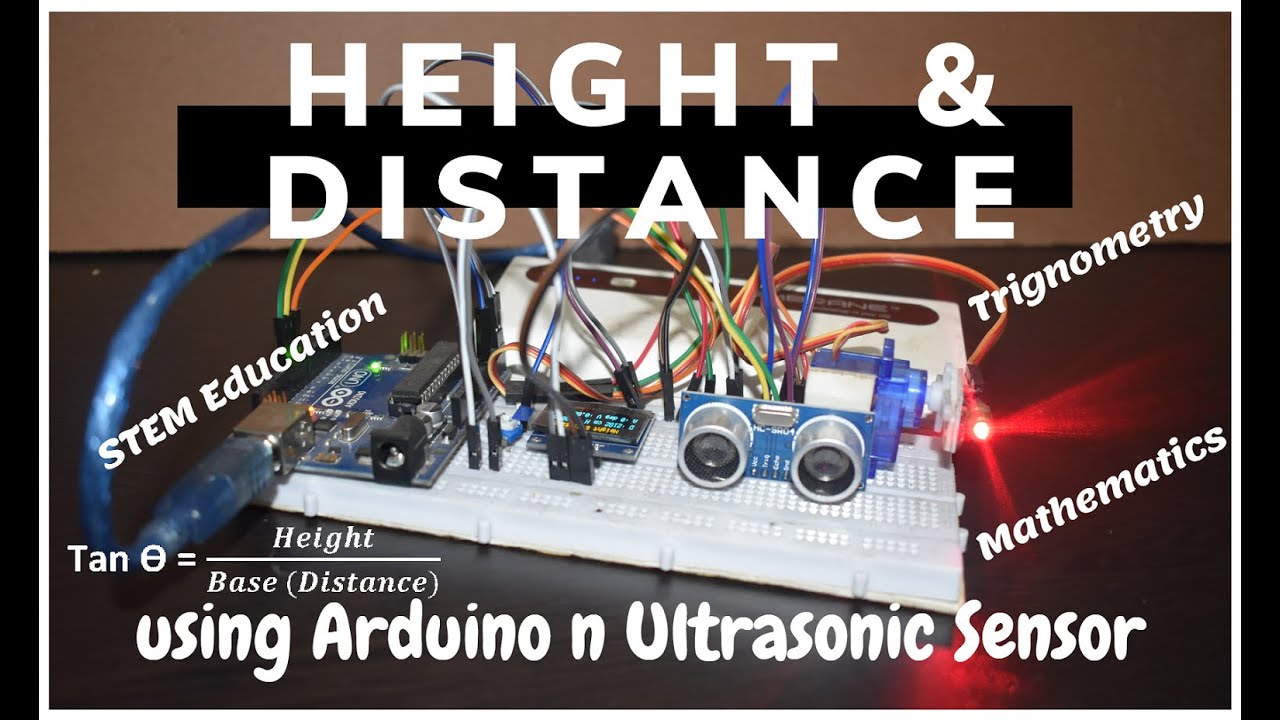
I am making a project for my maths exibition. It is based on this video I will share below. It requires a Oled display to show information
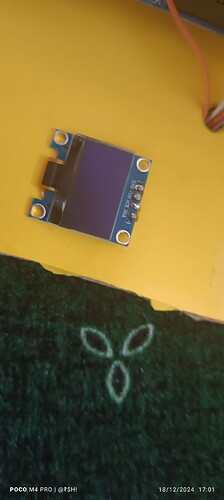
. I have connected each and every wire accordingly to each component of my project. But, when I switch on the Arduino, The Oled display does not work and remains still like the sun. Please Help Me

Here is the link to the video. Both the codes and the diagram are shared in the comments.

Welcome to the forum

Please post your sketch here, using code tags when you do, and a schematic showing all components, how they are connected and powered. A picture of a hand drawn circuit is good enough

what OLED display and host microcomputer are you using? give links if possible?

Let us talk on the forum please.

#include <Servo.h>
#include <SPI.h>
#include <Wire.h>
#include <Adafruit_GFX.h>
#include <Adafruit_SSD1306.h>

#define OLED_RESET 4
Adafruit_SSD1306 display(OLED_RESET);

Servo myservo; // create servo object to control a servo

int encoderPin1 = 3;
int encoderPin2 = 2;

volatile int lastEncoded = 0;
volatile long encoderValue = 0;
long lastencoderValue = 0;

int lastMSB = 0;
int lastLSB = 0;

int selectButton = 6;

const int angle = 180;
double angleX;
const double rad = 0.0174533;

double height;

const int trigPin = 10;
const int echoPin = 11;

long duration;
int distance;

void setup() {
display.begin(SSD1306_SWITCHCAPVCC, 0x3C);
display.clearDisplay();

myservo.attach(9); // attaches the servo on pin 9 to the servo object
Serial.begin(9600);

pinMode(trigPin, OUTPUT); // Sets the trigPin as an Output
pinMode(echoPin, INPUT); // Sets the echoPin as an Input

pinMode(encoderPin1, INPUT);
pinMode(encoderPin2, INPUT);
pinMode(selectButton, INPUT);

digitalWrite(encoderPin1, HIGH);
digitalWrite(encoderPin2, HIGH);
digitalWrite(selectButton, HIGH);

attachInterrupt(0, updateEncoder, CHANGE);
attachInterrupt(1, updateEncoder, CHANGE);
}

String S1, S2;

void loop()
{
int count = encoderValue / 2;

if (digitalRead(selectButton) == LOW)
{
encoderValue = 0;
}

digitalWrite(trigPin, LOW); // Clears the trigPin
delayMicroseconds(2);
digitalWrite(trigPin, HIGH); // Sets the trigPin on HIGH state for 10 micro seconds
delayMicroseconds(10);
digitalWrite(trigPin, LOW); // Reads the echoPin, returns the sound wave travel time in microseconds

duration = pulseIn(echoPin, HIGH);

// Calculating the distance
distance = duration * 0.034 / 2;

if (count < 90)
{
angleX = tan((angle + count) * rad);
height = angleX * (distance + 2);
myservo.write(angle - count); // sets the servo position according to the scaled value

S1 = "D :" + String(distance + 2) + " cm " + "H :" + String(height) + " cm";
S2 = "A :" + String(count) + " deg " + "V :" + String(angleX);

}

display.setCursor(18, 0); //oled display
display.setTextSize(1);
display.setTextColor(WHITE);
display.println("Height & Distance");

display.setCursor(0, 10); //oled display
display.setTextSize(1);
display.setTextColor(WHITE);
display.println(S1);

display.setCursor(0, 22); //oled display
display.setTextSize(1);
display.setTextColor(WHITE);
display.println(S2);

display.display();
delay(500);
display.clearDisplay();
}

void updateEncoder()
{
int MSB = digitalRead(encoderPin1);
int LSB = digitalRead(encoderPin2);

int encoded = (MSB << 1) | LSB;
int sum = (lastEncoded << 2) | encoded;

if (sum == 0b1101 || sum == 0b0100 || sum == 0b0010 || sum == 0b1011)
{
encoderValue ++;
}
if (sum == 0b1110 || sum == 0b0111 || sum == 0b0001 || sum == 0b1000)
{
encoderValue --;
}
lastEncoded = encoded;
}
Posting your code using code tags prevents parts of it being interpreted as HTML coding and makes it easier to copy for examination

In my experience the easiest way to tidy up the code and add the code tags is as follows
Start by tidying up your code by using Tools/Auto Format in the IDE to make it easier to read. Then use Edit/Copy for Forum and paste what was copied in a new reply. Code tags will have been added to the code to make it easy to read in the forum thus making it easier to provide help.

Does that mean that when I would do these steps before this step you had said in this quote, The code would be ready to be pasted in the forum automatically?

#include <Servo.h
#include <SPI.h>
#include <Wire.h>
#include <Adafruit_GFX.h>
#include <Adafruit_SSD1306.h>

#define OLED_RESET 4
Adafruit_SSD1306 display(OLED_RESET);

Servo myservo; // create servo object to control a servo

int encoderPin1 = 3;
int encoderPin2 = 2;

volatile int lastEncoded = 0;
volatile long encoderValue = 0;
long lastencoderValue = 0;

int lastMSB = 0;
int lastLSB = 0;

int selectButton = 6;

const int angle = 180;
double angleX;
const double rad = 0.0174533;

double height;

const int trigPin = 10;
const int echoPin = 11;

long duration;
int distance;

void setup() {
display.begin(SSD1306_SWITCHCAPVCC, 0x3C);
display.clearDisplay();

myservo.attach(9); // attaches the servo on pin 9 to the servo object
Serial.begin(9600);

pinMode(trigPin, OUTPUT); // Sets the trigPin as an Output
pinMode(echoPin, INPUT); // Sets the echoPin as an Input

pinMode(encoderPin1, INPUT);
pinMode(encoderPin2, INPUT);
pinMode(selectButton, INPUT);

digitalWrite(encoderPin1, HIGH);
digitalWrite(encoderPin2, HIGH);
digitalWrite(selectButton, HIGH);

attachInterrupt(0, updateEncoder, CHANGE);
attachInterrupt(1, updateEncoder, CHANGE);
}

String S1, S2;

void loop() {
int count = encoderValue / 2;

if (digitalRead(selectButton) == LOW) {
encoderValue = 0;
}

digitalWrite(trigPin, LOW); // Clears the trigPin
delayMicroseconds(2);
digitalWrite(trigPin, HIGH); // Sets the trigPin on HIGH state for 10 micro seconds
delayMicroseconds(10);
digitalWrite(trigPin, LOW); // Reads the echoPin, returns the sound wave travel time in microseconds

duration = pulseIn(echoPin, HIGH);

// Calculating the distance
distance = duration * 0.034 / 2;

if (count < 90) {
angleX = tan((angle + count) * rad);
height = angleX * (distance + 2);
myservo.write(angle - count); // sets the servo position according to the scaled value

S1 = "D :" + String(distance + 2) + " cm " + "H :" + String(height) + " cm";
S2 = "A :" + String(count) + " deg " + "V :" + String(angleX);

}

display.setCursor(18, 0); //oled display
display.setTextSize(1);
display.setTextColor(WHITE);
display.println("Height & Distance");

display.setCursor(0, 10); //oled display
display.setTextSize(1);
display.setTextColor(WHITE);
display.println(S1);

display.setCursor(0, 22); //oled display
display.setTextSize(1);
display.setTextColor(WHITE);
display.println(S2);

display.display();
delay(500);
display.clearDisplay();
}

void updateEncoder() {
int MSB = digitalRead(encoderPin1);
int LSB = digitalRead(encoderPin2);

int encoded = (MSB << 1) | LSB;
int sum = (lastEncoded << 2) | encoded;

if (sum == 0b1101 || sum == 0b0100 || sum == 0b0010 || sum == 0b1011) {
encoderValue++;
}
if (sum == 0b1110 || sum == 0b0111 || sum == 0b0001 || sum == 0b1000) {
encoderValue--;
}
lastEncoded = encoded;
}

Did I miss any steps or not?

did you test the display in a separate program before attempting your complete program
e.g. from File>Examples>ssd1306>Demos

The code will not be posted in the forum automatically but it is put on the PC clipboard ready to pasted into a new reply

Here is your code after carrying out my instruction steps and pasting it below

#include <Servo.h
#include <SPI.h>
#include <Wire.h>
#include <Adafruit_GFX.h>
#include <Adafruit_SSD1306.h>

#define OLED_RESET 4
Adafruit_SSD1306 display(OLED_RESET);

Servo myservo;  // create servo object to control a servo

int encoderPin1 = 3;
int encoderPin2 = 2;

volatile int lastEncoded = 0;
volatile long encoderValue = 0;
long lastencoderValue = 0;

int lastMSB = 0;
int lastLSB = 0;

int selectButton = 6;

const int angle = 180;
double angleX;
const double rad = 0.0174533;

double height;

const int trigPin = 10;
const int echoPin = 11;

long duration;
int distance;

void setup()
{
    display.begin(SSD1306_SWITCHCAPVCC, 0x3C);
    display.clearDisplay();

    myservo.attach(9);  // attaches the servo on pin 9 to the servo object
    Serial.begin(9600);

    pinMode(trigPin, OUTPUT);  // Sets the trigPin as an Output
    pinMode(echoPin, INPUT);   // Sets the echoPin as an Input

    pinMode(encoderPin1, INPUT);
    pinMode(encoderPin2, INPUT);
    pinMode(selectButton, INPUT);

    digitalWrite(encoderPin1, HIGH);
    digitalWrite(encoderPin2, HIGH);
    digitalWrite(selectButton, HIGH);

    attachInterrupt(0, updateEncoder, CHANGE);
    attachInterrupt(1, updateEncoder, CHANGE);
}

String S1, S2;

void loop()
{
    int count = encoderValue / 2;

    if (digitalRead(selectButton) == LOW)
    {
        encoderValue = 0;
    }

    digitalWrite(trigPin, LOW);  // Clears the trigPin
    delayMicroseconds(2);
    digitalWrite(trigPin, HIGH);  // Sets the trigPin on HIGH state for 10 micro seconds
    delayMicroseconds(10);
    digitalWrite(trigPin, LOW);  // Reads the echoPin, returns the sound wave travel time in microseconds

    duration = pulseIn(echoPin, HIGH);

    // Calculating the distance
    distance = duration * 0.034 / 2;

    if (count < 90)
    {
        angleX = tan((angle + count) * rad);
        height = angleX * (distance + 2);
        myservo.write(angle - count);  // sets the servo position according to the scaled value

        S1 = "D :" + String(distance + 2) + " cm " + "H :" + String(height) + " cm";
        S2 = "A :" + String(count) + " deg " + "V :" + String(angleX);
    }

    display.setCursor(18, 0);  //oled display
    display.setTextSize(1);
    display.setTextColor(WHITE);
    display.println("Height & Distance");

    display.setCursor(0, 10);  //oled display
    display.setTextSize(1);
    display.setTextColor(WHITE);
    display.println(S1);

    display.setCursor(0, 22);  //oled display
    display.setTextSize(1);
    display.setTextColor(WHITE);
    display.println(S2);

    display.display();
    delay(500);
    display.clearDisplay();
}

void updateEncoder()
{
    int MSB = digitalRead(encoderPin1);
    int LSB = digitalRead(encoderPin2);

    int encoded = (MSB << 1) | LSB;
    int sum = (lastEncoded << 2) | encoded;

    if (sum == 0b1101 || sum == 0b0100 || sum == 0b0010 || sum == 0b1011)
    {
        encoderValue++;
    }
    if (sum == 0b1110 || sum == 0b0111 || sum == 0b0001 || sum == 0b1000)
    {
        encoderValue--;
    }
    lastEncoded = encoded;
}

The code is the same but note how much it easier it is to see the code structure and to scroll through it and copy it if required

I can see the idea

Yes,I did when it arrived and it was working.

But when I did it again on your suggestion, It is not working now.

if the display uses 3.3V logic the 5V logic of the UNO may have damaged it

I just brought another oled display.